![[Updated] Initiate Interactive Storytelling with Windows 11'S Movie Maker](https://thmb.techidaily.com/99131a0c0da4530303a8f3d5a541a1cf2cb9af3e3d24fd391ca764cff18f1395.jpg)
[Updated] Initiate Interactive Storytelling with Windows 11'S Movie Maker
Initiate Interactive Storytelling with Windows 11’S Movie Maker
Microsoft’s video editing tool, movie maker, which debuted 19 years ago, did not find the kind of success Microsoft had hoped for, and as a result, the firm was forced to stop supporting it. In a new video, Microsoft wishes to remind users that a superior alternative to Windows Movie Maker is called Clipchamp. However, the demise of the 19-year-old program opened the door for alternative movie maker windows 11, which is included with Windows 11.
The corporation reportedly acquired the editing suite Clipchamp last year, and it is reportedly accessible as an “inbox” app for Windows 11. It will therefore be pre-installed alongside other applications like Microsoft Family. In Windows 11, Clipchamp is intended to take the place of Windows Movie Maker as a video editing program. A recognizable user interface, including templates, project bins, timeline, and more, is provided by Clipchamp for Windows movie maker 11. Styles, stock media, transitions and. Filters are all included in the asset libraries that are supplied.
Part 1. Use Clipchamp Video Maker
With the help of Clipchamp, anyone can easily create videos, even those without any prior editing skills. In Windows 10 and Windows 11, you may create videos using the new program Clipchamp. The editing program Clipchamp, which Microsoft purchased last year, is superior to earlier programs like Windows Movie Maker. For work, social networking, or to document significant occasions, you may use Clipchamp on Windows to produce intriguing new films. Let’s check how to edit in Clipchamp windows 11 movie maker.
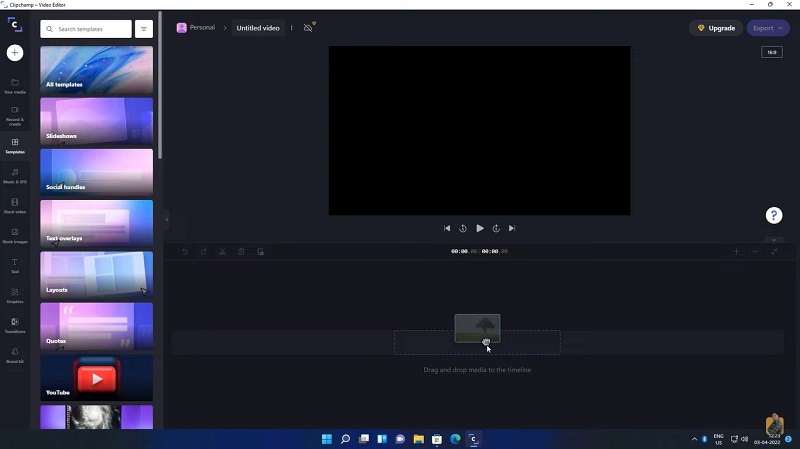

Add videos to the timeline
- Drag and drop the video from the library to the timeline. One can tap on the “+” button to add a file directly to the timeline, and tap on “Add” to all media files.

- After adding the videos to the timeline, you can start editing and viewing. Users can add numerous videos to the timeline and edit them.
Trim the video clip
- For trimming the unwanted parts, you can select the video on the timeline and drag their edges to cut the part.
Split the clips
- Choose the clips on the timeline, and move that scrubber to mention where you want to cut your clips.
- After that, tap on the “scissor icon” on the top left.
Play the clip on the timeline
- Playing the clips on the timeline is necessary. You can move that scrubber to select the position where you want to start the video.
- Tap on the Play button, or you can also hit the spacebar on the keyboard.
Zoom in and out of the timeline
- If you want to zoom in on the video, then use the + button and use the - button to zoom out.

Add a filter or Change the video
- To speed up, slow down, rotate, change volume, add filters, or crop, choose the clips on your timeline and use those options.
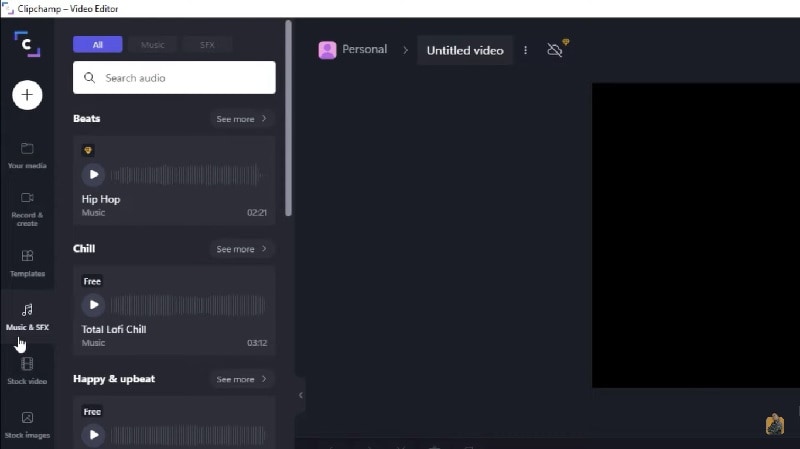
Add music
- One can even add audio files to the video. You can drag the Audio from the computer to the library area. You can choose the audio file from the library.
 DEX 3 RE is Easy-To-Use DJ Mixing Software for MAC and Windows Designed for Today’s Versatile DJ.
Mix from your own library of music, iTunes or use the Pulselocker subsciprtion service for in-app access to over 44 million songs. Use with over 85 supported DJ controllers or mix with a keyboard and mouse.
DEX 3 RE is everything you need without the clutter - the perfect 2-deck mixing software solution for mobile DJs or hard-core hobbiests.
PCDJ DEX 3 RE (DJ Software for Win & MAC - Product Activation For 3 Machines)
- After you have loaded the file, you can drag it to the timeline.
- For changing the audio level, you can add the video go timeline.
- Tap on an audio file, and an option will appear. Tap on Audio and drag your slider to adjust the volume.
Add title
- To add the title to the video, you can tap on “Text” in the left menu.

- Tap on the preferred titles from the sidebar using the drag and drop option to get the desired title to the timeline.

Export the video
- After you have finished your edits, you can save the file in MP4 and tap on the export option in the right corner of the screen.
Part 2. Edit Videos in Windows 11 with Photos App
Windows has always offered methods for searching and displaying photos because it is a relatively flexible operating system. However, with Windows 11, Microsoft tried combining browsing, organizing, and viewing into a single program and some simple editing.
The outcome, the innocently named “Photos” app, can be pretty confusing. You can do anything with your photographs and videos, thanks to the Photos experience. Compare, edit, view, construct albums and create movies with ease of your priceless memories. While keeping you involved in the experience, it displays all of the goods from that place and lets you navigate to other pictures.
Add the file
- You can tap on the “ADD” option, select “From the PC” from the overlay menu, and choose the desired video from the storage drive.
- After importing the videos from photos, you can see the storyboard screen to edit the video.
Add title card
- Tap on the “Add title card” option on your storyboard pane, which can result in adding some extra fame before selecting the video on the storyboard.
Add color pallete
- Choose the desired color from your color palette to change the background.
- You can tap on the “+” button under “Custom color” to choose the color by using the color picker.
Time the unwanted parts
- Tap on the “Trim” option and choose the file you wish to trim if you have various video files on the storyboard.
- Then, click and hold your left mouse button and drag the pointer to adjust the clip.
- After editing according to your preference, you can tap on the “Done” option.
Add some filters
- You can tap “Filters” on the storyboard pane, choose one, but tap on individual thumbnails on the sidebar.
- After applying the preferred filter, tap on the “Done” button from the bottom section, and click on confirm and apply.

WPS Office Premium ( File Recovery, Photo Scanning, Convert PDF)–Yearly
Export the video
- After you are done with your edit, you can tap “Finish Video” on the top section of the window.
- Choose video quality using the dropdown menu under the “Video quality” label.
- Tap on the export button to export the video.
Part 3. Windows 11 Movie Maker Alternative
With the help of various robust editing tools and Wondershare Filmora , users may quickly and easily make great videos. With Wondershare Filmora, anyone can learn how to be an excellent video editor, thanks to its wonderfully simple design. Additionally, animated elements, filters, and several video effects are provided by Wondershare Filmora. The use of various graphic and filter overlays on top of the video is made possible by the filters and overlays. Wondershare Filmora’s vast library of lower third aids, openers, and titles in communicating.
Users of Wondershare Filmora can add moving graphics by dragging and dropping them into their videos. Users can select the ideal royalty-free tune from a music library and merge multiple movies and photos effortlessly. Wondershare Filmora’s main features include support for 4K editing, GIF compatibility, noise removal, color tuning, a powerful text editor, a sound mixer, video stabilization, scene detection, and an audio equalizer.
Free Download For Win 7 or later(64-bit)
Free Download For macOS 10.14 or later
Step1Click on create a video
Tap on “New Project” and enter the video editor. Register your product by tapping on the “Register” option. You can visit the “File” menu in the upper section, click “Project setting,” and choose aspect ratio.

Step2Trim and edit the unwanted parts
When you create a raw video, it contains several unwanted parts that need to be removed from the video. You must drag the video to the timeline from Media Tab to cut or trim the video parts.

One can add numerous clips, but each clip will get placed after the previously added clip. To rearrange the files, you must drag clips according to your preference.
Step3Add some visual effects
You have now successfully removed the unnecessary parts from video clips. You will need to detach audio files and add music and transitions to the clips. Tap on the text icon to add subtitles to the video.
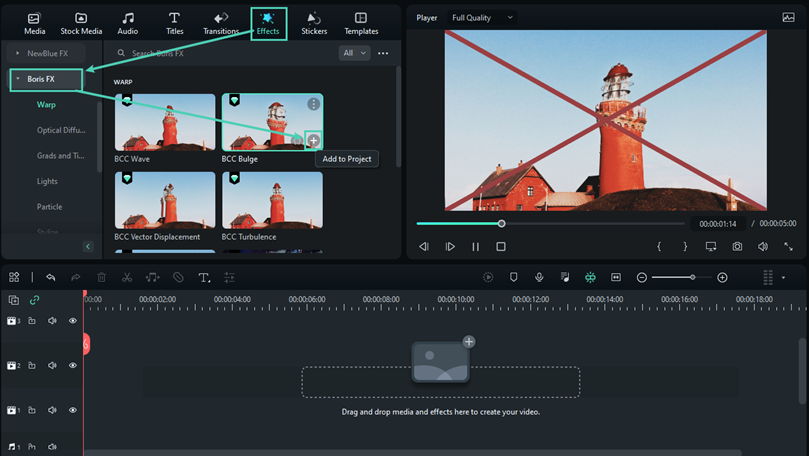
You can get various templates in the software, which you can use for the video.
Step4Use the color correction
One can utilize numerous software filters to add exciting colors to the clip. Drag the filter and drop it on the timeline. Sliding to the end of the filter can change the lasting of the filter.
Once you finish your edits, you can easily save and publish them.
 PDF application, powered by AI-based OCR, for unified workflows with both digital and scanned documents.
 The Bottom Line
In this article, you have learned about various video editors available on Windows 11 and an alternative. You can choose your video editors according to your preference and comfortability. Each video editor has unique features, and everyone can deliver the best user results. Clipchamp is the superior alternative option for previous Windows movie makers and comes with lots of features. If you want professional video editing, you can choose Clipchamp or Wondershare Filmora .
Free Download For Win 7 or later(64-bit)
Free Download For macOS 10.14 or later
Free Download For macOS 10.14 or later
Step1Click on create a video
Tap on “New Project” and enter the video editor. Register your product by tapping on the “Register” option. You can visit the “File” menu in the upper section, click “Project setting,” and choose aspect ratio.
Step2Trim and edit the unwanted parts
When you create a raw video, it contains several unwanted parts that need to be removed from the video. You must drag the video to the timeline from Media Tab to cut or trim the video parts.
One can add numerous clips, but each clip will get placed after the previously added clip. To rearrange the files, you must drag clips according to your preference.
Step3Add some visual effects
You have now successfully removed the unnecessary parts from video clips. You will need to detach audio files and add music and transitions to the clips. Tap on the text icon to add subtitles to the video.

WPS Office Premium ( File Recovery, Photo Scanning, Convert PDF)–Yearly
You can get various templates in the software, which you can use for the video.
Step4Use the color correction
One can utilize numerous software filters to add exciting colors to the clip. Drag the filter and drop it on the timeline. Sliding to the end of the filter can change the lasting of the filter.
Once you finish your edits, you can easily save and publish them.
The Bottom Line
In this article, you have learned about various video editors available on Windows 11 and an alternative. You can choose your video editors according to your preference and comfortability. Each video editor has unique features, and everyone can deliver the best user results. Clipchamp is the superior alternative option for previous Windows movie makers and comes with lots of features. If you want professional video editing, you can choose Clipchamp or Wondershare Filmora .
Free Download For Win 7 or later(64-bit)
Free Download For macOS 10.14 or later
- Title: [Updated] Initiate Interactive Storytelling with Windows 11'S Movie Maker
- Author: Frank
- Created at : 2024-07-26 14:48:04
- Updated at : 2024-07-27 14:48:04
- Link: https://some-techniques.techidaily.com/updated-initiate-interactive-storytelling-with-windows-11s-movie-maker/
- License: This work is licensed under CC BY-NC-SA 4.0.