![[Updated] Incorporate Tunes Into PPT Slides](https://www.lifewire.com/thmb/rQ3q4SoJdzdvXlfXUbIk9JHjOFk=/400x300/filters:no_upscale():max_bytes(150000):strip_icc()/watchcnnplus-7287fbb439934fd7a21cd7c8389b3147.jpg)
[Updated] Incorporate Tunes Into PPT Slides
Incorporate Tunes Into PPT Slides
“I am looking to create a compelling assignment, and I need someone who can help me promptly answer how to add music to PowerPoint.”
Adding a music piece helps the PPT be attractive and enjoyable. Any presentation needs to be understood by the audience who is wandering it. Picking the viewers’ interest is the standard task for the person presenting the presentation. Thus, make the PowerPoint as creative as possible.
Without any further ado, let’s read a quick step-by-step tutorial to add music to PowerPoint as follows.
In this article
01 [How to add music to PowerPoint?](#Part 1)
02 [Can I play music automatically on PowerPoint](#Part 2)
03 [Get music to play throughout a PowerPoint](#Part 3)
04 [Add more songs to a PowerPoint presentation](#Part 4)

Part 1 How to add music to PowerPoint?
Before you add music to PowerPoint, note specific points.
Your presentation size will increase by the size of the MP3 music file you add after the audio files are embedded directly into PPT.
For instance, the size of your presentation will magnify by 17MB if you add a song of 17MB to the presentation.
So, the solution is that you need to compress your file size accordingly.
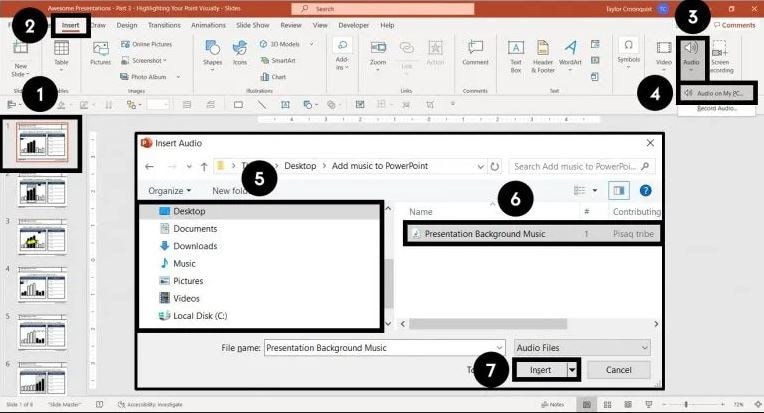

Steps on how to insert music in PowerPoint presentation
Step1 Navigate to your Title slide (or wherever you want your music to start)
Step2 Click the Insert tab
Step3 Open the Audio drop-down (in the Media group)
Step4 Select Audio on My PC
Step5 Visit the folder on your computer
Step6 Select the Audio file
Step7 Hit the Insert tab
Consequently, the audio file gets embedded in your presentation.

After the music embeds in your presentation, anyone who opens the presentation can access and play the music inside PowerPoint.
Your song will play within the Click Sequence of your presentation by default.
After inserting music into your presentation, you can then convert your entire presentation into a video and share it with your colleagues.
Part 2 Can I play music automatically on PowerPoint
Yes, you can start the audio in the click sequence or immediately.
<di
Step1Click the audio icon on the slide in the Normal view while you edit the slides
Step2 Choose Automatically or In Click Sequence in the Start list within the Audio Options of Audio Tools Playback tab
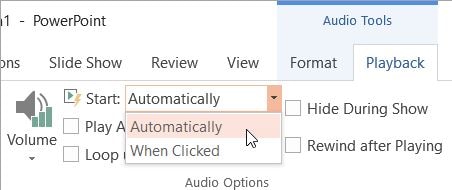
Step3 Remember that the In Click Sequence function is only available in PowerPoint 2016 and the latest versions
Click From Beginning to test the sound over the Slide Show tab.
Reminder: It would help if you keep your computer equipped with speakers or sound cards to hear sounds or music.
Part 3 Get music to play throughout a PowerPoint
You can add music to your PowerPoint and play it across slides in the slide show background.
If you wish to add audio or music from the web, you have to download it to your computer before using it in a presentation.
Steps to play a song across slides
Step1 Select Audio on the Insert tab and choose Audio on My PC
Step2 Browse to the music file you want to use within the File Explorer, and then select Insert
Step3 Select Play in Background within the audio icon chosen over the slide
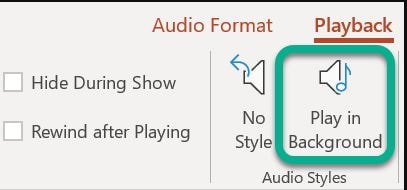
Play in Background helps automatically start the audio file during a slide show and makes the audio play throughout the multiple slides.

Part 4 Add more songs to a PowerPoint presentation
You can add more songs if your slide show plays longer than one song. Yet, find that you’re having difficulty synchronizing the Audio with the PowerPoint slideshow. For this purpose, you can use a third-party audio editing tool, such as Wondershare Filmora, to combine the Audio into one file and enjoy it all together. And, this makes how to insert music in PowerPoint even easier than before. Here, we’d like to show you a tutorial on using Wondershare Filmora to add music to PowerPoint indirectly but more interestingly so that you don’t have to work for longer.
Step1 Download Filmora and launch it
Click the Free Download button in the Wondershare Filmora to install it on your PC and then launch it.
Before you do a new project, you can select the aspect ratio as per the requirements. And hit the New Project and continue.
Step2 Import Photos and Music
You can import music media to the Media Library and then directly drag and drop them to the timeline.
Step3 Add Transitions

There are multiples of transitions available in Filmora to choose among. You can apply a particular transition between each selected photo or apply random transitions as per your interests.
Filmora features 30 plus transitions, especially for Slideshow or PowerPoint presentations, such as cross split, cross merge, swap, and sweep clockwise. You can also use 3D transition, speed blur, or ripple and dissolve transitions.
Moreover, you can accordingly adjust the duration of the transition.
To make your photos slideshow look amazing, applying filters and overlays effects is highly recommended.
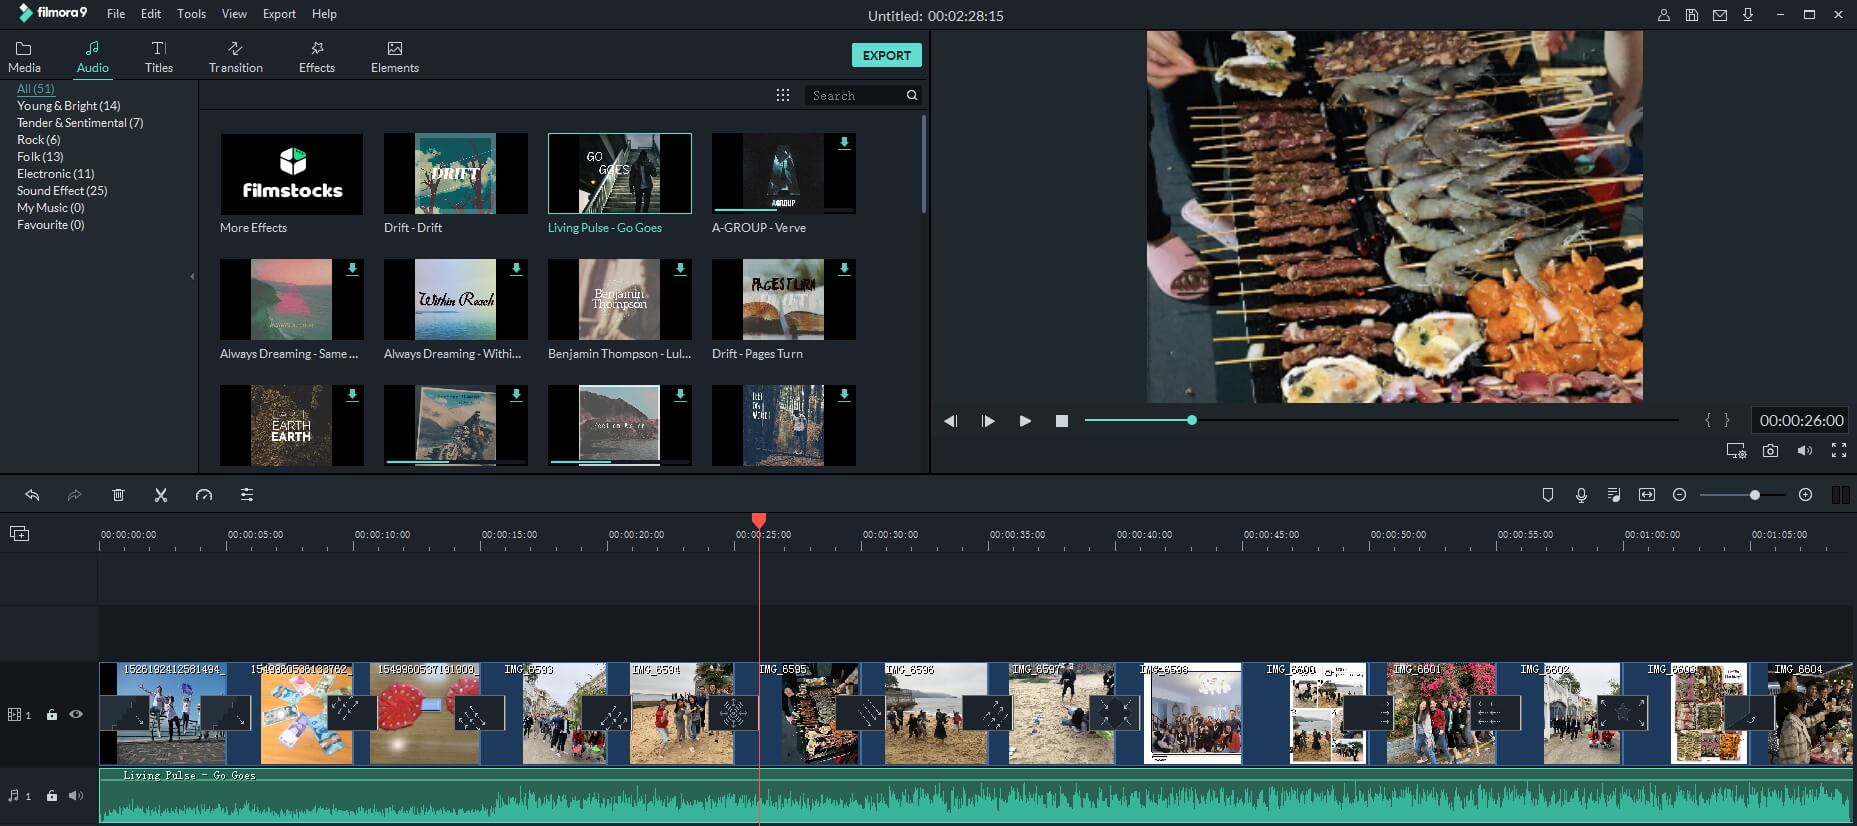
Step4 Add background music
You can select the sound effect or background music from the inbuilt audio library in Filmora or drag and drop these media or files to the timeline directly.
Filmora features the voiceover recording tool, which assists you in recording your voice easily.

Step5 Export and Save
Now, it’s time to save and export the music slideshow as you see fit. You have several options where you can save the final project within your PC in different formats, or you can share it to various social media platforms directly, or you can burn it to DVD.
Why choose Filmora to add music to the PowerPoint presentation?
● Compatibility with different formats.
● It helps you crop, zoom, and pan the PowerPoint slideshow automatically or manually by applying Pan & Zoom Photo Placement.
● It has a massive library of sound effects, music tracks, stunning transitions, elements presets, and effects.
● Here, you can record your voiceover and apply fade-in and fade-out effects.
Conclusion
So, we’re now concluding on how to add music to PowerPoint along with describing the most straightforward yet proficient way of making things simpler. We’ve discussed a quick yet straightforward to absorb step-by-step guide on how to put music in PowerPoint. If you wish to add a fully edited video directly into the PowerPoint presentation, try using Wondershare Filmora and enjoy your greatest wonders!
02 [Can I play music automatically on PowerPoint](#Part 2)
03 [Get music to play throughout a PowerPoint](#Part 3)
04 [Add more songs to a PowerPoint presentation](#Part 4)
Part 1 How to add music to PowerPoint?
Before you add music to PowerPoint, note specific points.
Your presentation size will increase by the size of the MP3 music file you add after the audio files are embedded directly into PPT.
For instance, the size of your presentation will magnify by 17MB if you add a song of 17MB to the presentation.
So, the solution is that you need to compress your file size accordingly.
Parental Control Software
Steps on how to insert music in PowerPoint presentation
Step1 Navigate to your Title slide (or wherever you want your music to start)
Step2 Click the Insert tab
Step3 Open the Audio drop-down (in the Media group)
Step4 Select Audio on My PC
Step5 Visit the folder on your computer
Step6 Select the Audio file
Step7 Hit the Insert tab
Consequently, the audio file gets embedded in your presentation.
 PearlMountain Image Converter
After the music embeds in your presentation, anyone who opens the presentation can access and play the music inside PowerPoint.
Your song will play within the Click Sequence of your presentation by default.
After inserting music into your presentation, you can then convert your entire presentation into a video and share it with your colleagues.
Part 2 Can I play music automatically on PowerPoint
Yes, you can start the audio in the click sequence or immediately.
<di
Step1Click the audio icon on the slide in the Normal view while you edit the slides
Step2 Choose Automatically or In Click Sequence in the Start list within the Audio Options of Audio Tools Playback tab
Step3 Remember that the In Click Sequence function is only available in PowerPoint 2016 and the latest versions
Click From Beginning to test the sound over the Slide Show tab.
Reminder: It would help if you keep your computer equipped with speakers or sound cards to hear sounds or music.
Part 3 Get music to play throughout a PowerPoint
You can add music to your PowerPoint and play it across slides in the slide show background.
If you wish to add audio or music from the web, you have to download it to your computer before using it in a presentation.

Steps to play a song across slides
Step1 Select Audio on the Insert tab and choose Audio on My PC
Step2 Browse to the music file you want to use within the File Explorer, and then select Insert
Step3 Select Play in Background within the audio icon chosen over the slide
 Easy and Safe Partition Software & Hard Disk Manager
Play in Background helps automatically start the audio file during a slide show and makes the audio play throughout the multiple slides.
 SwifDoo PDF Perpetual (2-PC) Free upgrade. No monthly fees ever.
Part 4 Add more songs to a PowerPoint presentation
You can add more songs if your slide show plays longer than one song. Yet, find that you’re having difficulty synchronizing the Audio with the PowerPoint slideshow. For this purpose, you can use a third-party audio editing tool, such as Wondershare Filmora, to combine the Audio into one file and enjoy it all together. And, this makes how to insert music in PowerPoint even easier than before. Here, we’d like to show you a tutorial on using Wondershare Filmora to add music to PowerPoint indirectly but more interestingly so that you don’t have to work for longer.
Step1 Download Filmora and launch it
Click the Free Download button in the Wondershare Filmora to install it on your PC and then launch it.
Before you do a new project, you can select the aspect ratio as per the requirements. And hit the New Project and continue.
Step2 Import Photos and Music
You can import music media to the Media Library and then directly drag and drop them to the timeline.
Step3 Add Transitions
There are multiples of transitions available in Filmora to choose among. You can apply a particular transition between each selected photo or apply random transitions as per your interests.
Filmora features 30 plus transitions, especially for Slideshow or PowerPoint presentations, such as cross split, cross merge, swap, and sweep clockwise. You can also use 3D transition, speed blur, or ripple and dissolve transitions.
Moreover, you can accordingly adjust the duration of the transition.
To make your photos slideshow look amazing, applying filters and overlays effects is highly recommended.
Step4 Add background music
You can select the sound effect or background music from the inbuilt audio library in Filmora or drag and drop these media or files to the timeline directly.
Filmora features the voiceover recording tool, which assists you in recording your voice easily.
Step5 Export and Save
Now, it’s time to save and export the music slideshow as you see fit. You have several options where you can save the final project within your PC in different formats, or you can share it to various social media platforms directly, or you can burn it to DVD.
Why choose Filmora to add music to the PowerPoint presentation?
● Compatibility with different formats.
● It helps you crop, zoom, and pan the PowerPoint slideshow automatically or manually by applying Pan & Zoom Photo Placement.
● It has a massive library of sound effects, music tracks, stunning transitions, elements presets, and effects.
● Here, you can record your voiceover and apply fade-in and fade-out effects.
 ZoneAlarm Pro Antivirus + Firewall NextGen
Conclusion
So, we’re now concluding on how to add music to PowerPoint along with describing the most straightforward yet proficient way of making things simpler. We’ve discussed a quick yet straightforward to absorb step-by-step guide on how to put music in PowerPoint. If you wish to add a fully edited video directly into the PowerPoint presentation, try using Wondershare Filmora and enjoy your greatest wonders!
02 [Can I play music automatically on PowerPoint](#Part 2)
03 [Get music to play throughout a PowerPoint](#Part 3)
04 [Add more songs to a PowerPoint presentation](#Part 4)
Part 1 How to add music to PowerPoint?
Before you add music to PowerPoint, note specific points.
Your presentation size will increase by the size of the MP3 music file you add after the audio files are embedded directly into PPT.
For instance, the size of your presentation will magnify by 17MB if you add a song of 17MB to the presentation.
So, the solution is that you need to compress your file size accordingly.
 NeoDownloader - Fast and fully automatic image/video/music downloader.
Steps on how to insert music in PowerPoint presentation
Step1 Navigate to your Title slide (or wherever you want your music to start)
Step2 Click the Insert tab
Step3 Open the Audio drop-down (in the Media group)
Step4 Select Audio on My PC
Step5 Visit the folder on your computer
Step6 Select the Audio file
Step7 Hit the Insert tab
Consequently, the audio file gets embedded in your presentation.
After the music embeds in your presentation, anyone who opens the presentation can access and play the music inside PowerPoint.
Your song will play within the Click Sequence of your presentation by default.
After inserting music into your presentation, you can then convert your entire presentation into a video and share it with your colleagues.
Part 2 Can I play music automatically on PowerPoint
Yes, you can start the audio in the click sequence or immediately.
<di
Step1Click the audio icon on the slide in the Normal view while you edit the slides
Step2 Choose Automatically or In Click Sequence in the Start list within the Audio Options of Audio Tools Playback tab
Step3 Remember that the In Click Sequence function is only available in PowerPoint 2016 and the latest versions
Click From Beginning to test the sound over the Slide Show tab.
Reminder: It would help if you keep your computer equipped with speakers or sound cards to hear sounds or music.
Part 3 Get music to play throughout a PowerPoint
You can add music to your PowerPoint and play it across slides in the slide show background.
If you wish to add audio or music from the web, you have to download it to your computer before using it in a presentation.
Steps to play a song across slides
Step1 Select Audio on the Insert tab and choose Audio on My PC
Step2 Browse to the music file you want to use within the File Explorer, and then select Insert
Step3 Select Play in Background within the audio icon chosen over the slide
Play in Background helps automatically start the audio file during a slide show and makes the audio play throughout the multiple slides.
Part 4 Add more songs to a PowerPoint presentation
You can add more songs if your slide show plays longer than one song. Yet, find that you’re having difficulty synchronizing the Audio with the PowerPoint slideshow. For this purpose, you can use a third-party audio editing tool, such as Wondershare Filmora, to combine the Audio into one file and enjoy it all together. And, this makes how to insert music in PowerPoint even easier than before. Here, we’d like to show you a tutorial on using Wondershare Filmora to add music to PowerPoint indirectly but more interestingly so that you don’t have to work for longer.
Step1 Download Filmora and launch it
Click the Free Download button in the Wondershare Filmora to install it on your PC and then launch it.
Before you do a new project, you can select the aspect ratio as per the requirements. And hit the New Project and continue.
Step2 Import Photos and Music
You can import music media to the Media Library and then directly drag and drop them to the timeline.
Step3 Add Transitions
There are multiples of transitions available in Filmora to choose among. You can apply a particular transition between each selected photo or apply random transitions as per your interests.
Filmora features 30 plus transitions, especially for Slideshow or PowerPoint presentations, such as cross split, cross merge, swap, and sweep clockwise. You can also use 3D transition, speed blur, or ripple and dissolve transitions.
Moreover, you can accordingly adjust the duration of the transition.
To make your photos slideshow look amazing, applying filters and overlays effects is highly recommended.
Step4 Add background music
You can select the sound effect or background music from the inbuilt audio library in Filmora or drag and drop these media or files to the timeline directly.
Filmora features the voiceover recording tool, which assists you in recording your voice easily.
Step5 Export and Save
Now, it’s time to save and export the music slideshow as you see fit. You have several options where you can save the final project within your PC in different formats, or you can share it to various social media platforms directly, or you can burn it to DVD.
Why choose Filmora to add music to the PowerPoint presentation?
● Compatibility with different formats.
● It helps you crop, zoom, and pan the PowerPoint slideshow automatically or manually by applying Pan & Zoom Photo Placement.
● It has a massive library of sound effects, music tracks, stunning transitions, elements presets, and effects.
● Here, you can record your voiceover and apply fade-in and fade-out effects.
Conclusion
So, we’re now concluding on how to add music to PowerPoint along with describing the most straightforward yet proficient way of making things simpler. We’ve discussed a quick yet straightforward to absorb step-by-step guide on how to put music in PowerPoint. If you wish to add a fully edited video directly into the PowerPoint presentation, try using Wondershare Filmora and enjoy your greatest wonders!
02 [Can I play music automatically on PowerPoint](#Part 2)
03 [Get music to play throughout a PowerPoint](#Part 3)
04 [Add more songs to a PowerPoint presentation](#Part 4)
Part 1 How to add music to PowerPoint?
Before you add music to PowerPoint, note specific points.
Your presentation size will increase by the size of the MP3 music file you add after the audio files are embedded directly into PPT.
For instance, the size of your presentation will magnify by 17MB if you add a song of 17MB to the presentation.
So, the solution is that you need to compress your file size accordingly.
 dotConnect for Oracle is an ADO.NET data provider for Oracle with Entity Framework Support.
Steps on how to insert music in PowerPoint presentation
Step1 Navigate to your Title slide (or wherever you want your music to start)
Step2 Click the Insert tab
Step3 Open the Audio drop-down (in the Media group)
Step4 Select Audio on My PC
Step5 Visit the folder on your computer
Step6 Select the Audio file
Step7 Hit the Insert tab
Consequently, the audio file gets embedded in your presentation.
After the music embeds in your presentation, anyone who opens the presentation can access and play the music inside PowerPoint.
Your song will play within the Click Sequence of your presentation by default.
After inserting music into your presentation, you can then convert your entire presentation into a video and share it with your colleagues.
 Allavsoft Batch Download Online Videos, Music Offline to MP4, MP3, MOV, etc format
Part 2 Can I play music automatically on PowerPoint
Yes, you can start the audio in the click sequence or immediately.
<di
Step1Click the audio icon on the slide in the Normal view while you edit the slides
Step2 Choose Automatically or In Click Sequence in the Start list within the Audio Options of Audio Tools Playback tab
Step3 Remember that the In Click Sequence function is only available in PowerPoint 2016 and the latest versions
Click From Beginning to test the sound over the Slide Show tab.
Reminder: It would help if you keep your computer equipped with speakers or sound cards to hear sounds or music.
Part 3 Get music to play throughout a PowerPoint
You can add music to your PowerPoint and play it across slides in the slide show background.
If you wish to add audio or music from the web, you have to download it to your computer before using it in a presentation.
 WinUtilities Pro
Steps to play a song across slides
Step1 Select Audio on the Insert tab and choose Audio on My PC
Step2 Browse to the music file you want to use within the File Explorer, and then select Insert
Step3 Select Play in Background within the audio icon chosen over the slide
Play in Background helps automatically start the audio file during a slide show and makes the audio play throughout the multiple slides.
Part 4 Add more songs to a PowerPoint presentation
You can add more songs if your slide show plays longer than one song. Yet, find that you’re having difficulty synchronizing the Audio with the PowerPoint slideshow. For this purpose, you can use a third-party audio editing tool, such as Wondershare Filmora, to combine the Audio into one file and enjoy it all together. And, this makes how to insert music in PowerPoint even easier than before. Here, we’d like to show you a tutorial on using Wondershare Filmora to add music to PowerPoint indirectly but more interestingly so that you don’t have to work for longer.
Step1 Download Filmora and launch it
Click the Free Download button in the Wondershare Filmora to install it on your PC and then launch it.
Before you do a new project, you can select the aspect ratio as per the requirements. And hit the New Project and continue.
Step2 Import Photos and Music
You can import music media to the Media Library and then directly drag and drop them to the timeline.
Step3 Add Transitions
There are multiples of transitions available in Filmora to choose among. You can apply a particular transition between each selected photo or apply random transitions as per your interests.
Filmora features 30 plus transitions, especially for Slideshow or PowerPoint presentations, such as cross split, cross merge, swap, and sweep clockwise. You can also use 3D transition, speed blur, or ripple and dissolve transitions.
Moreover, you can accordingly adjust the duration of the transition.
To make your photos slideshow look amazing, applying filters and overlays effects is highly recommended.
Step4 Add background music
You can select the sound effect or background music from the inbuilt audio library in Filmora or drag and drop these media or files to the timeline directly.
Filmora features the voiceover recording tool, which assists you in recording your voice easily.
Step5 Export and Save
Now, it’s time to save and export the music slideshow as you see fit. You have several options where you can save the final project within your PC in different formats, or you can share it to various social media platforms directly, or you can burn it to DVD.
Why choose Filmora to add music to the PowerPoint presentation?
● Compatibility with different formats.
● It helps you crop, zoom, and pan the PowerPoint slideshow automatically or manually by applying Pan & Zoom Photo Placement.
● It has a massive library of sound effects, music tracks, stunning transitions, elements presets, and effects.
● Here, you can record your voiceover and apply fade-in and fade-out effects.
Conclusion
So, we’re now concluding on how to add music to PowerPoint along with describing the most straightforward yet proficient way of making things simpler. We’ve discussed a quick yet straightforward to absorb step-by-step guide on how to put music in PowerPoint. If you wish to add a fully edited video directly into the PowerPoint presentation, try using Wondershare Filmora and enjoy your greatest wonders!
- Title: [Updated] Incorporate Tunes Into PPT Slides
- Author: Frank
- Created at : 2024-07-26 14:43:16
- Updated at : 2024-07-27 14:43:16
- Link: https://some-techniques.techidaily.com/updated-incorporate-tunes-into-ppt-slides/
- License: This work is licensed under CC BY-NC-SA 4.0.