![[Updated] Google Images & You Fast Collages Created in Seconds](https://thmb.techidaily.com/d47941553c96756e0922bd70e1fb76549037277932507e29a378053d0b9798db.jpg)
"[Updated] Google Images & You Fast Collages Created in Seconds"
Google Images & You: Fast Collages Created in Seconds
Top Tip: How to Create a Quick and Easy Google Collage Photo
An easy yet powerful editor
Numerous effects to choose from
Detailed tutorials provided by the official channel
The Google Photos collage function is very easy to use We’ll be teaching you exactly how to make a collage in google photos in order to answer your question.
And just, to be thorough, we’ve supplied a tutorial that would work for creating a Google Photos collage on your desktop and another that will work for making a collage in Google Photos’ IOS app (for iPhone and iPad users.)
In this article
01 [How to Make a Photo Collage with Google Photos on the Web](#Part 1)
02 [How to Make a Photo Collage with Google Photos on Google Photos Application](#Part 2)
03 [How to Make a Photo Collage in Google Photos on iPhone and iPad](#Part 3)
Part 1 How to Make a Photo Collage with Google Photos on the Web
First up is our tutorial on how to make a collage in Google Photos (web version) Technically, this can be done on just about any device (your computer, tablet, smartphone, etc.) It can also be done on most OS Systems (Windows and Mac included.) However, our demonstration will be focused on examples that show using it on your desktop.
01Step 1. Go to Google Photos & Log-In
To start, open up your desktop browser and go to the Google Photos website. You can also just open it up after logging in to your Google Account and opening the ‘Photos’ app.
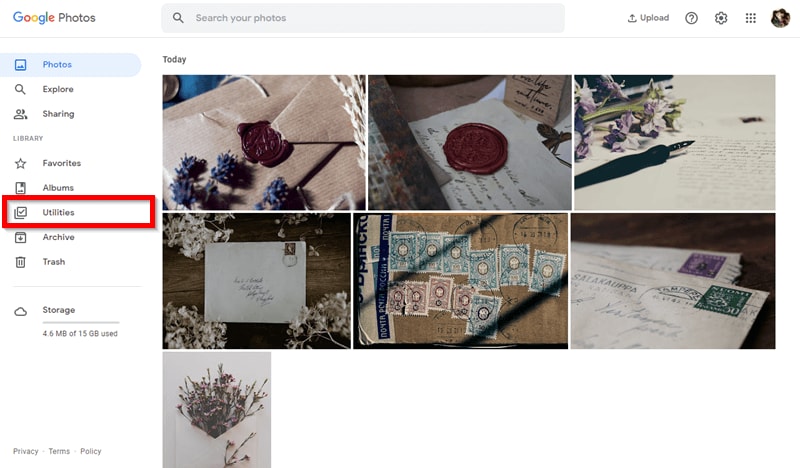
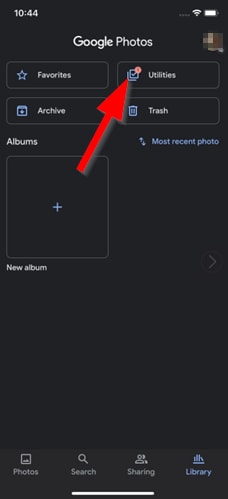
02Step 2. Open ‘Utilities’
Next up, in order to be able to make a Google collage photo, you need to head to the ‘Utilities’ page (which you can access through the side menu under ‘LIBRARY’ — as is shown in the image provided.)
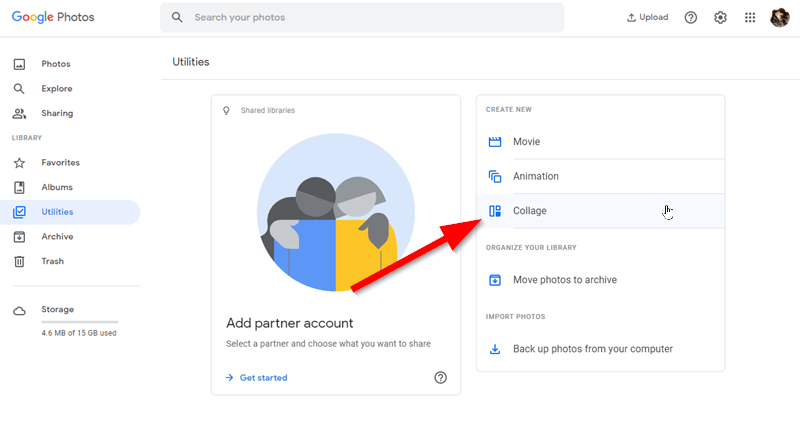
03Step 3. Create New ‘Collage’
Up next, once you’re on the ‘Utilities’ page, locate the ‘Collage’ option under the ‘Create New’ section.
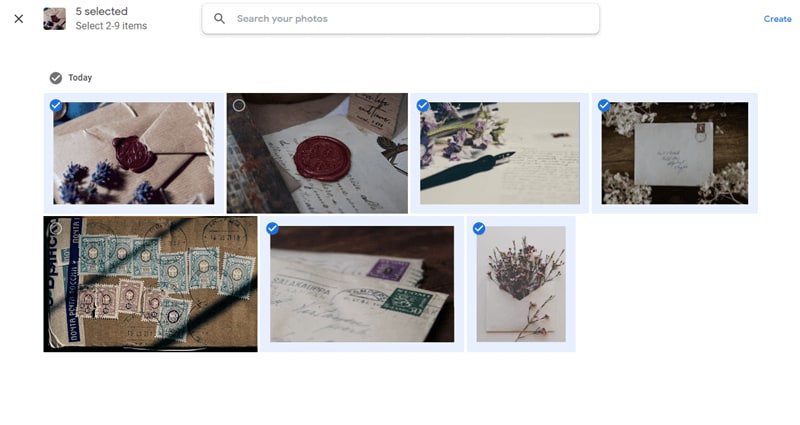
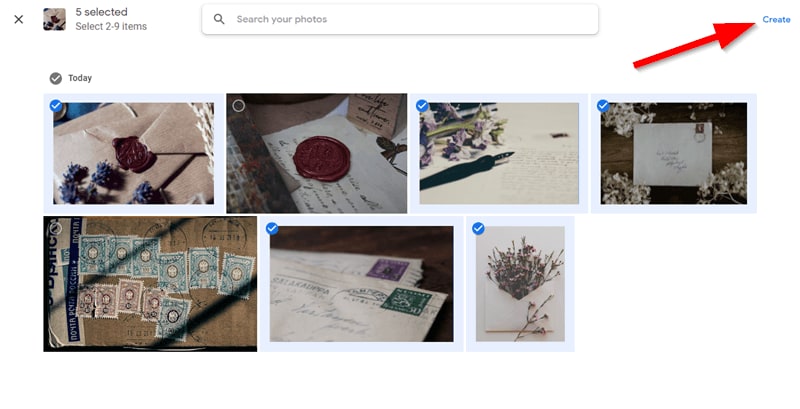
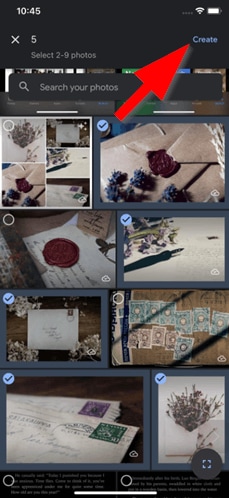
04Step 4. Select 2-9 Items for Collage
For the next part, you’ll be prompted to choose the photos you want to make a Google Photos collage out of. This is relatively easy. You can scroll through your gallery (starting from the most recent), or you can search your photos for specific images that you want using the toolbar provided.
05Step 5. Create Google Photos Collage
When you’ve finished selecting all the photos that you want for your Google Collage Photo, select the ‘Create’ button (it can be found on the upper right-hand corner of the screen.)
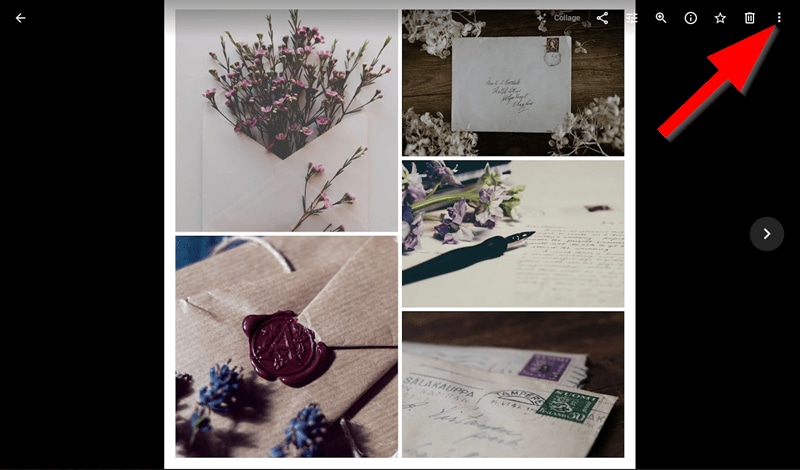
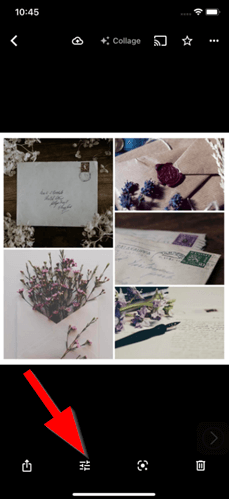
06Step 6. Open Settings Menu for Options
Your Google Photos collage should now be complete To see available share options, open the ‘Settings’ menu on the upper-right hand corner (it’s the three-descending dots the furthest to the right.)
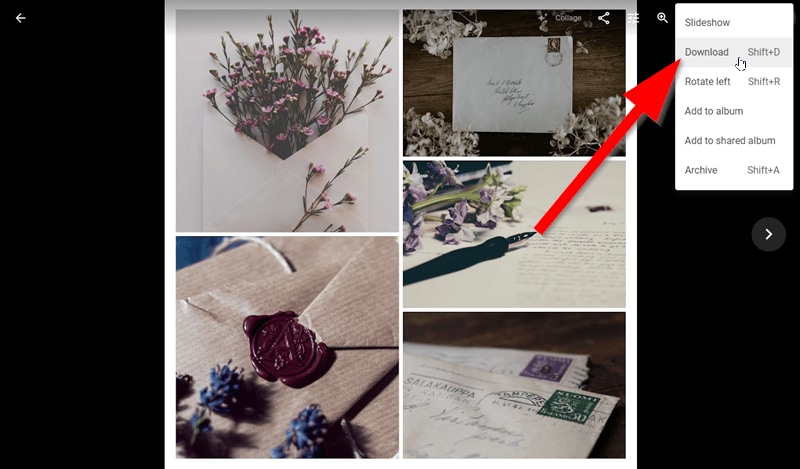
07Step 7. Download Completed Google Photos Collage
Whether you’re hoping to share the Google Photos collage with friends and family or print it out for your own enjoyment, make sure to remember to ‘Download’ it or ‘Add to Album’
08Step 8. (Optional) Edit
If there are any changes that you want to make before downloading it or sending it over to friends and family, Google Photos, thankfully, offers an ‘Edit’ Function that has basic photo editing features that you can use to make some minor changes to the collage.
Part 2 How to Make a Photo Collage with Google Photos on Google Photos Application
Up, next we’ll be teaching you how to make a collage in Google Photos (app version) Specifically, we’ll be demonstrating with an iPhone — but you can do this with just about any smartphone or tablet. All you need is a log-in for Google.
01Step 1. Download Google Photos App
First of all, in order to have Google Photos make collages for you, you need the app. You can download this on the App-Store. It’s FREE-to-use.
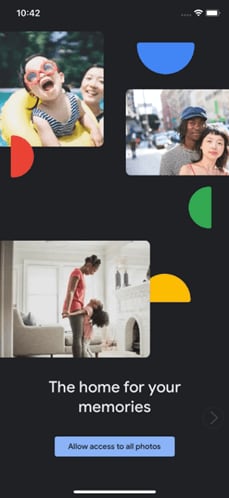
02Step 2. Allow Google Access to ‘All Photos’
In order to proceed, you’ll need to give Google Photos permission to access all the photos on your device.
03Step 3. Go to the Library Page
Unlike the web version of Google Photos, the app version has the make collage in Google photos feature under the ‘Library’ page (which you can find on the bottom-right corner of the interface.
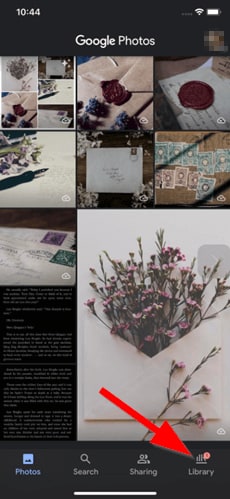
04Step 4. Utilities > Collage
Back to similar surroundings. Select the ‘Utilities’ option and then click the ‘Collage’ feature in order to move forward.
05Step 5. Create Google Photos Collage
Again, just like before, you must first select the images that you want for your collage (either by scrolling for them or using the search option) and then click the ‘Create’ button to finish up.
06Step 6. (Optional) Edit Photos
The basic edit features we talked about on the web version of Google Photos is also available on the app (you can find it on the toolbar on the bottom of the interface.)
07Step 7. Download and Share
When you’re happy with the look of your collage, you can move on by selecting the ‘share’ option on the toolbar at the bottom of the interface

Part 3 How to Make a Photo Collage in Google Photos on iPhone and iPad
Bonus tip If you want to make a collage in Google Photos for another purpose (either for a personal project or a professional project), we suggest that you check out **Wondershare Filmora Video Editor **’s Stock Media This includes photos, videos, sounds, etc. that you can use both for personal reasons and commercial reasons (without incurring any fees or being penalized.) As a bonus, Filmora is also one of the best video editors out in the market right now.
So, if you want to level up your collage game even more. You can go full-on and arrange a personal message video in the form of collages right here with all of the helpful tools and templates that the software comes with.
For Win 7 or later (64-bit)
For macOS 10.12 or later
● Key Takeaways from This Episode →
● Interested in learning how to make a collage in Google Photos? No problem We’ve included both a tutorial for the web version and on the app version of Google Photos.
● The procedure for both is similar and incredibly easy to do — it’s a completely stress-free way of making an aesthetically pleasing collage that you can show to your friends and families
● Of course, if you want to up your game a bit — or just level up your skills in general, there are plenty of ways of doing so. For example, you can use of Filmora V11’s NEW Stock Media library or just take advantage of its many video editing tools to create even better personal messages that your friends and families can enjoy and cherish.
The Google Photos collage function is very easy to use We’ll be teaching you exactly how to make a collage in google photos in order to answer your question.
And just, to be thorough, we’ve supplied a tutorial that would work for creating a Google Photos collage on your desktop and another that will work for making a collage in Google Photos’ IOS app (for iPhone and iPad users.)
In this article
01 [How to Make a Photo Collage with Google Photos on the Web](#Part 1)
02 [How to Make a Photo Collage with Google Photos on Google Photos Application](#Part 2)
03 [How to Make a Photo Collage in Google Photos on iPhone and iPad](#Part 3)
Part 1 How to Make a Photo Collage with Google Photos on the Web
First up is our tutorial on how to make a collage in Google Photos (web version) Technically, this can be done on just about any device (your computer, tablet, smartphone, etc.) It can also be done on most OS Systems (Windows and Mac included.) However, our demonstration will be focused on examples that show using it on your desktop.
01Step 1. Go to Google Photos & Log-In
To start, open up your desktop browser and go to the Google Photos website. You can also just open it up after logging in to your Google Account and opening the ‘Photos’ app.
02Step 2. Open ‘Utilities’
Next up, in order to be able to make a Google collage photo, you need to head to the ‘Utilities’ page (which you can access through the side menu under ‘LIBRARY’ — as is shown in the image provided.)
03Step 3. Create New ‘Collage’
Up next, once you’re on the ‘Utilities’ page, locate the ‘Collage’ option under the ‘Create New’ section.
04Step 4. Select 2-9 Items for Collage
For the next part, you’ll be prompted to choose the photos you want to make a Google Photos collage out of. This is relatively easy. You can scroll through your gallery (starting from the most recent), or you can search your photos for specific images that you want using the toolbar provided.
05Step 5. Create Google Photos Collage
When you’ve finished selecting all the photos that you want for your Google Collage Photo, select the ‘Create’ button (it can be found on the upper right-hand corner of the screen.)
06Step 6. Open Settings Menu for Options
Your Google Photos collage should now be complete To see available share options, open the ‘Settings’ menu on the upper-right hand corner (it’s the three-descending dots the furthest to the right.)
07Step 7. Download Completed Google Photos Collage
Whether you’re hoping to share the Google Photos collage with friends and family or print it out for your own enjoyment, make sure to remember to ‘Download’ it or ‘Add to Album’
08Step 8. (Optional) Edit
If there are any changes that you want to make before downloading it or sending it over to friends and family, Google Photos, thankfully, offers an ‘Edit’ Function that has basic photo editing features that you can use to make some minor changes to the collage.
Part 2 How to Make a Photo Collage with Google Photos on Google Photos Application
Up, next we’ll be teaching you how to make a collage in Google Photos (app version) Specifically, we’ll be demonstrating with an iPhone — but you can do this with just about any smartphone or tablet. All you need is a log-in for Google.
01Step 1. Download Google Photos App
First of all, in order to have Google Photos make collages for you, you need the app. You can download this on the App-Store. It’s FREE-to-use.
02Step 2. Allow Google Access to ‘All Photos’
In order to proceed, you’ll need to give Google Photos permission to access all the photos on your device.
03Step 3. Go to the Library Page
Unlike the web version of Google Photos, the app version has the make collage in Google photos feature under the ‘Library’ page (which you can find on the bottom-right corner of the interface.
04Step 4. Utilities > Collage
Back to similar surroundings. Select the ‘Utilities’ option and then click the ‘Collage’ feature in order to move forward.
05Step 5. Create Google Photos Collage
Again, just like before, you must first select the images that you want for your collage (either by scrolling for them or using the search option) and then click the ‘Create’ button to finish up.
06Step 6. (Optional) Edit Photos
The basic edit features we talked about on the web version of Google Photos is also available on the app (you can find it on the toolbar on the bottom of the interface.)
07Step 7. Download and Share
When you’re happy with the look of your collage, you can move on by selecting the ‘share’ option on the toolbar at the bottom of the interface
Part 3 How to Make a Photo Collage in Google Photos on iPhone and iPad
Bonus tip If you want to make a collage in Google Photos for another purpose (either for a personal project or a professional project), we suggest that you check out **Wondershare Filmora Video Editor **’s Stock Media This includes photos, videos, sounds, etc. that you can use both for personal reasons and commercial reasons (without incurring any fees or being penalized.) As a bonus, Filmora is also one of the best video editors out in the market right now.
So, if you want to level up your collage game even more. You can go full-on and arrange a personal message video in the form of collages right here with all of the helpful tools and templates that the software comes with.
For Win 7 or later (64-bit)
For macOS 10.12 or later
● Key Takeaways from This Episode →
● Interested in learning how to make a collage in Google Photos? No problem We’ve included both a tutorial for the web version and on the app version of Google Photos.
● The procedure for both is similar and incredibly easy to do — it’s a completely stress-free way of making an aesthetically pleasing collage that you can show to your friends and families
● Of course, if you want to up your game a bit — or just level up your skills in general, there are plenty of ways of doing so. For example, you can use of Filmora V11’s NEW Stock Media library or just take advantage of its many video editing tools to create even better personal messages that your friends and families can enjoy and cherish.
Also read:
- [New] From Hobbyist to Pro The Audacity Journey
- [New] Full Review of LG BP350 - From Screen Brightness to Audio Output
- [Updated] Initiate the Art of Movie Making Xp Edition
- [Updated] Visual Impact The Ultimate Photo Grid List for 2024
- 2024 Approved Expert Advice for Efficiently Creating SRT Files
- 2024 Approved Gopro Match-Up Ultimate Buyer's Analysis
- 2024 Approved Grading for Emotion Altering Footage to Evoke Feelings
- 3 Best Tools to Hard Reset Tecno Spark 10 4G | Dr.fone
- In 2024, Refreshed Array of Podcast Interviews to Attract Listeners
- Infusing YouTube Soundtracks Within Multimedia for 2024
- Secure Your Apple Vision Pro with a VPN: Installation Tutorials & Advantages Explained on ZDNet
- StarTech: Fixing Driver Problems on Windows (10, 8, & 7) - Resolved
- Top Review of DBPower's 600A Peak Charger: A Deep Dive Into Its 18K mAh Features
- Transforming Human Resources: The Impact of Oracle's Integration of Generative AI Into HR Solutions
- Ultimate Guide: Solving NVIDIA Control Panel Failures & Unresponsiveness
- Unlock Full Control: Navigating Through Every Setting Option on YL's Control Panel
- Title: [Updated] Google Images & You Fast Collages Created in Seconds
- Author: Frank
- Created at : 2025-01-04 19:42:13
- Updated at : 2025-01-09 20:04:39
- Link: https://some-techniques.techidaily.com/updated-google-images-and-you-fast-collages-created-in-seconds/
- License: This work is licensed under CC BY-NC-SA 4.0.