
Ubuntu Compatibility with Windows 11: A Guide to Running Linux Applications

Ubuntu Compatibility with Windows 11: A Guide to Running Linux Applications
Key Takeaways
- Install WSL2 Kernel, activate Virtual Machine Platform, and make sure you have Admin rights before getting Ubuntu on Windows 11.
- Enable Windows Subsystem for Linux, then download and install Ubuntu for WSL via Microsoft Store to run Linux apps on Windows 11.
Did you know using Ubuntu-exclusive apps doesn’t require overwriting your operating system? Unlock the true potential of your Windows desktop by using Ubuntu apps on Windows 11, enhancing your PC experience by blending the power of Linux and Windows.
Why Use Ubuntu Apps on Windows 11?
Adding Ubuntu to Windows 11 enables access to a wide variety of free applications unavailable on Windows alone. These aren’t just ordinary programs either; they can accomplish nearly any task on your computer, from enhancing your file management to creative projects. For example, if you’re looking for a great photo management tool not found on Windows 11, you might try Shotwell with WSL. Or, if you’re not a fan of the email apps available on Windows, you can install the Ubuntu-native Geary email client. There are many great exclusive applications for Ubuntu that can level up your Windows PC.
Furthermore, if you enjoy crafting and coding, the combination of Windows and Ubuntu significantly benefits you. It simplifies the process of working on Linux-oriented projects without the need to leave the Windows environment. This integration reduces complications and amplifies productivity, whether your pursuits involve coding for enjoyment or constructing significant projects.
Imagine you’re a developer working on a cross-platform project. Using Ubuntu apps on Windows means you can quickly and effectively test your new project on Linux and Windows with ease. Take it from me: I write programs in the Go programming language, and being able to test out my code and run it on both Ubuntu and Windows 11 seamlessly is very powerful.
Requirements Before You Begin
Before you can start using Ubuntu on your Windows 11 system, a few requirements must be met to ensure a smooth process. During my testing, WSL wouldn’t work until I installed the latest WSL2 Kernel package installed on Windows 11. If you’re having issues with WSL running on Windows 11 like I did, install this kernel package. It will ensure that WSL v2 operating systems run correctly. You can download and install the EXE file directly from Microsoft .
In addition to the WSL2 Kernel EXE package, you’ll need to enable the “Virtual Machine Platform” feature in the “Windows Features” area of Windows 11. WSL runs with the help of virtualization, and this feature is a requirement to get the most out of Ubuntu in Windows 11.
Lastly, ensure you have Administrator rights on your Windows 11 system. Using WSL requires modifying Windows features, and it won’t work if you don’t have Administrator privileges.
Enabling Windows Subsystem for Linux (WSL)
Windows Subsystem for Linux is not enabled by default on Windows 11. You’ll need to activate this feature on Windows before you can use it to run Ubuntu apps on your Windows PC.
To start, open the Windows Start Menu on the desktop. Once it is open, type “Turn Windows Features on or off” into the search box. Launch the icon labeled “Control Panel” beneath it to access the “Add/Remove Features” area of Windows 11.
Inside the “Windows Features” window, scroll down and locate “Windows Subsystem for Linux.” After finding it, click on the empty box next to it to activate this feature. Select “OK” after making your selection.
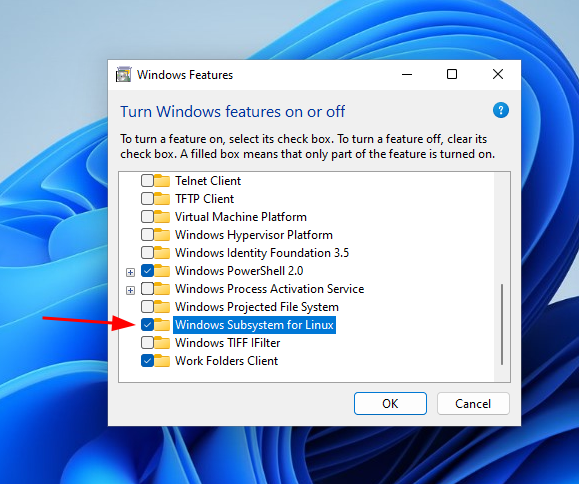
Now that the “OK” button has been selected, Windows 11 will begin setting up WSL on your system. This setup process should take a few minutes to complete. When the setup is complete, you must reboot your Windows PC. Select the “Restart now” button to reboot.
Upon rebooting, log back into your Windows 11 desktop. Once you’ve logged back in, the Windows Subsystem for Linux will be enabled on Windows 11.
Installing Ubuntu
Ubuntu for WSL is available for Windows 11 via the Microsoft Store, enabling the installation of Ubuntu on your system to run Linux apps within Windows 11.
To initiate the installation of Ubuntu for WSL, open the Microsoft Store from the Windows 11 desktop. Once open, locate the “Search apps, games, movies, and more” box and click on it.
In the search box, type “Ubuntu.” Upon entering “Ubuntu,” the Microsoft Store will display various versions of the Ubuntu app. Select “Ubuntu 22.04.3 LTS” using the mouse.
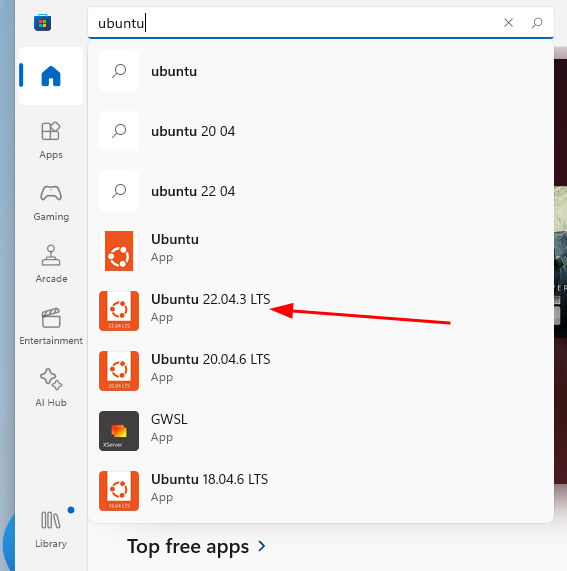
After selecting “Ubuntu 22.04.3 LTS,” you will be directed to its feature page in the Microsoft Store. Locate the “Get” button and click on it. Selecting the “Get” button will initiate the Ubuntu download for Windows 11.
Downloading Ubuntu 22.04.3 LTS on Windows 11 should be swift, given the program’s size is only about 560 MB. Once the download is complete, Ubuntu will be accessible in the Windows Start Menu.
After Ubuntu 22.04.3 LTS has finished installing on Windows 11, access the Windows Start Menu, search for “Ubuntu 22.04.3 LTS,” and launch it. Upon its first launch, Ubuntu will automatically configure itself and prepare for use.
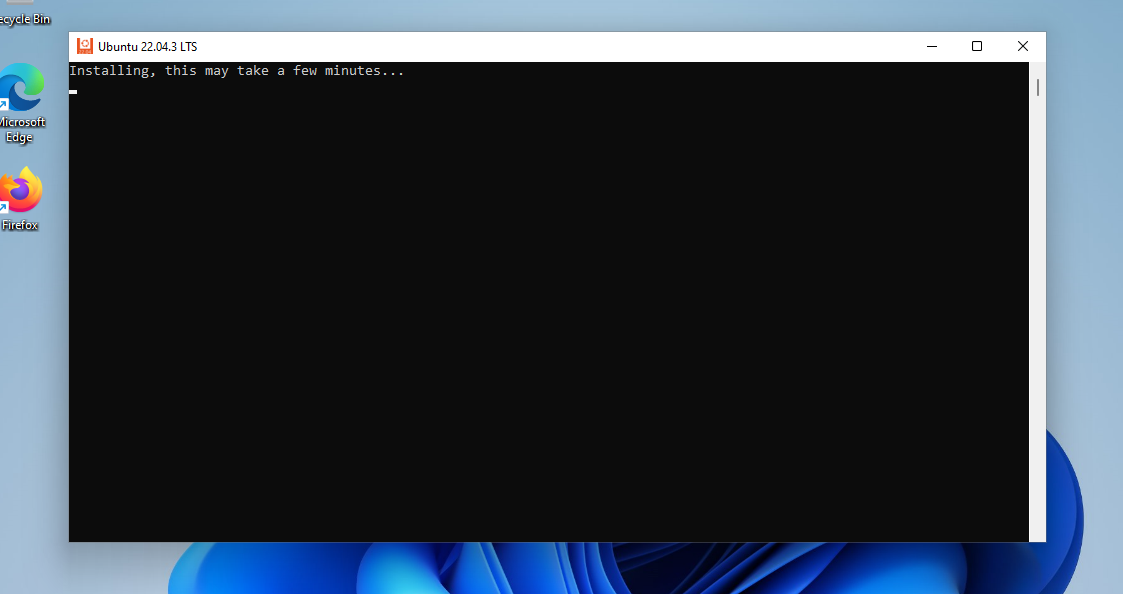
Once Ubuntu has finished its setup on Windows 11, you will see an empty terminal window, ready for you to interact with Ubuntu on your Windows 11 system.
Basic Configuration Tips
Here are some basic configuration tips to improve the WSL experience on Windows 11.
Windows and Linux File System Integration
Windows and Linux File System Integration simplifies moving files between your Ubuntu WSL setup and your Windows 11 desktop. Here’s how to utilize this feature.
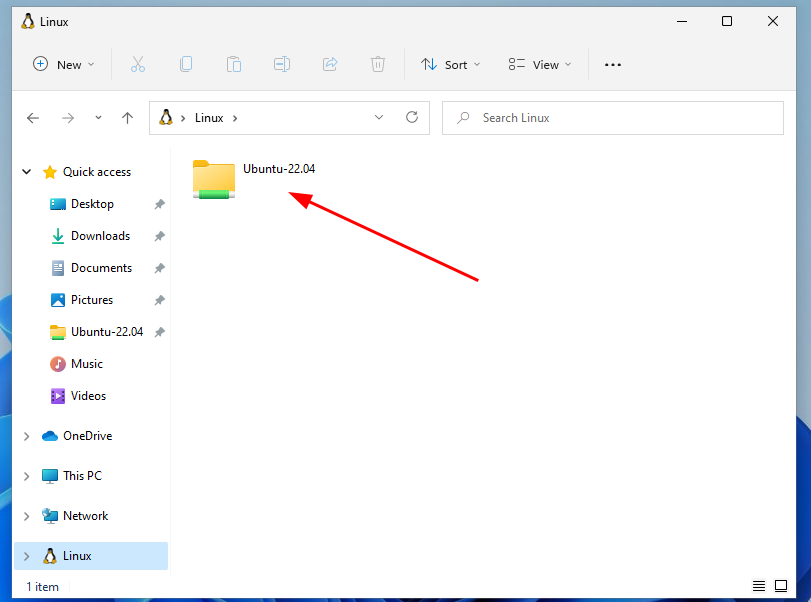
To access your Ubuntu files from Windows 11, begin by opening Windows Explorer. Once opened, locate the “Linux” penguin icon in the sidebar and select it.
Upon selecting “Linux,” a folder named “Ubuntu-22.04” will appear. Right-click this folder and choose “Pin to Quick access.” This action allows you to effortlessly access your Ubuntu files from Windows.
To access Windows files from Ubuntu, navigate to the /mnt/c folder using the cd command. This method provides interaction with the Windows 11 C:/ drive.
cd /mnt/c
Update your Ubuntu WSL app
It is good practice to update your Ubuntu WSL app from time to time, otherwise programs will stop working. Here’s how to do it on Windows 11.
First, open up the Ubuntu app from the Windows Start Menu. Once it is open, run the apt update command to check for Ubuntu software updates.
sudo apt update
When you’ve finished checking for updates, you can use the apt upgrade command to install them.
sudo apt upgrade
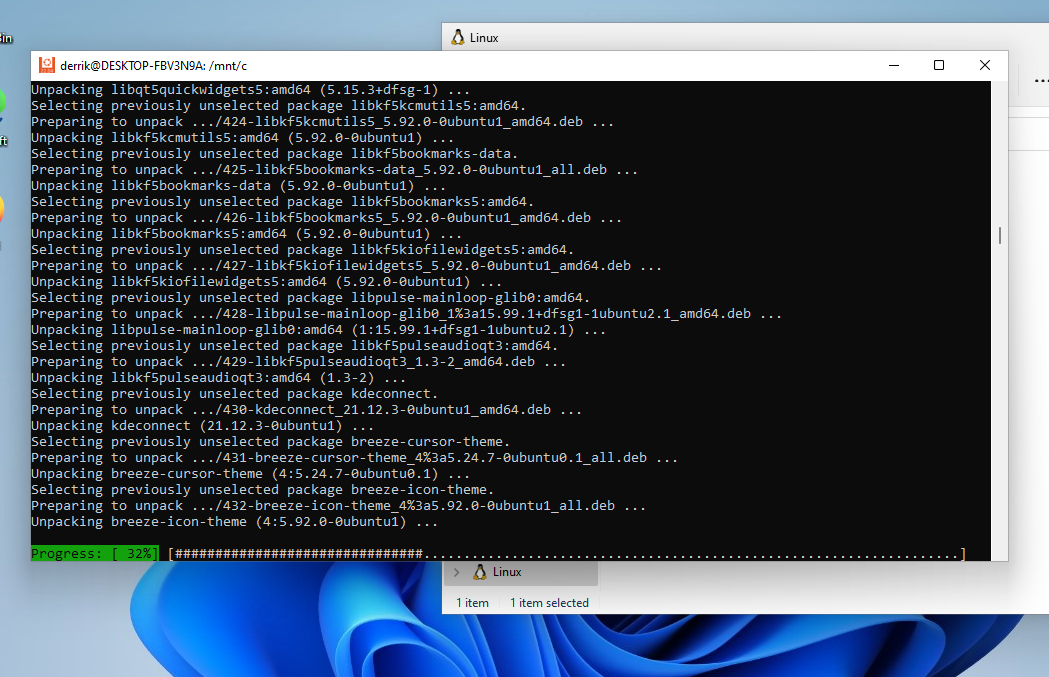
Starting and Using Ubuntu
Ubuntu in Windows 11 has a terminal interface with WSL. WSL is a Linux system layer that is accessible directly from Windows, rather than a Linux desktop on top of the Windows Desktop.
Using Ubuntu means installing packages to use on Windows 11. To start Ubuntu, search for “Ubuntu 22.04.3 LTS” in the Windows Start Menu. Once it is opened, it’ll be ready to use.
From here, you can install any app you like. To install an Ubuntu app on your Windows 11 system, start by searching for the name of the app. You can search using the apt search command. For example, to find “wireshark,” do:
apt search wireshark
Look through the search results for the program you wish to install. Then, use the “apt install programname” command. To install Wireshark, for example, it’s:
sudo apt install wireshark
When your program is installed, you can launch it directly from the terminal with the following command:
nohup program_name & disown
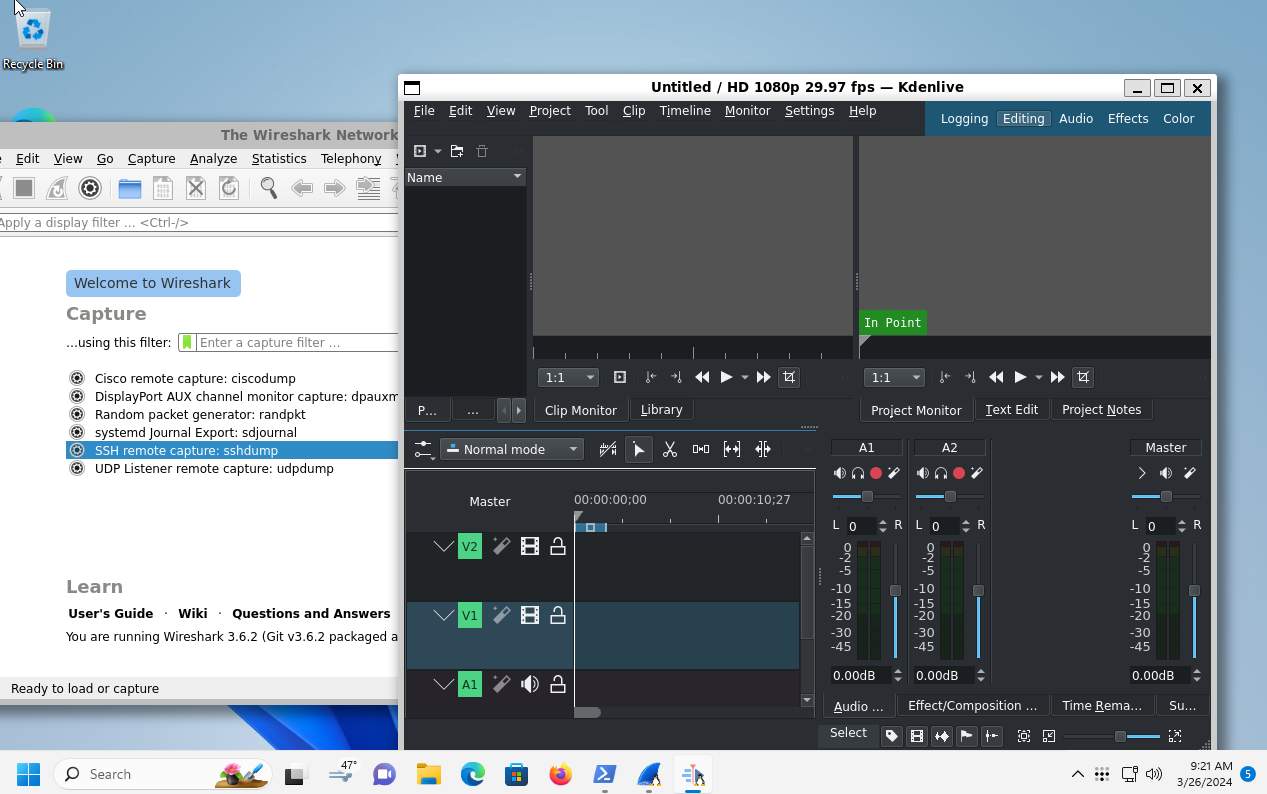
Alternatively, applications can be started from the Windows 11 start menu.
Integration with Windows 11
When apps are installed through WSL, they integrate into Windows 11 quite well by installing themselves into the Windows 11 Start menu. To access your installed WSL programs from Windows 11, look through your programs. Each integrated application will have a Linux icon.
The WSL integration with Windows 11 is quite good. However, keep in mind that not every single application is going to create a desktop icon. Sometimes, you may need to launch your Ubuntu programs directly from the terminal. You typically do this by typing its package name and hitting Enter.
Troubleshooting Common Setup Issues
WSL usually installs without a hitch on Windows 11. However, if you’re having issues, there is a quick and easy fix. First, open up PowerShell in Windows 11. Once it is open, use the update command for WSL. Updating WSL will install various patches and fixes that are sure to alleviate the issues you’re experiencing.
wsl –update
Alternatively, if updating doesn’t help, consider re-installing Ubuntu WSL again by following the installation instructions in the “Setup” portion of this guide.
WSL upgrades your Windows 11 experience by bringing Ubuntu apps to your desktop without the hassle of virtualization. Jump into Ubuntu and WSL to enhance the power of your Windows 11 PC and discover new possibilities in computing.
Also read:
- 2024 Approved Experience Unparalleled Reality Top 10 PC Headsets for In-Depth VR Video
- Avoiding Constant Printer Service Disruptions on Win7/Win10
- Bypass Downvids Errors: Effective Strategies for Resolving Non-Responsive Downvids
- Exploring Next-Gen Coding Is AV1 Superior to VP9, In 2024
- Free Online Subtitle Converters Our Recommended 10 for 2024
- Ghostly North Carolina | Free Book
- How to Fix Unfortunately, Contacts Has Stopped Error on Vivo V27 Pro | Dr.fone
- In 2024, Best Pokemons for PVP Matches in Pokemon Go For Samsung Galaxy S23 Ultra | Dr.fone
- In 2024, Exploring the Vivid World with Curved Images
- Unlocking the Secrets of Your Mac: Reveal Hidden Files Using Terminal
- Will Pokémon Go Ban the Account if You Use PGSharp On Apple iPhone 6s | Dr.fone
- Title: Ubuntu Compatibility with Windows 11: A Guide to Running Linux Applications
- Author: Frank
- Created at : 2025-02-18 17:19:22
- Updated at : 2025-02-19 17:00:53
- Link: https://some-techniques.techidaily.com/ubuntu-compatibility-with-windows-11-a-guide-to-running-linux-applications/
- License: This work is licensed under CC BY-NC-SA 4.0.