
"In 2024, High Dynamic Range Luminance's Impact Review"
High Dynamic Range: Luminance’s Impact Review
Creating HDR images ‘High Dynamic Range Images’ involves combining several narrow range images with multiple exposures. And as we all know, digital cameras can only capture images with differentiation in a specific range of luminosity.
You need reliable HDR software to be able to create HDR images. Luminance HDR is one of the top software that many people want to have at their fingertips. But is the tool worth it? Does it have all it takes to satisfy your HDR image creation and editing needs? Well, this post has the right answers to these questions and lots more. So, stick around to find out more.
Part 1: Summary Box on Luminance HDR
Luminance HDR is a digital graphics software that is used for the creation and editing of ‘High Dynamic Range Images. Formerly known as Qtpfsgui, this tool is a free and open-source program that not only facilitates the workflow for HDR imaging but also LDR imaging.
Effectiveness: Highly effective, but with some confusing features.
Price: Free
Supported OS: Windows, Mac OS, Linux
Ease to use: 3.5/5
Best for: Creating and editing HDR images
Value for Money: The tool is free
Support: 0/5
Our Verdict: Luminance HDR is a very effective HDR software with a wide range of functionalities.
The tool boasts up to six photo blending algorithms for users to take advantage of in a fairly responsive interface.
It supports a wide range of decent features ranging from alignment to deghosting, EV-based histogram, and lots more. But the only thing is some features are confusing, making it quite challenging.
Also, enabling features like ‘alignment and deghosting could cause the program to crash.
What we like
- It offers a wide range of functionalities despite being a free and open-source tool.
- High compatibility with both Mac and Windows computers.
- Allows Batch HDR merging.
- It can read images in RAW, JPEG, PNG, and lots more formats smoothly.
- The tool supports lots of helpful features that users can always take advantage of in both the fusion stage and tone mapping stage.
- Support up to six photo blending algorithms.
- The tool support multiple languages.
What we don’t like
- Some of its features are confusing.
- The interface could be better.
HDR expands the range of contrasts and color of images significantly. Thus, making bright sides brighter and colors become expanded so every detail of the images would be seen without stress.
Besides, there are various HDR formats including Dolby vision, generic, and lots more. It is even used in TVs to enrich colors with content that supports it.
Since HDR photography requires a narrow range of digital images with multiple exposures, it’s essential you have the right HDR software at your fingertips to be able to calculate the high contrast image, combine the images, and do lots more efficiently.
That being said, let’s dive into a detailed review on Luminance HDR to find out more about how the tool can help users in their endeavors to create/edit HDR images
Part 2: Review in detail on Luminance HDR
Luminance HDR software is a free tool and it offers users a simple way to create and edit HDR images efficiently. It identifies data correctly and it supports lots of decent features that users can take advantage of when executing HDR image editing or creation tasks.
In the current development after almost two years, Luminance HDR has optimized different aspects to fix bugs, enhance its speed, and lots more. Some new developments introduced include a better CLI interface, better HDPI support, automatic adjustments of LDRs levels, a new Dark theme, and fast export.
We’ve outlined some of the features of Luminance HDR below;
- HDR Editing
In terms of editing, you can rely on Luminance HDR for cool editing features that can always come in handy when you’re looking to edit HDR images. From resizing to cropping, rotating, etc. Keep reading to know more about the editing featured on Luminance HDR.
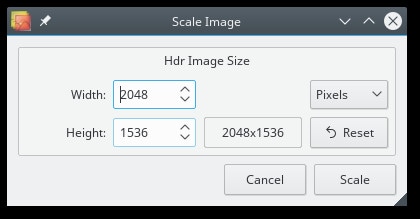
Resize: ‘Resize’ can be used to resize HDR images to a preferred pixel or percentage value just by clicking the ‘Scale’ button.
To utilize this feature, just navigate to Edit and select ‘Resize’ from the menu. Then enter a value in percentage or pixel and click the ‘Scale’ button to resize your HDR image instantly.
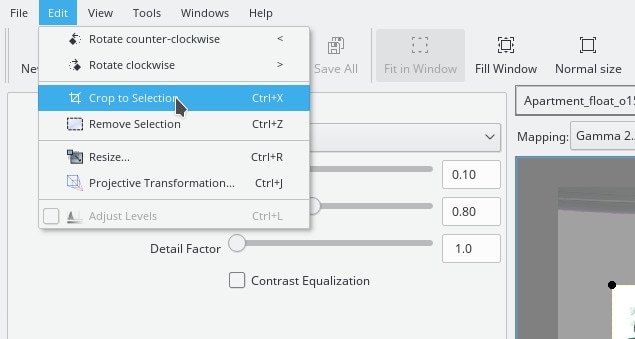
Crop: Once you upload your HDR image to Luminous HDR, you can just click anywhere on it, then drag the mouse pointer that appears to a side and release it to crop the image.
Also, you can use the ‘Crop’ feature to edit the frame you created by dragging its corners. After you’ve edited the HDR image frame to the required level, you can crop it using the relevant button in the toolbar or use the ‘Edit’ option to select ‘Crop to Selection’ in the menu.
Rotate: Rotate HDR images up to 90 degrees by using the < and > shortcuts or the ‘Clockwise’ and ‘Counter-Clockwise’ commands under the Edit menu. You can rotate images up to
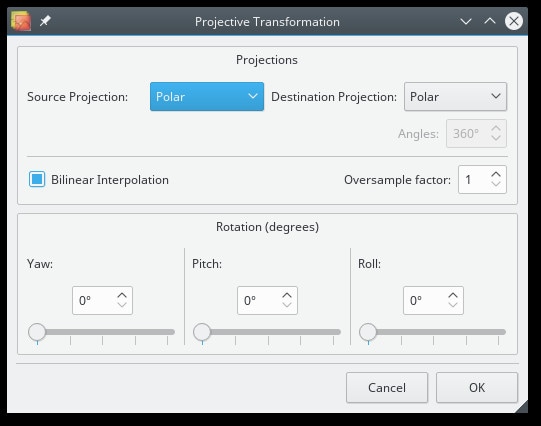
Project Transformation: The project transformation tool is effective to shoot mirrorball Hdrs and unwrap them.
Under ‘Project Transformation’ you can set rotation degree, add source projection, and do lots more.
- HDR Processing
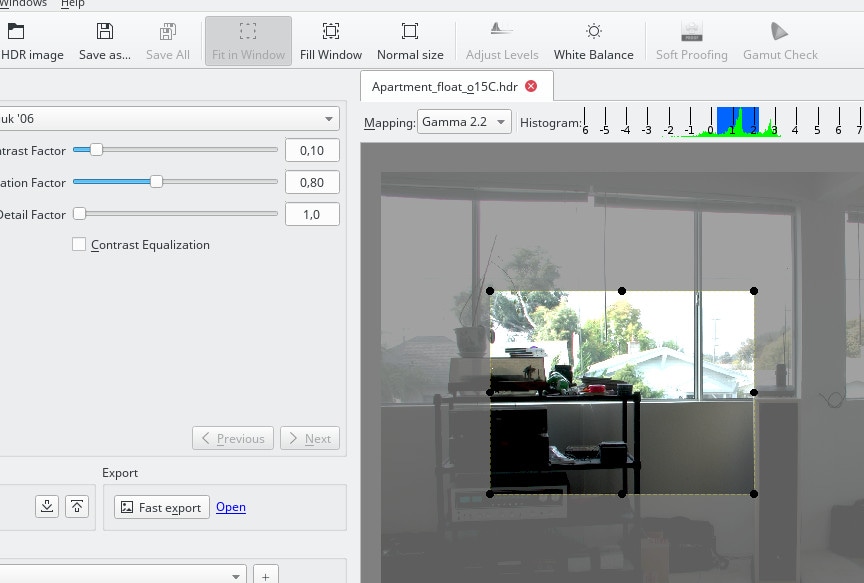
Luminance HDR separates the processing of HDR images into two phases: The creation of HDR images and its conversion to an LDR image. The creation and tone mapping of HDR images are interactive using GUI, and images can be enhanced using quality features. The image loading speed is quite fair. So, in all, we could say the Luminance HDR processing is reliable.
- UI and Layout
The Luminous HDR interface is fairly responsive, but some of the features are quite confusing, making it challenging. Users can set a preferred interface theme and set it if they want it to always show in the preview panel window.
Also, you can utilize ‘Portable’ mode to put the Luminous HDR application on a USB stick with its settings.

Pro Tips: How to Edit HDR videos on your Desktop?
Unfortunately, Luminous HDR is limited to only editing HDR images. But what if you want to edit HDR videos on your desktop, how do you go about that? Well, there does the help of a powerful HDR video editing software like Filmora comes into the game.
Filmora is professional video editing software that’s packed with lots of sophisticated features that facilitates quick and easy video editing tasks. Supported on both Mac and Windows computers, this tool allows users to perform both basic and advanced video editing effortlessly.
Free Download For Win 7 or later(64-bit)
Free Download For macOS 10.14 or later
Key Features
- Support a fully featured effects library with over 300 beauty and fashion filters that can be added to videos.
- Tools like Chroma Key Effect, Time lapse, or image stabilization are effective for advanced video editing.
- Edit HDR video without washed out colors in just a few clicks.
- The software is lightweight and it doesn’t compromise computer functionality.
How to use Filmora Video Editor to Edit HDR Videos
Step1Download & Install Filmora
Download Filmora video editor software from the official website and install it on your Mac or Windows computer.
Step2Launch Filmora
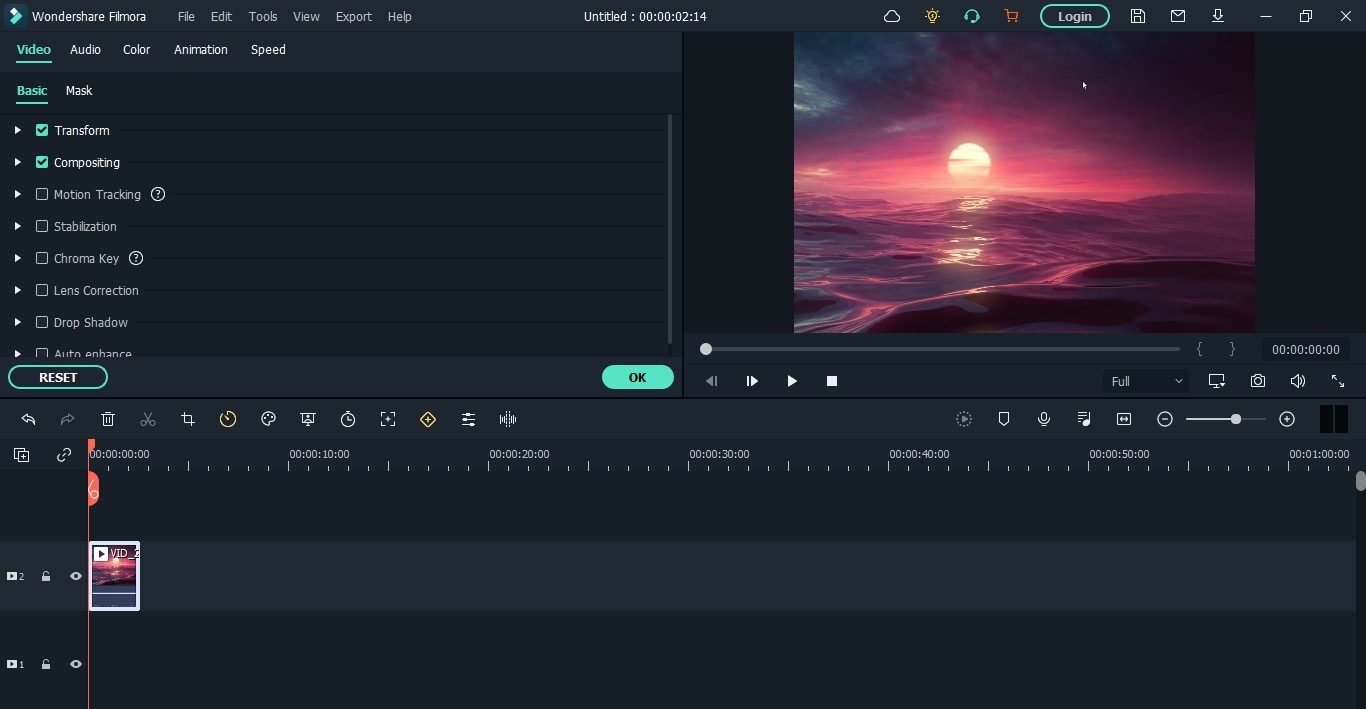
Double click on the Filmora icon to start the program. Then click on ‘New Project’. Also, select the project aspect ratio by clicking the drop-down icon under ‘Select Project Aspect Ratio’.
Step3Import HDR Video
Navigate to the top left corner of your computer screen and click on ‘Import’ to upload the HDR video you’re looking to edit.

- You will also see the ‘Import with Instant Cutter Tool’ option - this allows you to trim HDR videos fast and conveniently.
Step4Edit HDR Video
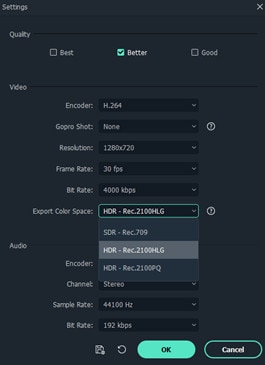
Now, click the ‘Register’ button, then navigate to the ‘File’ menu and select ‘Project Settings. Then, click on the ‘Color Space’ drop-down and select ‘HDR Parameter Value’. The default value is SDR - Rec.709.
You can also trim and cut your HDR video according to your requirements by dragging the end of the video left or right, apply visual effects, and correct color.
Step5Share & Export Edited HDR Video
Finally, click on ‘Export’, then in the Output window, select the desired video format, ‘Quality’, storage location, and other settings.
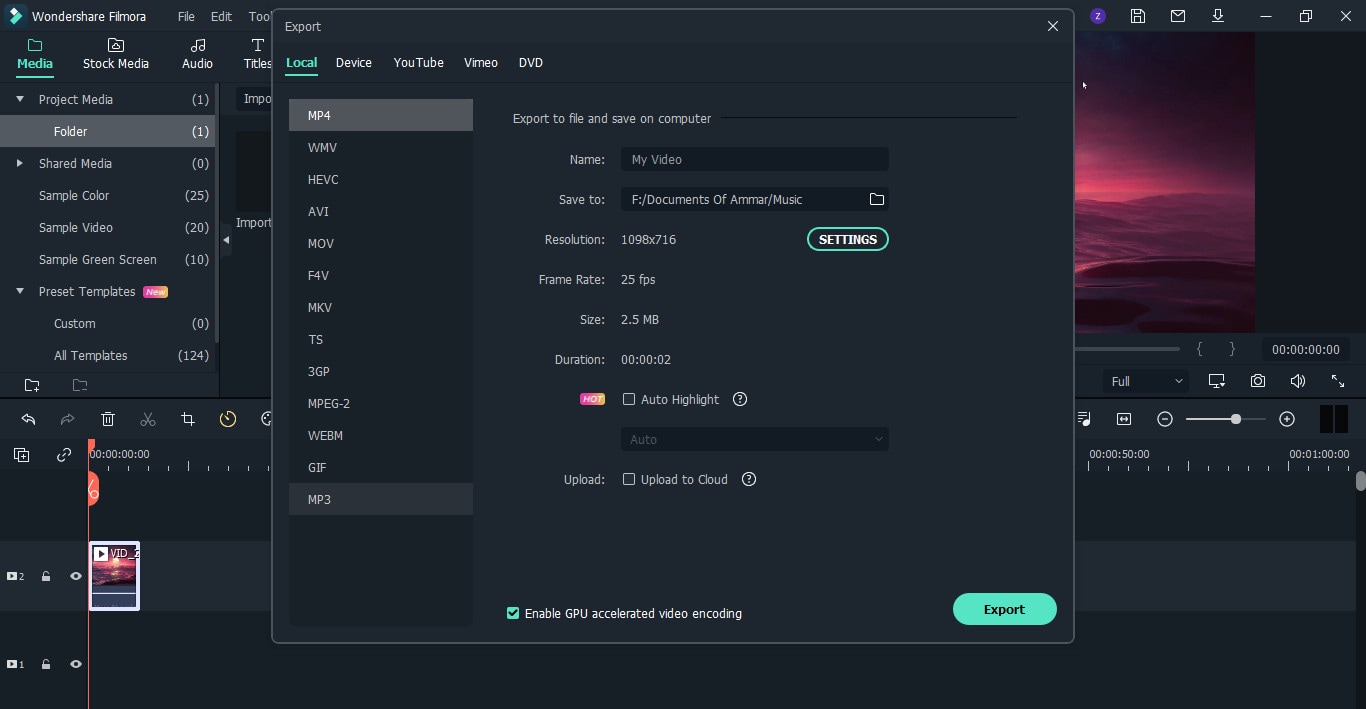
- Also, click the ‘Export Color Space’ drop/down icon and select the video output HDR quality. Then, hit the ‘OK’ button to complete the operation. Filmora also allows users to share edited videos to third-party platforms like Vimeo and YouTube.
Final Words
Truth be told, Luminance HDR is a great tool for creating/editing HDR images. Yes, despite being free the tool is very flexible and it has the capability of helping users give their HDR image a realistic and surrealistic look. It doesn’t matter what kind of operation you want to perform on your HDR image, Luminance HDR can help you achieve it once you master the features perfectly.
In addition to that, if you’re looking to edit HDR videos with high quality, we highly recommend using the powerful Filmora video editing software for a seamless editing task.
Free Download For Win 7 or later(64-bit)
Free Download For macOS 10.14 or later
Free Download For macOS 10.14 or later
Key Features
- Support a fully featured effects library with over 300 beauty and fashion filters that can be added to videos.
- Tools like Chroma Key Effect, Time lapse, or image stabilization are effective for advanced video editing.
- Edit HDR video without washed out colors in just a few clicks.
- The software is lightweight and it doesn’t compromise computer functionality.
How to use Filmora Video Editor to Edit HDR Videos
Step1Download & Install Filmora
Download Filmora video editor software from the official website and install it on your Mac or Windows computer.
Step2Launch Filmora
Double click on the Filmora icon to start the program. Then click on ‘New Project’. Also, select the project aspect ratio by clicking the drop-down icon under ‘Select Project Aspect Ratio’.
Step3Import HDR Video
Navigate to the top left corner of your computer screen and click on ‘Import’ to upload the HDR video you’re looking to edit.
- You will also see the ‘Import with Instant Cutter Tool’ option - this allows you to trim HDR videos fast and conveniently.
Step4Edit HDR Video
Now, click the ‘Register’ button, then navigate to the ‘File’ menu and select ‘Project Settings. Then, click on the ‘Color Space’ drop-down and select ‘HDR Parameter Value’. The default value is SDR - Rec.709.
You can also trim and cut your HDR video according to your requirements by dragging the end of the video left or right, apply visual effects, and correct color.
Step5Share & Export Edited HDR Video
Finally, click on ‘Export’, then in the Output window, select the desired video format, ‘Quality’, storage location, and other settings.
- Also, click the ‘Export Color Space’ drop/down icon and select the video output HDR quality. Then, hit the ‘OK’ button to complete the operation. Filmora also allows users to share edited videos to third-party platforms like Vimeo and YouTube.
Final Words
Truth be told, Luminance HDR is a great tool for creating/editing HDR images. Yes, despite being free the tool is very flexible and it has the capability of helping users give their HDR image a realistic and surrealistic look. It doesn’t matter what kind of operation you want to perform on your HDR image, Luminance HDR can help you achieve it once you master the features perfectly.
In addition to that, if you’re looking to edit HDR videos with high quality, we highly recommend using the powerful Filmora video editing software for a seamless editing task.
Free Download For Win 7 or later(64-bit)
Free Download For macOS 10.14 or later
Also read:
- [New] Amp Up Illumination Basic Steps to Lighten iPhone Films
- [New] Expert Tips on Selecting Best FREE SRT Tools
- [New] Ingenious Stop-Motion Cinema - Ranking the Best 15
- [Updated] Android & iPhone Select Top-Tier Mobile Multimedia Tools
- [Updated] Dissecting YouTubes' User Commentary for 2024
- [Updated] Superior Selection Winning 16 Free Video Tools
- 2024 Approved Focus Freshness The Ultimate Clear Image Software Guide
- 2024 Approved Innovative Social Media Collages Made Fast
- 免費で簡単に変換!オンラインMOVフォーマットの移行 - ムバヴィ
- Best Drone Selections for Young Pilots and Rookie Flyers
- Hilarity Renderings Kapwing's Image Craft for 2024
- How Does a Whole-Sphere Video Work for 2024
- In 2024, Harnessing LUT Power for Free, High-Quality Colorization
- In 2024, How to Unlock Apple iPhone SE Without Passcode?
- Top 12 Prominent Realme GT Neo 5 Fingerprint Not Working Solutions
- Troubleshooting and Resolving 'No Audio Output' Issues in Windows 11
- Title: In 2024, High Dynamic Range Luminance's Impact Review
- Author: Frank
- Created at : 2024-12-27 20:21:31
- Updated at : 2025-01-01 22:48:34
- Link: https://some-techniques.techidaily.com/in-2024-high-dynamic-range-luminances-impact-review/
- License: This work is licensed under CC BY-NC-SA 4.0.