In 2024, Ghostly Replay Instructional Guide
Ghostly Replay Instructional Guide
A phantom slow-motion camera is a specialized high-speed camera that is used to capture extremely fast-moving objects or phenomena. These cameras are often used in scientific research or to capture footage of extraordinary events. Phantom slow-motion cameras are capable of capturing images at very high speeds, often exceeding 1 million frames per second.
A phantom slow-motion camera is a high-speed camera that uses image sensor technology to capture fast-moving objects or events. These cameras are often used in scientific and industrial applications where motion analysis is needed. Phantom cameras can capture up to 1,000 frames per second (fps), allowing for detailed analysis of fast-moving objects or events.
The use of a phantom super slow-motion camera has numerous benefits for both filmmakers and spectators. For filmmakers, slow motion allows them to capture fast-paced action sequences that would otherwise be too difficult or dangerous to film. For spectators, slow motion can provide a new level of immersion and understanding of the action taking place on the screen. It can help to create an emotional connection to the characters and events occurring in the film.
- Why do we need a phantom slow-motion camera?
- How to create a time-lapse video on a phantom slow-motion camera
Part 1: How to Use Phantom Slow Motion Camera
Slow-motion recordings are very popular in today’s society. This is because people can see and appreciate the world around them. People are also able to show off their skills in a new light. The Phantom camera is a great way to capture slow-motion recordings. There are many different ways to use the Phantom camera, but here are some tips on how to get started.
Step1 Purchase a phantom camera and select subject
First, you will need to purchase a Phantom camera. You can find these cameras online or at your local camera store. Once you have your camera, you will need to choose a subject.
Step2 Pick an authentic subject
It is important to pick something that will move slowly or that you can control the speed of. For example, a water droplet or a leaf falling from a tree.
Step3 Setup your camera
The camera will then capture the movement in slow motion, allowing you to see the beauty of the movement that would otherwise be missed.
Why do we need a phantom slow-motion camera?
There are many reasons why someone might want or need to use a phantom slow-motion camera. For example, law enforcement officials can use them to capture footage of high-speed car chases or accidents. Scientists can use them to study fast-moving objects or phenomena. And sports enthusiasts can use them to study the movements of athletes and improve their performance.
Phantom cameras are the newest type of camera on the market that can capture slow-motion footage at an incredibly high speed. These cameras can record up to 2.5 million frames per second, which is significantly higher than any other type of camera. No matter what the reason, phantom slow-motion cameras are an essential tool for anyone who needs to capture fast-moving objects.
One of the most popular ways to use a phantom slow-motion camera is to capture beautiful slow-motion footage of nature. This can be done by setting up the camera in a location where there is a lot of natural movement. The camera will then capture the movement in slow motion, allowing you to see the beauty of the movement that would otherwise be missed.
How to create a time-lapse video on a phantom slow-motion camera
A phantom slow-motion camera is a special type of camera that can be used to create time-lapse videos. Time-lapse videos are created by taking a series of photos or videos over a while and then playing them back at a faster speed. This gives the appearance of time moving faster or slower than it is. To create a time-lapse video using a phantom slow-motion camera, you will need the following:
- A phantom slow-motion camera
- A tripod
- A remote shutter releases
- A time-lapse video editing software
Once you have all of the necessary equipment, you will need to set up your camera on the tripod and position it in the desired location. Then, you will need to set the camera to record in slow motion. Once the camera is recording, you will need to use the remote shutter release to take a picture every few seconds.
Depending on the length of the video you want to create, you may need to take thousands of pictures. Once you have all of the pictures, you will need to use a time-lapse video editing software to put them all together.
 The Tube Sites Submitter is a fast and efficient tool for anyone who needs to upload videos quickly, easily and automatically to hundreds of tube sites in mere minutes .
 Part 2: How to edit time-lapse video on a computer
If you’ve ever been to a nature preserve, you know that the best way to see it is with your own eyes. But what if you don’t have time to go out and look at the wildlife? What if you’re stuck in traffic or at work? What if there’s a storm? Or what if it’s dark out and you can’t see anything?
The answer is simple: You need to edit time-lapse on your computer. You’ll be able to edit time-lapse with ease so that you can get the most from your experience of watching animals in their natural habitat. You’ll be able to make sure that everything looks great from the lighting to your camera angle and even just how fast everything moves.
Editing time-lapse video on a computer is not as easy as it sounds. It takes a lot of work and dedication to get the results you want. However, if you’re willing to do the work and put in the time, you’ll be able to get amazing results!
The first step is to make sure that your camera is set up correctly. Make sure that there are no objects blocking your view, and that the camera is within range of your subject (in case they move). Try to keep things as simple as possible things like dark backgrounds or colored lights will distract from your footage.
Next, open up any programs or software that might be helpful for editing time-lapses. If you’re using Filmora , head over to the “Timeline” tab and select “Create a new project.” From here, you can choose which program or video you’d like to use for editing.
Edit video with Filmora
Filmora is the best video editing software available. It gives you the tools you need to edit your videos and make them look amazing. The fact that it’s easy to use, and has tons of features and options. Using the right tools at the right time will help you create something great that people will enjoy watching over and over again.
With video, you can share your story with the world, show off your skills and talents, or just entertain yourself. You can do all of this in a short amount of time, which makes it perfect for sharing on social media platforms like Facebook or Instagram. But if you want to get the most out of your videos, you’ll need to edit them and that’s where Filmora comes in!
Filmora is a powerful program designed specifically for editing videos. It has everything you need to make your videos look amazing and sound great—no matter what kind of camera you have or how much experience you have when filming them. Whether it’s a DSLR camera or an iPhone, Filmora has everything you need to make beautiful videos that people will love watching over and over again!
Step to edit video on Filmora:
In addition to being able to edit videos quickly and easily, Filmora also offers features like music mixing and audio recording so that even if you don’t know how to edit videos before starting work on yours, there will still be plenty of tools available for you as well as some tutorials on YouTube if needed! Let’s have a look at some steps to edit a video on Filmora.
Step1 Open Filmora and create a new project
You can easily install Filmora for free, after installing click on it three options will appear but you have to select the first one which is Create a new project.

Step2 Add some media to edit
After creating a new project, there is an option to add media you can your the video which you want to edit.

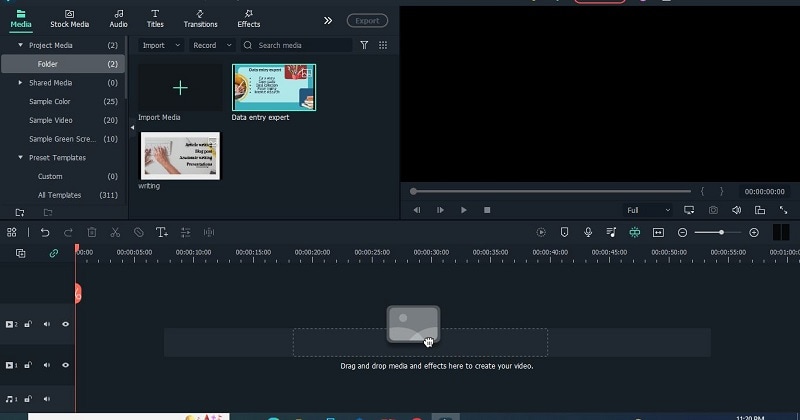
Step3 Drop the media to timeline
Drag and drop your videos on the timeline to start the editing. Once you placed your videos on timelines put the video header at the front.
 OtsAV TV Webcaster
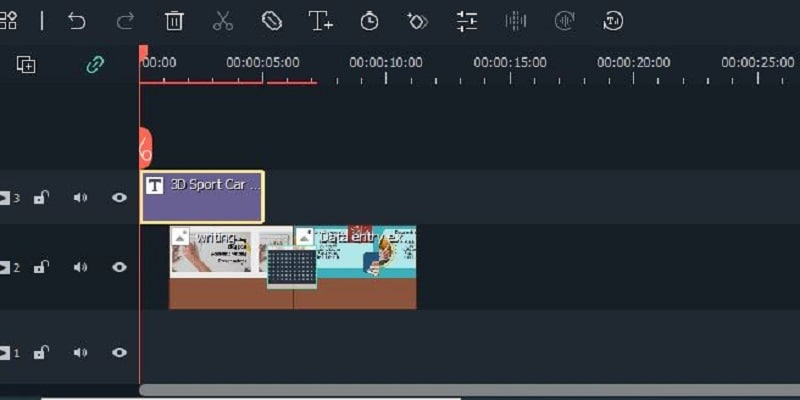
Step4 Add titles, effects, and transitions to your video
Filmora provides several titles, effects, and transitions. You can add them according to your needs. If you want to make a time-lapse video then you can copy your video and paste it on the end of the first video, so that you can make a time-lapse video. But if you add the dissolve transition between them then your video will become so smooth.

Step5 Export to your desktop
When you want to save your video or share it on social media just click on the export button. It will provide you with different features like you can export your video on a desktop or where ever you want. You can export it in HD form.


Conclusion
We need to use a phantom slow-motion camera since most of us will be realized the truth is that we live in a world that change very quickly. We want to keep up with changes around us so we want to capture everything with our camera. We will never stop pursuing perfection because the perfection goal is always moving further and further away from us.
As filmmakers and video lovers, we have come up with some solid examples of times when a Phantom slow-motion camera would have been the ideal filming tool. When it comes to testing out your skills on higher-end equipment and a piece of software that can withstand the toughest conditions, then Filmora is the one to do so with!
Free Download For Win 7 or later(64-bit)
Free Download For macOS 10.14 or later
Part 1: How to Use Phantom Slow Motion Camera
Slow-motion recordings are very popular in today’s society. This is because people can see and appreciate the world around them. People are also able to show off their skills in a new light. The Phantom camera is a great way to capture slow-motion recordings. There are many different ways to use the Phantom camera, but here are some tips on how to get started.
Step1 Purchase a phantom camera and select subject
First, you will need to purchase a Phantom camera. You can find these cameras online or at your local camera store. Once you have your camera, you will need to choose a subject.
Step2 Pick an authentic subject
It is important to pick something that will move slowly or that you can control the speed of. For example, a water droplet or a leaf falling from a tree.
Step3 Setup your camera
The camera will then capture the movement in slow motion, allowing you to see the beauty of the movement that would otherwise be missed.
Why do we need a phantom slow-motion camera?
There are many reasons why someone might want or need to use a phantom slow-motion camera. For example, law enforcement officials can use them to capture footage of high-speed car chases or accidents. Scientists can use them to study fast-moving objects or phenomena. And sports enthusiasts can use them to study the movements of athletes and improve their performance.
Phantom cameras are the newest type of camera on the market that can capture slow-motion footage at an incredibly high speed. These cameras can record up to 2.5 million frames per second, which is significantly higher than any other type of camera. No matter what the reason, phantom slow-motion cameras are an essential tool for anyone who needs to capture fast-moving objects.
One of the most popular ways to use a phantom slow-motion camera is to capture beautiful slow-motion footage of nature. This can be done by setting up the camera in a location where there is a lot of natural movement. The camera will then capture the movement in slow motion, allowing you to see the beauty of the movement that would otherwise be missed.
How to create a time-lapse video on a phantom slow-motion camera
A phantom slow-motion camera is a special type of camera that can be used to create time-lapse videos. Time-lapse videos are created by taking a series of photos or videos over a while and then playing them back at a faster speed. This gives the appearance of time moving faster or slower than it is. To create a time-lapse video using a phantom slow-motion camera, you will need the following:
- A phantom slow-motion camera
- A tripod
- A remote shutter releases
- A time-lapse video editing software
Once you have all of the necessary equipment, you will need to set up your camera on the tripod and position it in the desired location. Then, you will need to set the camera to record in slow motion. Once the camera is recording, you will need to use the remote shutter release to take a picture every few seconds.
Depending on the length of the video you want to create, you may need to take thousands of pictures. Once you have all of the pictures, you will need to use a time-lapse video editing software to put them all together.
Part 2: How to edit time-lapse video on a computer
If you’ve ever been to a nature preserve, you know that the best way to see it is with your own eyes. But what if you don’t have time to go out and look at the wildlife? What if you’re stuck in traffic or at work? What if there’s a storm? Or what if it’s dark out and you can’t see anything?
The answer is simple: You need to edit time-lapse on your computer. You’ll be able to edit time-lapse with ease so that you can get the most from your experience of watching animals in their natural habitat. You’ll be able to make sure that everything looks great from the lighting to your camera angle and even just how fast everything moves.
Editing time-lapse video on a computer is not as easy as it sounds. It takes a lot of work and dedication to get the results you want. However, if you’re willing to do the work and put in the time, you’ll be able to get amazing results!
The first step is to make sure that your camera is set up correctly. Make sure that there are no objects blocking your view, and that the camera is within range of your subject (in case they move). Try to keep things as simple as possible things like dark backgrounds or colored lights will distract from your footage.
Next, open up any programs or software that might be helpful for editing time-lapses. If you’re using Filmora , head over to the “Timeline” tab and select “Create a new project.” From here, you can choose which program or video you’d like to use for editing.
Edit video with Filmora
Filmora is the best video editing software available. It gives you the tools you need to edit your videos and make them look amazing. The fact that it’s easy to use, and has tons of features and options. Using the right tools at the right time will help you create something great that people will enjoy watching over and over again.
With video, you can share your story with the world, show off your skills and talents, or just entertain yourself. You can do all of this in a short amount of time, which makes it perfect for sharing on social media platforms like Facebook or Instagram. But if you want to get the most out of your videos, you’ll need to edit them and that’s where Filmora comes in!
Filmora is a powerful program designed specifically for editing videos. It has everything you need to make your videos look amazing and sound great—no matter what kind of camera you have or how much experience you have when filming them. Whether it’s a DSLR camera or an iPhone, Filmora has everything you need to make beautiful videos that people will love watching over and over again!
Step to edit video on Filmora:
In addition to being able to edit videos quickly and easily, Filmora also offers features like music mixing and audio recording so that even if you don’t know how to edit videos before starting work on yours, there will still be plenty of tools available for you as well as some tutorials on YouTube if needed! Let’s have a look at some steps to edit a video on Filmora.
Step1 Open Filmora and create a new project
You can easily install Filmora for free, after installing click on it three options will appear but you have to select the first one which is Create a new project.
 PearlMountain Image Converter
Step2 Add some media to edit
After creating a new project, there is an option to add media you can your the video which you want to edit.
Step3 Drop the media to timeline
Drag and drop your videos on the timeline to start the editing. Once you placed your videos on timelines put the video header at the front.
Step4 Add titles, effects, and transitions to your video
Filmora provides several titles, effects, and transitions. You can add them according to your needs. If you want to make a time-lapse video then you can copy your video and paste it on the end of the first video, so that you can make a time-lapse video. But if you add the dissolve transition between them then your video will become so smooth.
Step5 Export to your desktop
When you want to save your video or share it on social media just click on the export button. It will provide you with different features like you can export your video on a desktop or where ever you want. You can export it in HD form.
Conclusion
We need to use a phantom slow-motion camera since most of us will be realized the truth is that we live in a world that change very quickly. We want to keep up with changes around us so we want to capture everything with our camera. We will never stop pursuing perfection because the perfection goal is always moving further and further away from us.
As filmmakers and video lovers, we have come up with some solid examples of times when a Phantom slow-motion camera would have been the ideal filming tool. When it comes to testing out your skills on higher-end equipment and a piece of software that can withstand the toughest conditions, then Filmora is the one to do so with!
Free Download For Win 7 or later(64-bit)
Free Download For macOS 10.14 or later
- Title: In 2024, Ghostly Replay Instructional Guide
- Author: Frank
- Created at : 2024-07-26 14:18:33
- Updated at : 2024-07-27 14:18:33
- Link: https://some-techniques.techidaily.com/in-2024-ghostly-replay-instructional-guide/
- License: This work is licensed under CC BY-NC-SA 4.0.