
How to Bring Back Your Preferred Photo Viewer in Win 11 for 2024
How to Bring Back Your Preferred Photo Viewer in Win 11
How to Restore Windows Photo Viewer in Windows 10

Shanoon Cox
Mar 27, 2024• Proven solutions
Well, with advancement in technology, everyone is upgrading to a better version of everything out there. Likewise, when Windows Photo Viewer got upgraded to Windows 10 Photos and a plethora of new features got added to it.
But, what if you are not keen to depart with your Windows Photo Viewer and rather do away with the Windows 10 Photos App? In order to restore Windows Photo Viewer, we have multiple solutions for you in this article.
Stay tuned to learn more!
- Part1: Why you prefer Windows Photo Viewer
- Part2: Method 1 to restore Windows Photo Viewer
- Part3: Method 2 to get Windows Photo Viewer back

WPS Office Premium ( File Recovery, Photo Scanning, Convert PDF)–Yearly
Part 1: Why you prefer Windows Photo Viewer
We would like to explain why most people are still not over Windows Photo Viewer? The good old Photo Viewer has quiet loyal fans out there singing its glory. This portion of the article comprises of the highs about Windows Photo Viewer.
Here is why they want to restore Windows Photo Viewer –
- Windows Photo Viewer offers a better UI, allowing you to get everything at the bottom of the screen. It speeds up access, whereas Windows 10 Photos UI at times hidden. Unless you move the mouse around the entire screen for switching between photos.
- The scroll wheel enables you to precisely zoom faster.
- There is no slide effect between images nor does it show the splash/delay screen while initiating the app. It ensures faster action sans unnecessary enhancements.
- You can use forward or back on mouse to move to the next or previous photo.
- You can see the photo’s name in Windows Photos Viewer.
- Right-click allows you to access copy, open with, properties etc. option for your photos on the Windows computer.
- You can pause to view a single picture using full-screen mode.
- You can view the image in actual size using the UI button without any scaling.
- There is a solid UI across the image which doesn’t cover it, but works as a nice border.
- You can delete an image without any confirmation here.


Though, Windows 10 Photos offers a dark theme, the effectiveness, responsiveness and features available with Windows Photo Viewer are hard to compromise.
Method 1 to restore Windows Photo Viewer
The first method speaks about, when you have upgraded from a Windows 7/8/8.1 computer to Windows 10. You can easily swing back to your most loved Windows Photo Viewer within no time. Here is the detailed guide –
Step 1: Go to ‘Settings’ and open ‘Apps’. Click on ‘Default Apps’ and check ‘Photo Viewer’. The default photo viewer will be visible here.
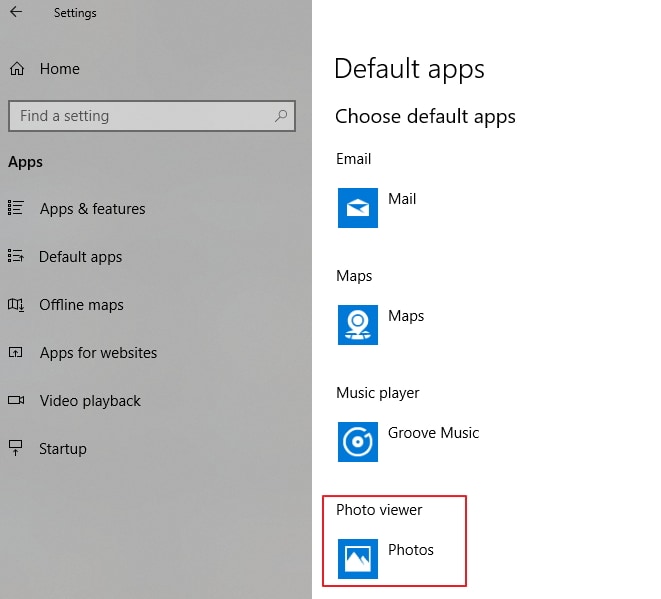
Step 2: Click on the present photo viewer app over there and look for ‘Windows Photo Viewer’. We assume that you have upgraded from an older version on Windows and Windows Photo Viewer is there in the options.
Step 3: Tap on ‘Windows Photo Viewer’ and then exit ‘Settings’. Now, you have successfully restored Windows Photo Viewer and you can open photos in Windows Photo Viewer.
Method 2 to get Windows Photo Viewer back
Here comes another way to restore Windows Photo Viewer on your computer. If your computer has been upgraded to Windows 10 from an older version, then Windows Photo Viewer might be lying around somewhere. You can retrieve it to view images.
Here is the detailed guide –
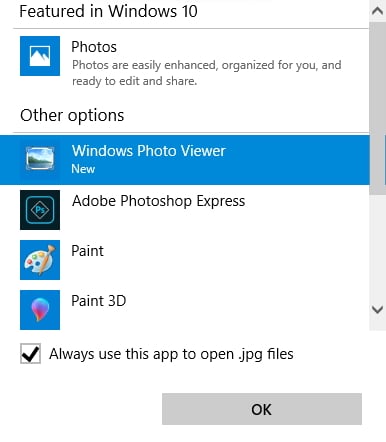
Step 1 – Go to the image or picture folder on your Windows 10 computer and right click on any image. Now, choose ‘Open With’ and click on ‘Choose another app’.
Step 2 – Tap the ‘More apps’ option here in case, you can’t find out the Windows Photo Viewer within the list.
Step 3 – Keep scrolling towards the bottom of the screen to find out ‘Windows Photo Viewer’. If ‘Windows Photo Viewer’ is visible, then it has been installed there and you can use it without any problem.
Note: If the Windows Photo Viewer isn’t there, here is a backup. You need to change Windows Registry to make Windows Photo Viewer returned. You need to go to Edwin over on Ten Forums to add code on your PC.

Conclusion
From the above article, we found out that restoring Windows Photo Viewer on your system is not a tough task. But, without having the proper knowledge you shouldn’t play around with your Photos app. So, this article guides you through a reliable method for restoring Windows Photo Viewer and view your photos like you always loved to. We hope you liked our efforts of enlightening you about Windows Photo Viewer and got the necessary information. Plus, if none of these work, you can use Windows 10 Photos app alternatives . Thanks for reading! Do comment us below to let us know your views.
 Easy and Safe Partition Software & Hard Disk Manager
Shanoon Cox
Shanoon Cox is a writer and a lover of all things video.
Follow @Shanoon Cox
Shanoon Cox
Mar 27, 2024• Proven solutions
Well, with advancement in technology, everyone is upgrading to a better version of everything out there. Likewise, when Windows Photo Viewer got upgraded to Windows 10 Photos and a plethora of new features got added to it.
But, what if you are not keen to depart with your Windows Photo Viewer and rather do away with the Windows 10 Photos App? In order to restore Windows Photo Viewer, we have multiple solutions for you in this article.
Stay tuned to learn more!
- Part1: Why you prefer Windows Photo Viewer
- Part2: Method 1 to restore Windows Photo Viewer
- Part3: Method 2 to get Windows Photo Viewer back

Part 1: Why you prefer Windows Photo Viewer
We would like to explain why most people are still not over Windows Photo Viewer? The good old Photo Viewer has quiet loyal fans out there singing its glory. This portion of the article comprises of the highs about Windows Photo Viewer.
Here is why they want to restore Windows Photo Viewer –
- Windows Photo Viewer offers a better UI, allowing you to get everything at the bottom of the screen. It speeds up access, whereas Windows 10 Photos UI at times hidden. Unless you move the mouse around the entire screen for switching between photos.
- The scroll wheel enables you to precisely zoom faster.
- There is no slide effect between images nor does it show the splash/delay screen while initiating the app. It ensures faster action sans unnecessary enhancements.
- You can use forward or back on mouse to move to the next or previous photo.
- You can see the photo’s name in Windows Photos Viewer.
- Right-click allows you to access copy, open with, properties etc. option for your photos on the Windows computer.
- You can pause to view a single picture using full-screen mode.
- You can view the image in actual size using the UI button without any scaling.
- There is a solid UI across the image which doesn’t cover it, but works as a nice border.
- You can delete an image without any confirmation here.
Though, Windows 10 Photos offers a dark theme, the effectiveness, responsiveness and features available with Windows Photo Viewer are hard to compromise.
Method 1 to restore Windows Photo Viewer
The first method speaks about, when you have upgraded from a Windows 7/8/8.1 computer to Windows 10. You can easily swing back to your most loved Windows Photo Viewer within no time. Here is the detailed guide –
Step 1: Go to ‘Settings’ and open ‘Apps’. Click on ‘Default Apps’ and check ‘Photo Viewer’. The default photo viewer will be visible here.
Step 2: Click on the present photo viewer app over there and look for ‘Windows Photo Viewer’. We assume that you have upgraded from an older version on Windows and Windows Photo Viewer is there in the options.
Step 3: Tap on ‘Windows Photo Viewer’ and then exit ‘Settings’. Now, you have successfully restored Windows Photo Viewer and you can open photos in Windows Photo Viewer.
Method 2 to get Windows Photo Viewer back
Here comes another way to restore Windows Photo Viewer on your computer. If your computer has been upgraded to Windows 10 from an older version, then Windows Photo Viewer might be lying around somewhere. You can retrieve it to view images.
Here is the detailed guide –
Step 1 – Go to the image or picture folder on your Windows 10 computer and right click on any image. Now, choose ‘Open With’ and click on ‘Choose another app’.
Step 2 – Tap the ‘More apps’ option here in case, you can’t find out the Windows Photo Viewer within the list.
Step 3 – Keep scrolling towards the bottom of the screen to find out ‘Windows Photo Viewer’. If ‘Windows Photo Viewer’ is visible, then it has been installed there and you can use it without any problem.
Note: If the Windows Photo Viewer isn’t there, here is a backup. You need to change Windows Registry to make Windows Photo Viewer returned. You need to go to Edwin over on Ten Forums to add code on your PC.
 The Tube Sites Submitter is a fast and efficient tool for anyone who needs to upload videos quickly, easily and automatically to hundreds of tube sites in mere minutes .
Conclusion
From the above article, we found out that restoring Windows Photo Viewer on your system is not a tough task. But, without having the proper knowledge you shouldn’t play around with your Photos app. So, this article guides you through a reliable method for restoring Windows Photo Viewer and view your photos like you always loved to. We hope you liked our efforts of enlightening you about Windows Photo Viewer and got the necessary information. Plus, if none of these work, you can use Windows 10 Photos app alternatives . Thanks for reading! Do comment us below to let us know your views.
Shanoon Cox
Shanoon Cox is a writer and a lover of all things video.
Follow @Shanoon Cox
Shanoon Cox
Mar 27, 2024• Proven solutions
Well, with advancement in technology, everyone is upgrading to a better version of everything out there. Likewise, when Windows Photo Viewer got upgraded to Windows 10 Photos and a plethora of new features got added to it.
But, what if you are not keen to depart with your Windows Photo Viewer and rather do away with the Windows 10 Photos App? In order to restore Windows Photo Viewer, we have multiple solutions for you in this article.
Stay tuned to learn more!
- Part1: Why you prefer Windows Photo Viewer
- Part2: Method 1 to restore Windows Photo Viewer
- Part3: Method 2 to get Windows Photo Viewer back
Part 1: Why you prefer Windows Photo Viewer
We would like to explain why most people are still not over Windows Photo Viewer? The good old Photo Viewer has quiet loyal fans out there singing its glory. This portion of the article comprises of the highs about Windows Photo Viewer.
Here is why they want to restore Windows Photo Viewer –
- Windows Photo Viewer offers a better UI, allowing you to get everything at the bottom of the screen. It speeds up access, whereas Windows 10 Photos UI at times hidden. Unless you move the mouse around the entire screen for switching between photos.
- The scroll wheel enables you to precisely zoom faster.
- There is no slide effect between images nor does it show the splash/delay screen while initiating the app. It ensures faster action sans unnecessary enhancements.
- You can use forward or back on mouse to move to the next or previous photo.
- You can see the photo’s name in Windows Photos Viewer.
- Right-click allows you to access copy, open with, properties etc. option for your photos on the Windows computer.
- You can pause to view a single picture using full-screen mode.
- You can view the image in actual size using the UI button without any scaling.
- There is a solid UI across the image which doesn’t cover it, but works as a nice border.
- You can delete an image without any confirmation here.

Though, Windows 10 Photos offers a dark theme, the effectiveness, responsiveness and features available with Windows Photo Viewer are hard to compromise.
Method 1 to restore Windows Photo Viewer
The first method speaks about, when you have upgraded from a Windows 7/8/8.1 computer to Windows 10. You can easily swing back to your most loved Windows Photo Viewer within no time. Here is the detailed guide –
Step 1: Go to ‘Settings’ and open ‘Apps’. Click on ‘Default Apps’ and check ‘Photo Viewer’. The default photo viewer will be visible here.
 CalendarBudget - Monthly subscription membership to CalendarBudget via web browser or mobile app. Support included.
Step 2: Click on the present photo viewer app over there and look for ‘Windows Photo Viewer’. We assume that you have upgraded from an older version on Windows and Windows Photo Viewer is there in the options.
Step 3: Tap on ‘Windows Photo Viewer’ and then exit ‘Settings’. Now, you have successfully restored Windows Photo Viewer and you can open photos in Windows Photo Viewer.
Method 2 to get Windows Photo Viewer back
Here comes another way to restore Windows Photo Viewer on your computer. If your computer has been upgraded to Windows 10 from an older version, then Windows Photo Viewer might be lying around somewhere. You can retrieve it to view images.
Here is the detailed guide –
Step 1 – Go to the image or picture folder on your Windows 10 computer and right click on any image. Now, choose ‘Open With’ and click on ‘Choose another app’.
Step 2 – Tap the ‘More apps’ option here in case, you can’t find out the Windows Photo Viewer within the list.
Step 3 – Keep scrolling towards the bottom of the screen to find out ‘Windows Photo Viewer’. If ‘Windows Photo Viewer’ is visible, then it has been installed there and you can use it without any problem.
Note: If the Windows Photo Viewer isn’t there, here is a backup. You need to change Windows Registry to make Windows Photo Viewer returned. You need to go to Edwin over on Ten Forums to add code on your PC.
Conclusion
From the above article, we found out that restoring Windows Photo Viewer on your system is not a tough task. But, without having the proper knowledge you shouldn’t play around with your Photos app. So, this article guides you through a reliable method for restoring Windows Photo Viewer and view your photos like you always loved to. We hope you liked our efforts of enlightening you about Windows Photo Viewer and got the necessary information. Plus, if none of these work, you can use Windows 10 Photos app alternatives . Thanks for reading! Do comment us below to let us know your views.
Shanoon Cox
Shanoon Cox is a writer and a lover of all things video.
Follow @Shanoon Cox
Shanoon Cox
Mar 27, 2024• Proven solutions
Well, with advancement in technology, everyone is upgrading to a better version of everything out there. Likewise, when Windows Photo Viewer got upgraded to Windows 10 Photos and a plethora of new features got added to it.
But, what if you are not keen to depart with your Windows Photo Viewer and rather do away with the Windows 10 Photos App? In order to restore Windows Photo Viewer, we have multiple solutions for you in this article.
Stay tuned to learn more!
- Part1: Why you prefer Windows Photo Viewer
- Part2: Method 1 to restore Windows Photo Viewer
- Part3: Method 2 to get Windows Photo Viewer back
Part 1: Why you prefer Windows Photo Viewer
We would like to explain why most people are still not over Windows Photo Viewer? The good old Photo Viewer has quiet loyal fans out there singing its glory. This portion of the article comprises of the highs about Windows Photo Viewer.
Here is why they want to restore Windows Photo Viewer –
- Windows Photo Viewer offers a better UI, allowing you to get everything at the bottom of the screen. It speeds up access, whereas Windows 10 Photos UI at times hidden. Unless you move the mouse around the entire screen for switching between photos.
- The scroll wheel enables you to precisely zoom faster.
- There is no slide effect between images nor does it show the splash/delay screen while initiating the app. It ensures faster action sans unnecessary enhancements.
- You can use forward or back on mouse to move to the next or previous photo.
- You can see the photo’s name in Windows Photos Viewer.
- Right-click allows you to access copy, open with, properties etc. option for your photos on the Windows computer.
- You can pause to view a single picture using full-screen mode.
- You can view the image in actual size using the UI button without any scaling.
- There is a solid UI across the image which doesn’t cover it, but works as a nice border.
- You can delete an image without any confirmation here.
Though, Windows 10 Photos offers a dark theme, the effectiveness, responsiveness and features available with Windows Photo Viewer are hard to compromise.
Method 1 to restore Windows Photo Viewer
The first method speaks about, when you have upgraded from a Windows 7/8/8.1 computer to Windows 10. You can easily swing back to your most loved Windows Photo Viewer within no time. Here is the detailed guide –
Step 1: Go to ‘Settings’ and open ‘Apps’. Click on ‘Default Apps’ and check ‘Photo Viewer’. The default photo viewer will be visible here.
Step 2: Click on the present photo viewer app over there and look for ‘Windows Photo Viewer’. We assume that you have upgraded from an older version on Windows and Windows Photo Viewer is there in the options.
Step 3: Tap on ‘Windows Photo Viewer’ and then exit ‘Settings’. Now, you have successfully restored Windows Photo Viewer and you can open photos in Windows Photo Viewer.
Method 2 to get Windows Photo Viewer back
Here comes another way to restore Windows Photo Viewer on your computer. If your computer has been upgraded to Windows 10 from an older version, then Windows Photo Viewer might be lying around somewhere. You can retrieve it to view images.
Here is the detailed guide –
Step 1 – Go to the image or picture folder on your Windows 10 computer and right click on any image. Now, choose ‘Open With’ and click on ‘Choose another app’.
Step 2 – Tap the ‘More apps’ option here in case, you can’t find out the Windows Photo Viewer within the list.
Step 3 – Keep scrolling towards the bottom of the screen to find out ‘Windows Photo Viewer’. If ‘Windows Photo Viewer’ is visible, then it has been installed there and you can use it without any problem.
Note: If the Windows Photo Viewer isn’t there, here is a backup. You need to change Windows Registry to make Windows Photo Viewer returned. You need to go to Edwin over on Ten Forums to add code on your PC.
Conclusion
From the above article, we found out that restoring Windows Photo Viewer on your system is not a tough task. But, without having the proper knowledge you shouldn’t play around with your Photos app. So, this article guides you through a reliable method for restoring Windows Photo Viewer and view your photos like you always loved to. We hope you liked our efforts of enlightening you about Windows Photo Viewer and got the necessary information. Plus, if none of these work, you can use Windows 10 Photos app alternatives . Thanks for reading! Do comment us below to let us know your views.
Shanoon Cox
Shanoon Cox is a writer and a lover of all things video.
Follow @Shanoon Cox
- Title: How to Bring Back Your Preferred Photo Viewer in Win 11 for 2024
- Author: Frank
- Created at : 2024-07-26 14:24:33
- Updated at : 2024-07-27 14:24:33
- Link: https://some-techniques.techidaily.com/how-to-bring-back-your-preferred-photo-viewer-in-win-11-for-2024/
- License: This work is licensed under CC BY-NC-SA 4.0.