
"Harness the Power of StoryRemix Elevate Video Quality for Windows 11 Users for 2024"
Harness the Power of StoryRemix: Elevate Video Quality for Windows 11 Users
How to Use Story Remix to Edit a Video in Windows 10 Photos

Shanoon Cox
Mar 27, 2024• Proven solutions
When it comes to Windows 10 systems, the offering in terms of features and functionalities surpass the earlier versions. Just talk about the Windows Photo Viewer and it brings a fresh air to Windows Photo Viewer by updating to Microsoft Photos .
For video editing, it has great things to offer, such as Story Remix.
If you are wondering, what Story Remix is, then we must tell you that, it is the advanced feather on the Photos App’s cap. This is meant to adapt artificial intelligence technology and automatically collate relevant content to create videos. These videos are shareable and you can save, edit or delete them as you wish.
Moreover, creating own videos is also possible with this tool.
- Part1: How to download Story Remix in Windows
- Part2: How to create Story Remix automatically and randomly
- Part3: How to create a Story Remix project from scratch
- Part4: How to edit a Story Remix video
- Part5: How to add 3D effects to a Story Remix project
- Part6: How to export a Story Remix video
Part 1: How to download Story Remix in Windows
In case you want to download Story Remix, we must tell you it is not a standalone product. It is bundled within the Windows Photos App.
Downloading Photos App will add Story Remix to your system for brilliant video editing. But, you got to update Photos with ‘Fall Creators Update’ in order to activate the Story Remix feature.
Go to Start menu and open Windows Photos. you can see videos and photos saved under the default Pictures folder organized by the Photos App. Tap on the ‘Create’ button on the top menu to discover Story Remix.
Part 2: How to create Story Remix automatically and randomly
In this part of the article, we would elaborate creation of Story Remix in different ways. The content is auto-generated or you can manually create it from scratch. The automatic method has themes, transitions, and soundtracks within.
How to create a Story Remix project automatically –
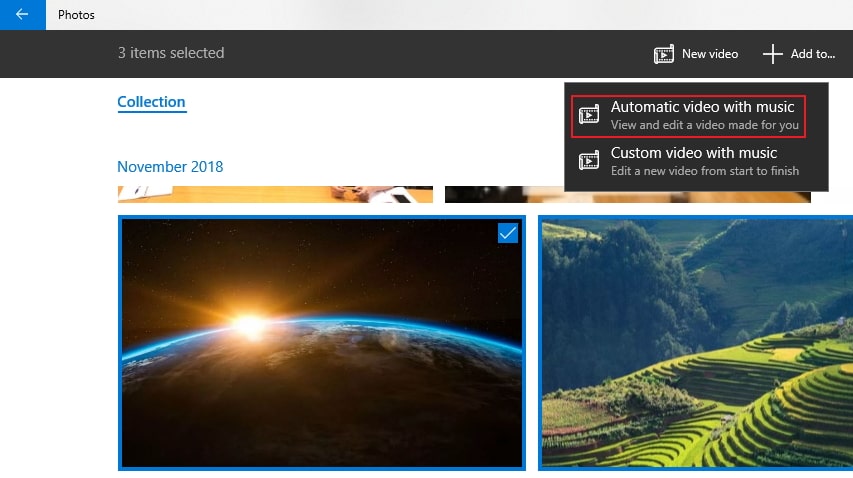
- Launch Photos > Collection.
- You got to choose the image and videos and click New video. Then choose Automatic video with music.
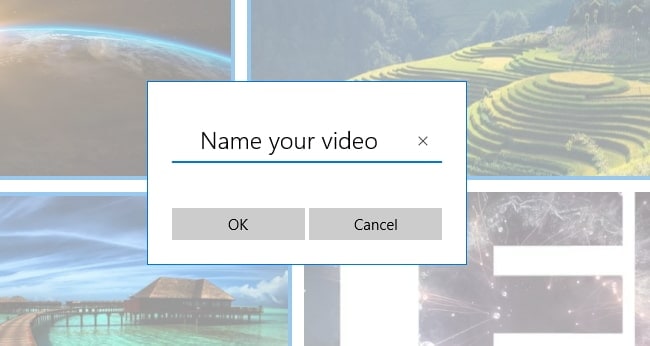
- Give a name and tap on OK.

- After the above process gets over, the content gets scanned to automatically create a video adding styles, transitions, and music. The final preview of the project is displayed thereafter.
- You can rearrange the content by tapping Remix it for me button.
Part 3: How to create a Story Remix project from scratch
Here is the guide –
- Launch Photos and hit on Create.
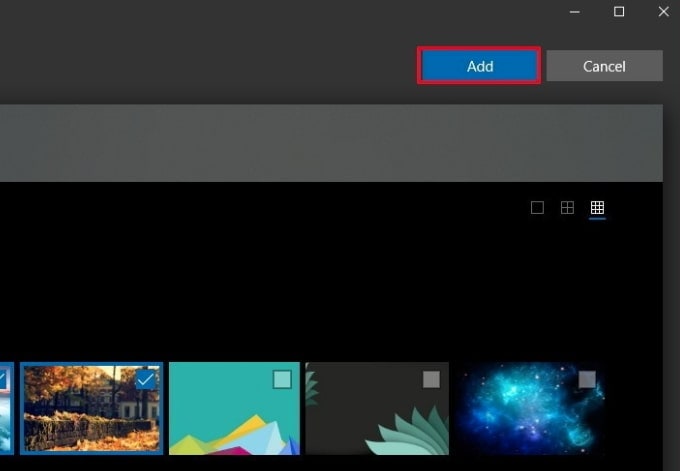
- Hit Video project and pick out the images/videos you wish.
- Tap on the Add button and give a name.
- Hit on Create video afterwards.
- Now, you can preview, edit or share your video.
Part 4: How to edit a Story Remix video
Story Remix has 3 major sections namely, media bin consists of files already included in your card-based timeline and files that you chose in previous steps; preview section with recent changes and timeline shows the card with a running video; and the timeline having the option to drag and drop cards from the media bin.
In the following sections, we have segregated each editing feature of Story Mix for you to explore –
Adding a new theme
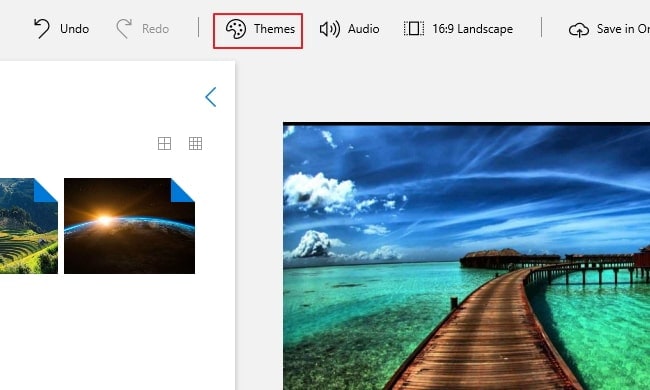
A theme is a built-in feature in Photos, just like music, filters, and text styles. Adding a theme does everything on the go.
- First all the things are added to your timeline followed by adding to the toolbar. Hit on Themes subsequently.
- You can select one theme from the listed options namely, “No theme”, “Adventure”, “Chilled”, “Classic”, “Electric”, “Joy” and “Loved”. Preview the selected theme and if satisfied, click on “Done”.
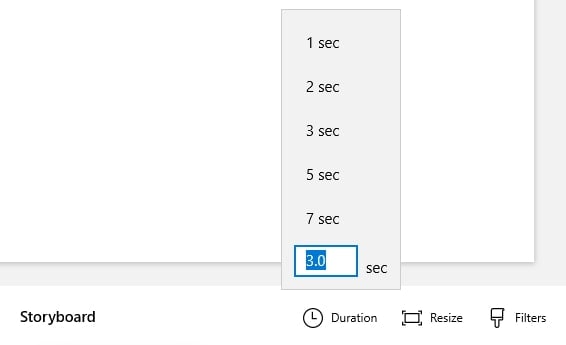
Adding image duration
While adding media to the timeline in Story Mix, you will see that there is a default timeline for each image. To adjust the duration, you can do –
Tap the ‘Duration’ button > pick another value or manually set the seconds.
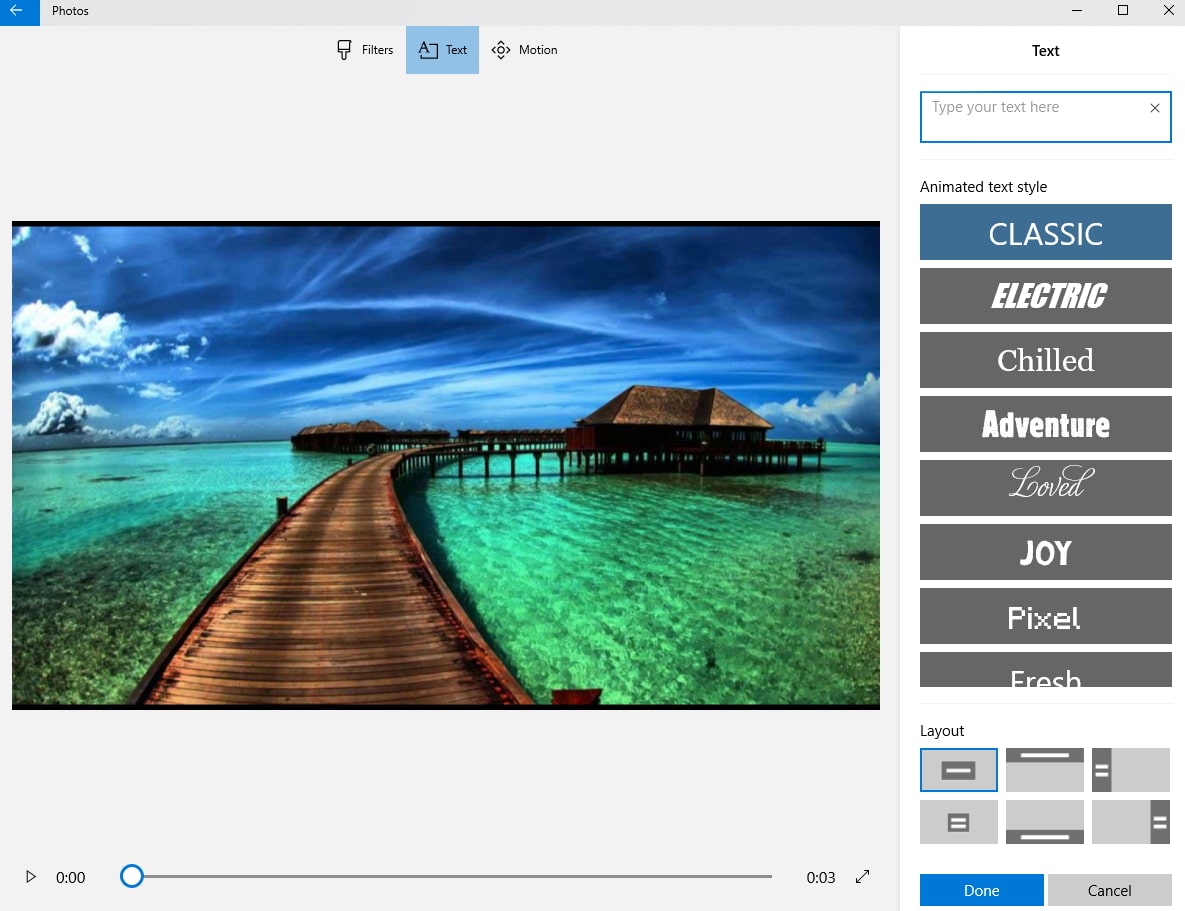
Adding custom text
- Choose card from timeline, click ‘Text’ and feed the custom text in the box located at right side. You can simply use animated text styles too.
- Use layout option and select location so that you can make the caption or title show up in a different place.
- Hit ‘Done’ after that.
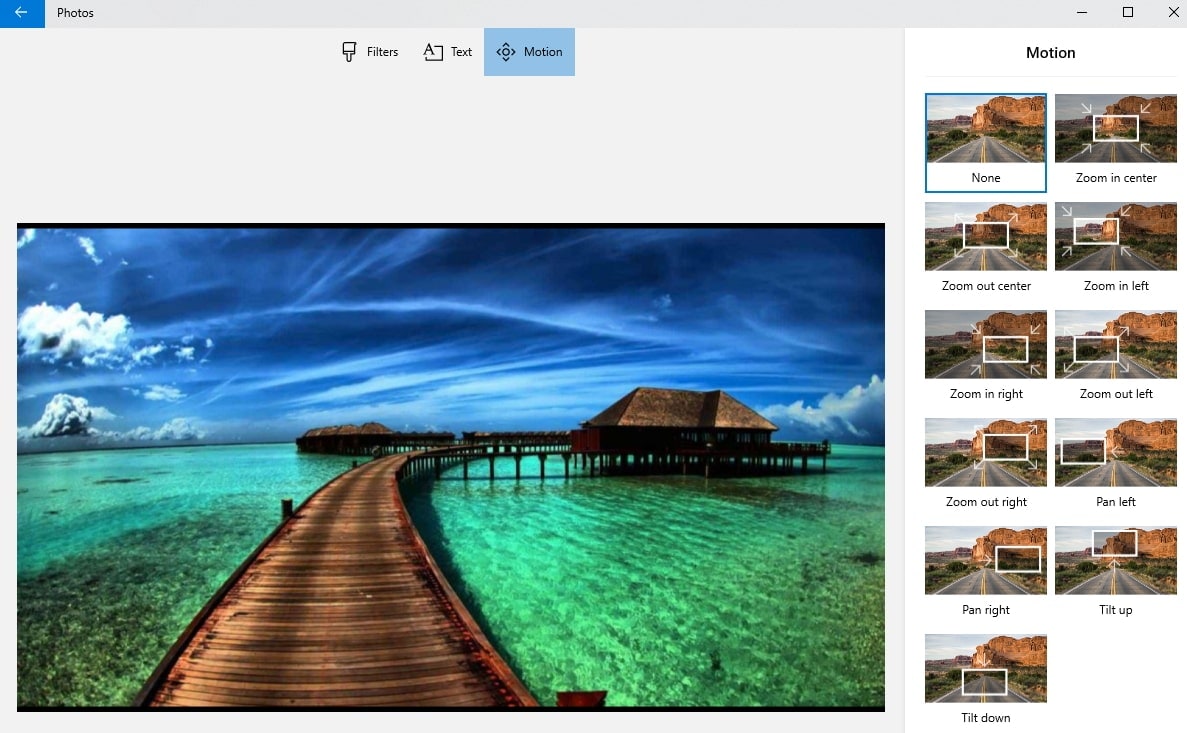
Adding motion
- Firstly, choose the content from the timeline and hit on ‘Motion’. Now, select camera motion style from ‘Zoom in center’/’Zoom in right’/’Pan left’/’Tilt up’ etc.
- Preview the changes and click ‘Done’.
Trimming video clips
- Pick the video from timeline and choose ‘Trim’ button. Mark the trim area and click ‘Play’ to preview.
- Hit ‘Done’ in the end.
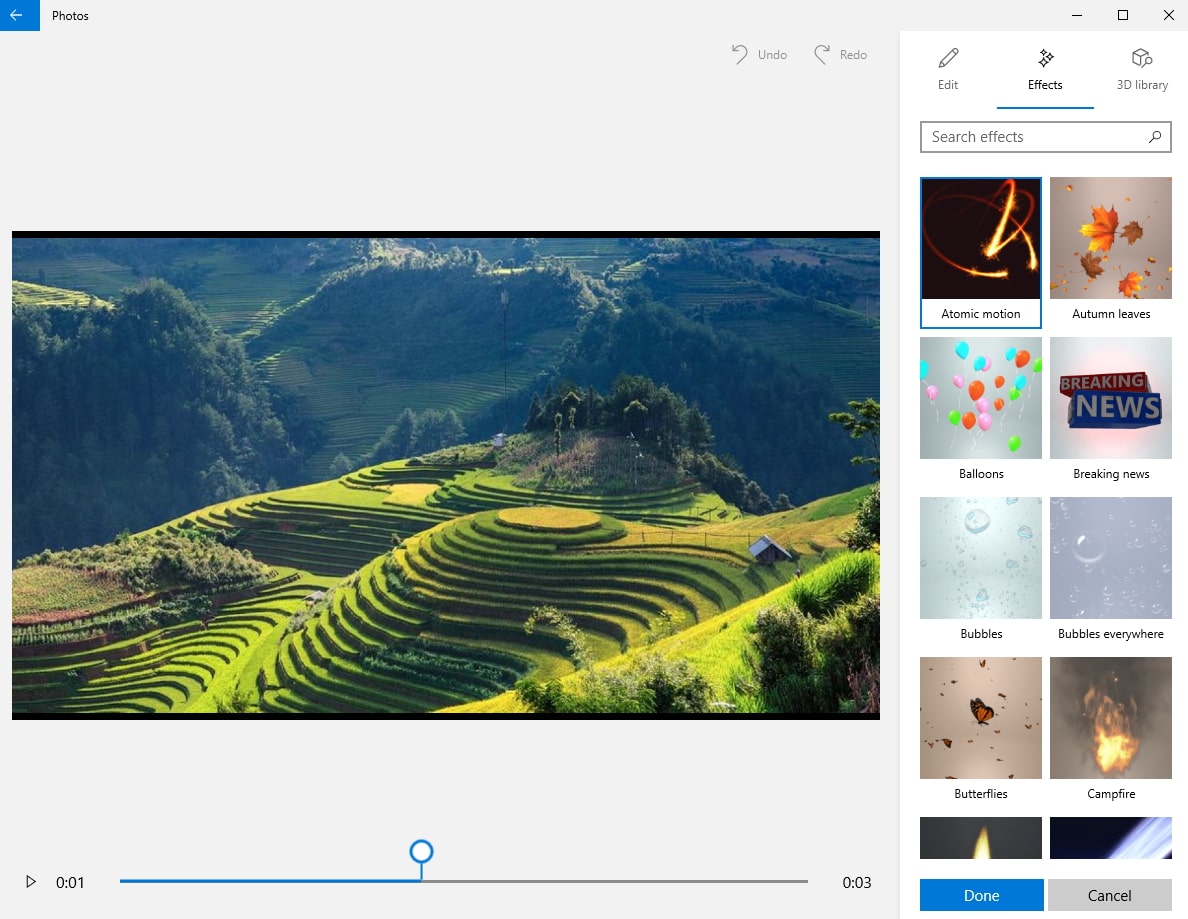
Part 5: How to add 3D effects to a Story Remix project
Adding 3D special effects to video clips is one of the lucrative features of Photos app.
- You can add 3D effects by selecting the clip in timeline and clicking the ‘3D effects’ button.
- Position the effect by dragging/dropping and via preview panel > set the time range for effect > adjust the Y and Z co-ordinates for the effect. Some of the effects are applicable to the whole clip, while some are meant to be placed at particular locations over the clip. Slide on the ‘Attach to a point’ toggle, so it makes the effect move or stay fixed, depending on the object it is fixed to.
- Click ‘Delete’ if you want to remove 3D effects. Hit ‘Done’ for saving the changes.
Part 6: How to export a Story Remix video
Now that you have learnt how to edit videos in Story Remix, let’s see how can you export or share them with the world. You can directly share from Photos or use a USB drive to do the needful.
- Click on the project name > give a new name > ‘Enter’.
- Press ‘Export or share’ > ‘S’/’M’/’L’.
Note: S is for mobile and email with a small video, M is for social media uploads, and L is meant for large Remix videos meant for large screens.
The file location is displayed soon after you create the video by the Photos app. On wanting to share the video, just hit on ‘Share to social media, email, or other apps’.
Now, pick the app or contact and send the video.
Recent videos are found on ‘Collections’ section if they are auto created. Otherwise, all the Story Remix files are located permanently on ‘Creations’ section.
Conclusion
From this article, we are sure that you have got plenty to learn about Story Remix. This wonderful feature from Windows 10 Photos is going to win hearts.
Why bother for messy and complex video editing tools, when you can get everything at your fingertips using this photo and video editing app. In case you are up for some advanced features and functionalities, then you might opt for a paid program.
If you want to edit video, we recommend Wondershare Filmora .


Shanoon Cox
Shanoon Cox is a writer and a lover of all things video.
Follow @Shanoon Cox
Shanoon Cox
Mar 27, 2024• Proven solutions
When it comes to Windows 10 systems, the offering in terms of features and functionalities surpass the earlier versions. Just talk about the Windows Photo Viewer and it brings a fresh air to Windows Photo Viewer by updating to Microsoft Photos .
For video editing, it has great things to offer, such as Story Remix.
If you are wondering, what Story Remix is, then we must tell you that, it is the advanced feather on the Photos App’s cap. This is meant to adapt artificial intelligence technology and automatically collate relevant content to create videos. These videos are shareable and you can save, edit or delete them as you wish.
Moreover, creating own videos is also possible with this tool.
- Part1: How to download Story Remix in Windows
- Part2: How to create Story Remix automatically and randomly
- Part3: How to create a Story Remix project from scratch
- Part4: How to edit a Story Remix video
- Part5: How to add 3D effects to a Story Remix project
- Part6: How to export a Story Remix video
Part 1: How to download Story Remix in Windows
In case you want to download Story Remix, we must tell you it is not a standalone product. It is bundled within the Windows Photos App.
Downloading Photos App will add Story Remix to your system for brilliant video editing. But, you got to update Photos with ‘Fall Creators Update’ in order to activate the Story Remix feature.
Go to Start menu and open Windows Photos. you can see videos and photos saved under the default Pictures folder organized by the Photos App. Tap on the ‘Create’ button on the top menu to discover Story Remix.
Part 2: How to create Story Remix automatically and randomly
In this part of the article, we would elaborate creation of Story Remix in different ways. The content is auto-generated or you can manually create it from scratch. The automatic method has themes, transitions, and soundtracks within.
How to create a Story Remix project automatically –
- Launch Photos > Collection.
- You got to choose the image and videos and click New video. Then choose Automatic video with music.
- Give a name and tap on OK.
- After the above process gets over, the content gets scanned to automatically create a video adding styles, transitions, and music. The final preview of the project is displayed thereafter.
- You can rearrange the content by tapping Remix it for me button.
Part 3: How to create a Story Remix project from scratch
Here is the guide –
- Launch Photos and hit on Create.
- Hit Video project and pick out the images/videos you wish.
- Tap on the Add button and give a name.
- Hit on Create video afterwards.
- Now, you can preview, edit or share your video.
Part 4: How to edit a Story Remix video
Story Remix has 3 major sections namely, media bin consists of files already included in your card-based timeline and files that you chose in previous steps; preview section with recent changes and timeline shows the card with a running video; and the timeline having the option to drag and drop cards from the media bin.
In the following sections, we have segregated each editing feature of Story Mix for you to explore –
Adding a new theme
A theme is a built-in feature in Photos, just like music, filters, and text styles. Adding a theme does everything on the go.
- First all the things are added to your timeline followed by adding to the toolbar. Hit on Themes subsequently.
- You can select one theme from the listed options namely, “No theme”, “Adventure”, “Chilled”, “Classic”, “Electric”, “Joy” and “Loved”. Preview the selected theme and if satisfied, click on “Done”.
Adding image duration
While adding media to the timeline in Story Mix, you will see that there is a default timeline for each image. To adjust the duration, you can do –
Tap the ‘Duration’ button > pick another value or manually set the seconds.
Adding custom text
- Choose card from timeline, click ‘Text’ and feed the custom text in the box located at right side. You can simply use animated text styles too.
- Use layout option and select location so that you can make the caption or title show up in a different place.
- Hit ‘Done’ after that.
Adding motion
- Firstly, choose the content from the timeline and hit on ‘Motion’. Now, select camera motion style from ‘Zoom in center’/’Zoom in right’/’Pan left’/’Tilt up’ etc.
- Preview the changes and click ‘Done’.
Trimming video clips
- Pick the video from timeline and choose ‘Trim’ button. Mark the trim area and click ‘Play’ to preview.
- Hit ‘Done’ in the end.
Part 5: How to add 3D effects to a Story Remix project
Adding 3D special effects to video clips is one of the lucrative features of Photos app.
- You can add 3D effects by selecting the clip in timeline and clicking the ‘3D effects’ button.
- Position the effect by dragging/dropping and via preview panel > set the time range for effect > adjust the Y and Z co-ordinates for the effect. Some of the effects are applicable to the whole clip, while some are meant to be placed at particular locations over the clip. Slide on the ‘Attach to a point’ toggle, so it makes the effect move or stay fixed, depending on the object it is fixed to.
- Click ‘Delete’ if you want to remove 3D effects. Hit ‘Done’ for saving the changes.
Part 6: How to export a Story Remix video
Now that you have learnt how to edit videos in Story Remix, let’s see how can you export or share them with the world. You can directly share from Photos or use a USB drive to do the needful.
- Click on the project name > give a new name > ‘Enter’.
- Press ‘Export or share’ > ‘S’/’M’/’L’.
Note: S is for mobile and email with a small video, M is for social media uploads, and L is meant for large Remix videos meant for large screens.
The file location is displayed soon after you create the video by the Photos app. On wanting to share the video, just hit on ‘Share to social media, email, or other apps’.
Now, pick the app or contact and send the video.
Recent videos are found on ‘Collections’ section if they are auto created. Otherwise, all the Story Remix files are located permanently on ‘Creations’ section.
Conclusion
From this article, we are sure that you have got plenty to learn about Story Remix. This wonderful feature from Windows 10 Photos is going to win hearts.
Why bother for messy and complex video editing tools, when you can get everything at your fingertips using this photo and video editing app. In case you are up for some advanced features and functionalities, then you might opt for a paid program.
If you want to edit video, we recommend Wondershare Filmora .
Shanoon Cox
Shanoon Cox is a writer and a lover of all things video.
Follow @Shanoon Cox
Also read:
- [New] Expert Selection Prime Auto Tracking Tech Review
- [New] Instant Shareability From TikTok to Facebook Networks
- [Updated] Expert's Blueprint for AVI to GIF Transformation Using Filmora (Windows/macOS)
- [Updated] Iphone and Selfies Unite - Our Top #8 Gear Guide
- 2024 Approved Easy Techniques Perfect Your iDevice Screen Shots
- 2024 Approved How to Take Portrait Photo with Old iPhone X/8 Plus/7 Plus
- 2024 Approved Ideal Illustration Tools for Windows No Cost, High Prices
- 効率的SSD管理:DiskPartによる全面クリーンアップ方法
- Expert Guide to Cutting-Edge Online Streaming via VLC Media Player for 2024
- Exploring AI's Potential with Prompt Engineering Careers
- How Many Seconds Is a 20Mb Video for 2024
- In 2024, Ideal Webcams to Upgrade Your Zoom Video Quality
- Increasing Interior Vibrancy Sun's Role Inside for 2024
- Master the Marketplace: The Best 4 Business Analytics Resources
- No Hassle, Full Control of Learning Latin Online
- Step-by-Step Solution to Fixing the Lack of Sound in USB Headsets on Windows 7 Systems
- Why Were My iMessages Undelivered Recently? Discover the Reason Behind It! | Tech Insights
- Title: Harness the Power of StoryRemix Elevate Video Quality for Windows 11 Users for 2024
- Author: Frank
- Created at : 2025-01-11 16:44:18
- Updated at : 2025-01-15 17:08:10
- Link: https://some-techniques.techidaily.com/harness-the-power-of-storyremix-elevate-video-quality-for-windows-11-users-for-2024/
- License: This work is licensed under CC BY-NC-SA 4.0.