
"2024 Approved In-Depth Exploration of PS 3D LUTs for Exceptional Image Grading"
In-Depth Exploration of PS 3D LUTs for Exceptional Image Grading
Create High-Quality Video - Wondershare Filmora
An easy and powerful YouTube video editor
Numerous video and audio effects to choose from
Detailed tutorials provided by the official channel
Creating a filter to use is a satisfying activity. Now, the shortcoming arises when you want to use a filter in Photoshop and you have a limited amount of time. To do the trick here, you can import LUTs to your Photoshop and briskly incorporate it into your project in seconds - This calls a halt to the extremes of creating a filter.
Even though 3D LUT is mainly associated with video projects, it conversely works with photos in Photoshop. You don’t have to sweat it when incorporating 3D LUT in Photoshop since here is a complete guide to using 3D LUT in Photoshop.
In this article
02 How to Import 3D LUT to Photoshop
03 How to Use 3D LUT in Photoshop

WPS Office Premium ( File Recovery, Photo Scanning, Convert PDF)–Yearly
What is 3D LUT?
3D LUT (Look-Up-Table) is a function key that maps a given color space to another. Technically, LUTs are used for complex processes such as converting an image shot from a Canon Log profile and making it more enticing or converting one image color space to its better version.
Working with LUTs, there are two types; 3D LUT and 1D LUT. The difference is that the former provides room for complex color operations, whereas the latter has limitations on the number of color operations.
Here are more differences between 3D and 1D LUTs:
3D LUT
It Places luma and color in a 3D (Cube) form; hence very easy to work with.
The output values are not from each respective combination in a color space.
It is a bit complex when customizing the basic settings such as contrast and white balance. Usually, the final result becomes remarkable.
1D LUT
The color and luma are placed in a 1D; hence quite not easy to work on.
It contains a clear value of the outputs and on the basis of the bit depth, i.e., 1024 values in a 10 - bit.
It is a walk in the park when it comes to adjustments to the basic settings such as contrast, brightness, and white balance. But, the resulting output will be mid.
Wrapping up the differences, 3D LUTs are essential for colorists and editors since they can carry out tons of color customizations. Therefore, they can make their work uniquely stunning.
How to Import 3D LUT to Photoshop
There are some 3D LUTs that Adobe Photoshop provides. Usually, these LUTs are limited and are not very effective when working on major projects. Most people, therefore, prefer to add their own 3D LUTs to Photoshop.
There are two ways to import 3D LUT to Photoshop; Adding LUTs to a specific project and Installing LUTs.
Before applying any of the two methods, you need to ensure you have your LUTs right there. You can purchase them or get them for free. Download them to your computer device.
Method 1. Adding LUTs to a Particular Project
This first step is undemanding since you only have to locate a given LUT and then directly incorporate it into your project.

Step 1. Unzip your LUTs
First, you ought to unzip your files. In Mac devices, you double-click on the file to unzip it, whereas, in Windows, you right-click then select “Extract all” from the drop-down list.

Step 2. Create a Project
Go to the Photoshop app and create a new project. Load the image that you want to edit to Photoshop.
Step 3. Generate a new Adjustment Layer in Color Look Up
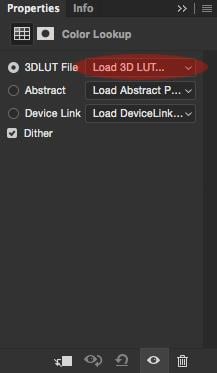
Go to the “Color Look Up” tab, then click on the “Adjustment” option.

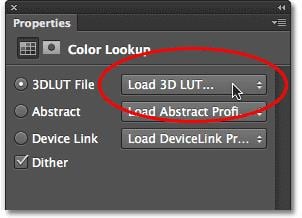
Step 4. Open 3D LUTs
A drop-down list will be displayed by clicking on the “Adjustment” option. From the list, select “Load 3D LUT.”
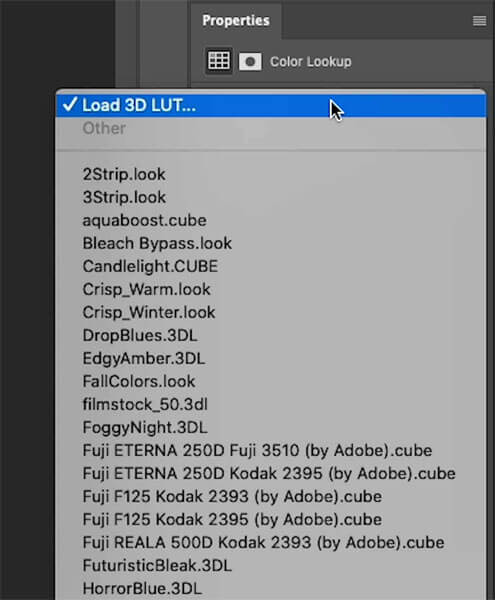
Step 5. Add your LUTs
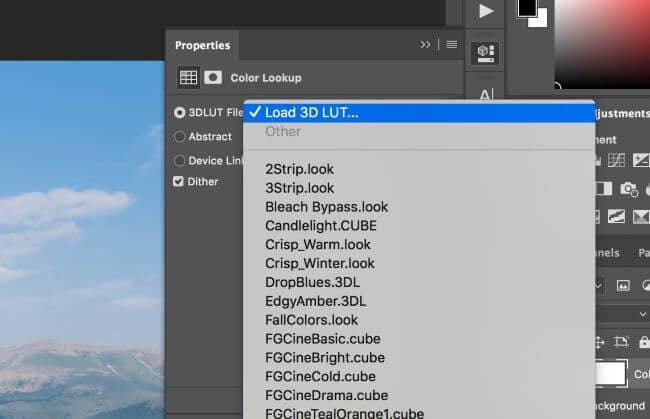
Lastly, load your LUTs. Click on the drop-down arrow, and a list of LUTs will be presented. Select the one that you had unzipped.
Method 2. Installing LUTs
The second method of adding 3D LUTs to Photoshop is installing LUTs in the Photoshop installation folder.

Step 1. Open LUT Folder
Firstly, quit Photoshop app.
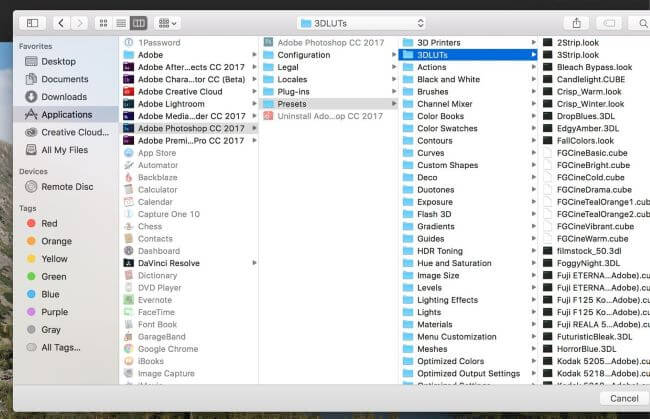
If you are using Mac, open the LUT folder by going to “Applications” > “Adobe Photoshop” > “Preset” > 3D LUTS.”
For Windows users, go to “Local disk C” > “Program Files” > “Adobe” > “Adobe Photoshop” > “Presets” > “3D LUTS.”
Step 2. Create a new Folder
After accessing your 3D LUTs on your computer, you need to create a new folder that will contain your new LUTs. Right-click, then click on “New folder.” Name the folder based on your preference.
Step 3. Copy and Paste your LUTs
Copy your LUTs and paste them to the folder you have just created.
Step 4. Restart Photoshop
Lastly, restart your Photoshop app. You can access your new files by clicking “Color Lookup” > “Adjustment layer.” Usually, the files are saved as .cube files.
How to Use 3D LUT in Photoshop
Now that you have incorporated your 3D LUTs into the Photoshop folder, it is that time that you make use of it.
Step 1. Open your Project Image
First, go to your Photoshop app and add your photo.
Step 2. Open the Adjustment Panel
Hover over to “Color Lookup” and then select “Adjustments.”
In some instances, the Adjustment tab might be turned off. For this case, click on the windows option at the top of your interface, then select “Adjustment”. Alternatively, you can access color look up adjustment by heading over to the Layers panel and clicking on “Adjustment.” From the drop-down menu, click on “Color Lookup.”

Step 3. Load 3D LUT
In the “Color lookup panel,” a drop-down list will be displayed. Select “Load 3D LUT.”
Parental Control Software
Step 4. Apply your 3D LUT
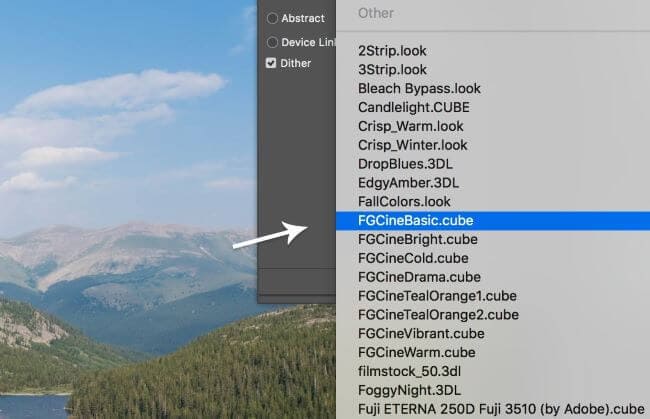
Here is our final step in 3D LUT Photoshop. After selecting “Load 3D LUT,” various LUTs will be displayed. Now, you need to select the LUT you added to the application.
Usually, the added LUTs are in .cube format, so select one that will work best with your project and apply it.
After applying your desired LUT, you can regulate the opacity levels by either lowering or raising the adjustment layer.
More Photoshop editing tips
 WinUtilities Pro
Bonus! Get 3D LUT File Photoshop Download Free
You don’t always have to pay for you to access 3D LUT files. Besides, tons of excellent 3D LUT files are offered for free.
Here are some of the places where you can access the 3D LUT file Photoshop free download:
1. PhotoshopDream
Another exceptional platform where you can get free 3D LUTs is PhotoshopDream. Here, you will access over 450 3D LUT Photoshop downloads for free. The 3D LUTs are compatible with footage from most cameras, including Sony RX10, Arri Alexa, Samsung NX1, and Lumix LX 100.
An outstanding factor about these 3D LUTs is that not only will you be able to use them in Photoshop alone but also in other video editing software such as, After Effects, Sony Vegas, and Premiere Pro. There is no attribute required when using these 450+ 3D LUTs in PhotoDream.
2. FixThePhoto
FixThePhoto is a renowned source of free 3D LUTs. There are over 200 free LUTs that will allow you to create eye-catching and vibrant projects.
Here, LUTs are arranged in various categories to suit every need. Some of the categories include Free Film LUTs, Free Wedding LUTs, Free Color LUTs, Free Ground Control LUTs, and LUTs for Premiere.
The 3D LUTs Photoshop in FixThePhoto is mostly essential for editing footage for travel, lifestyle, and wedding.
3. Giggster
Giggster is an ideal platform that offers free photography, guides, retouching tools, resources, tips, and tricks.
Giggster also offers free LUTs for Photoshop. It has a collection of over 12 free 3D LUTs. And with them, you can be able to carry out color grading and add tons of creative effects to your project.
3. Giggster
Free 3D LUTs can also be accessed from ON1. Here, you can download 3D LUTs for free and use them to stylize your photo.
Some of the free 3D LUTs in ON1 include Cinematic, Portrait, B&W, and Moody. Usually, the 3D LUTs in ON1 function effectively in software that supports .cube files – This includes Photoshop, Lightroom, and Adobe Premium.
ON1 has various special offers on some of their premium 3DLUTs. You can also check some of the great offers offered on this site.
Adjust Your Video Color with Filmora
Photos aren’t the only thing that requires color correction, videos also need color correction. When it comes to correcting or adjusting color in your video, you should choose the editor carefully to make sure it is easy to operate and get the outcome you want. We would like to recommend Filmora to you. As a video editing software for users of different levels, Filmora allows you to import 3D LUTs to use on your videos, you can also adjust the color setting by yourself. The below video can definitely help you learn more about how Filmora going to help you with the color of your videos.
For Win 7 or later (64-bit)
For macOS 10.12 or later
Conclusion
● Turn your footage into a masterpiece with 3D LUTs in Photoshop. By majoring in customizability and the number of operations, it is clear that 3D LUTs are way better than 1D LUT. Download free 3D LUTs from the sources above and import them to your Photoshop app.
● When using LUTs, there are a couple of things that you need to have right under your nose:
- Make sure that the white balance is accurate
- Carry out small adjustments to your footage, i.e., saturation and contrast, for you to obtain exemplary results
- Have correct exposure. You can use a histogram to aid you in this.
Creating a filter to use is a satisfying activity. Now, the shortcoming arises when you want to use a filter in Photoshop and you have a limited amount of time. To do the trick here, you can import LUTs to your Photoshop and briskly incorporate it into your project in seconds - This calls a halt to the extremes of creating a filter.
Even though 3D LUT is mainly associated with video projects, it conversely works with photos in Photoshop. You don’t have to sweat it when incorporating 3D LUT in Photoshop since here is a complete guide to using 3D LUT in Photoshop.
In this article
02 How to Import 3D LUT to Photoshop
03 How to Use 3D LUT in Photoshop

What is 3D LUT?
3D LUT (Look-Up-Table) is a function key that maps a given color space to another. Technically, LUTs are used for complex processes such as converting an image shot from a Canon Log profile and making it more enticing or converting one image color space to its better version.
Working with LUTs, there are two types; 3D LUT and 1D LUT. The difference is that the former provides room for complex color operations, whereas the latter has limitations on the number of color operations.
Here are more differences between 3D and 1D LUTs:
3D LUT
It Places luma and color in a 3D (Cube) form; hence very easy to work with.
The output values are not from each respective combination in a color space.
It is a bit complex when customizing the basic settings such as contrast and white balance. Usually, the final result becomes remarkable.
1D LUT
The color and luma are placed in a 1D; hence quite not easy to work on.
It contains a clear value of the outputs and on the basis of the bit depth, i.e., 1024 values in a 10 - bit.
It is a walk in the park when it comes to adjustments to the basic settings such as contrast, brightness, and white balance. But, the resulting output will be mid.
Wrapping up the differences, 3D LUTs are essential for colorists and editors since they can carry out tons of color customizations. Therefore, they can make their work uniquely stunning.
How to Import 3D LUT to Photoshop
There are some 3D LUTs that Adobe Photoshop provides. Usually, these LUTs are limited and are not very effective when working on major projects. Most people, therefore, prefer to add their own 3D LUTs to Photoshop.
There are two ways to import 3D LUT to Photoshop; Adding LUTs to a specific project and Installing LUTs.
Before applying any of the two methods, you need to ensure you have your LUTs right there. You can purchase them or get them for free. Download them to your computer device.
Method 1. Adding LUTs to a Particular Project
This first step is undemanding since you only have to locate a given LUT and then directly incorporate it into your project.
Step 1. Unzip your LUTs
First, you ought to unzip your files. In Mac devices, you double-click on the file to unzip it, whereas, in Windows, you right-click then select “Extract all” from the drop-down list.
Step 2. Create a Project
Go to the Photoshop app and create a new project. Load the image that you want to edit to Photoshop.
Step 3. Generate a new Adjustment Layer in Color Look Up
Go to the “Color Look Up” tab, then click on the “Adjustment” option.

Step 4. Open 3D LUTs
A drop-down list will be displayed by clicking on the “Adjustment” option. From the list, select “Load 3D LUT.”
Step 5. Add your LUTs
Lastly, load your LUTs. Click on the drop-down arrow, and a list of LUTs will be presented. Select the one that you had unzipped.
Method 2. Installing LUTs
The second method of adding 3D LUTs to Photoshop is installing LUTs in the Photoshop installation folder.
Step 1. Open LUT Folder
Firstly, quit Photoshop app.
If you are using Mac, open the LUT folder by going to “Applications” > “Adobe Photoshop” > “Preset” > 3D LUTS.”
For Windows users, go to “Local disk C” > “Program Files” > “Adobe” > “Adobe Photoshop” > “Presets” > “3D LUTS.”
Step 2. Create a new Folder
After accessing your 3D LUTs on your computer, you need to create a new folder that will contain your new LUTs. Right-click, then click on “New folder.” Name the folder based on your preference.
Step 3. Copy and Paste your LUTs
Copy your LUTs and paste them to the folder you have just created.
Step 4. Restart Photoshop
Lastly, restart your Photoshop app. You can access your new files by clicking “Color Lookup” > “Adjustment layer.” Usually, the files are saved as .cube files.
How to Use 3D LUT in Photoshop
Now that you have incorporated your 3D LUTs into the Photoshop folder, it is that time that you make use of it.
Step 1. Open your Project Image
First, go to your Photoshop app and add your photo.
Step 2. Open the Adjustment Panel
Hover over to “Color Lookup” and then select “Adjustments.”
In some instances, the Adjustment tab might be turned off. For this case, click on the windows option at the top of your interface, then select “Adjustment”. Alternatively, you can access color look up adjustment by heading over to the Layers panel and clicking on “Adjustment.” From the drop-down menu, click on “Color Lookup.”
Step 3. Load 3D LUT
In the “Color lookup panel,” a drop-down list will be displayed. Select “Load 3D LUT.”

Step 4. Apply your 3D LUT
Here is our final step in 3D LUT Photoshop. After selecting “Load 3D LUT,” various LUTs will be displayed. Now, you need to select the LUT you added to the application.
Usually, the added LUTs are in .cube format, so select one that will work best with your project and apply it.
After applying your desired LUT, you can regulate the opacity levels by either lowering or raising the adjustment layer.
More Photoshop editing tips
Bonus! Get 3D LUT File Photoshop Download Free
You don’t always have to pay for you to access 3D LUT files. Besides, tons of excellent 3D LUT files are offered for free.
Here are some of the places where you can access the 3D LUT file Photoshop free download:
1. PhotoshopDream
Another exceptional platform where you can get free 3D LUTs is PhotoshopDream. Here, you will access over 450 3D LUT Photoshop downloads for free. The 3D LUTs are compatible with footage from most cameras, including Sony RX10, Arri Alexa, Samsung NX1, and Lumix LX 100.
An outstanding factor about these 3D LUTs is that not only will you be able to use them in Photoshop alone but also in other video editing software such as, After Effects, Sony Vegas, and Premiere Pro. There is no attribute required when using these 450+ 3D LUTs in PhotoDream.
2. FixThePhoto
FixThePhoto is a renowned source of free 3D LUTs. There are over 200 free LUTs that will allow you to create eye-catching and vibrant projects.
Here, LUTs are arranged in various categories to suit every need. Some of the categories include Free Film LUTs, Free Wedding LUTs, Free Color LUTs, Free Ground Control LUTs, and LUTs for Premiere.
The 3D LUTs Photoshop in FixThePhoto is mostly essential for editing footage for travel, lifestyle, and wedding.
3. Giggster
Giggster is an ideal platform that offers free photography, guides, retouching tools, resources, tips, and tricks.
Giggster also offers free LUTs for Photoshop. It has a collection of over 12 free 3D LUTs. And with them, you can be able to carry out color grading and add tons of creative effects to your project.
3. Giggster
Free 3D LUTs can also be accessed from ON1. Here, you can download 3D LUTs for free and use them to stylize your photo.
Some of the free 3D LUTs in ON1 include Cinematic, Portrait, B&W, and Moody. Usually, the 3D LUTs in ON1 function effectively in software that supports .cube files – This includes Photoshop, Lightroom, and Adobe Premium.
ON1 has various special offers on some of their premium 3DLUTs. You can also check some of the great offers offered on this site.
Adjust Your Video Color with Filmora
Photos aren’t the only thing that requires color correction, videos also need color correction. When it comes to correcting or adjusting color in your video, you should choose the editor carefully to make sure it is easy to operate and get the outcome you want. We would like to recommend Filmora to you. As a video editing software for users of different levels, Filmora allows you to import 3D LUTs to use on your videos, you can also adjust the color setting by yourself. The below video can definitely help you learn more about how Filmora going to help you with the color of your videos.
For Win 7 or later (64-bit)
For macOS 10.12 or later
Conclusion
● Turn your footage into a masterpiece with 3D LUTs in Photoshop. By majoring in customizability and the number of operations, it is clear that 3D LUTs are way better than 1D LUT. Download free 3D LUTs from the sources above and import them to your Photoshop app.
● When using LUTs, there are a couple of things that you need to have right under your nose:
- Make sure that the white balance is accurate
- Carry out small adjustments to your footage, i.e., saturation and contrast, for you to obtain exemplary results
- Have correct exposure. You can use a histogram to aid you in this.
Creating a filter to use is a satisfying activity. Now, the shortcoming arises when you want to use a filter in Photoshop and you have a limited amount of time. To do the trick here, you can import LUTs to your Photoshop and briskly incorporate it into your project in seconds - This calls a halt to the extremes of creating a filter.
Even though 3D LUT is mainly associated with video projects, it conversely works with photos in Photoshop. You don’t have to sweat it when incorporating 3D LUT in Photoshop since here is a complete guide to using 3D LUT in Photoshop.
In this article
02 How to Import 3D LUT to Photoshop
03 How to Use 3D LUT in Photoshop
What is 3D LUT?
3D LUT (Look-Up-Table) is a function key that maps a given color space to another. Technically, LUTs are used for complex processes such as converting an image shot from a Canon Log profile and making it more enticing or converting one image color space to its better version.
Working with LUTs, there are two types; 3D LUT and 1D LUT. The difference is that the former provides room for complex color operations, whereas the latter has limitations on the number of color operations.
Here are more differences between 3D and 1D LUTs:
3D LUT
It Places luma and color in a 3D (Cube) form; hence very easy to work with.
The output values are not from each respective combination in a color space.
It is a bit complex when customizing the basic settings such as contrast and white balance. Usually, the final result becomes remarkable.
1D LUT
The color and luma are placed in a 1D; hence quite not easy to work on.
It contains a clear value of the outputs and on the basis of the bit depth, i.e., 1024 values in a 10 - bit.
It is a walk in the park when it comes to adjustments to the basic settings such as contrast, brightness, and white balance. But, the resulting output will be mid.
Wrapping up the differences, 3D LUTs are essential for colorists and editors since they can carry out tons of color customizations. Therefore, they can make their work uniquely stunning.

How to Import 3D LUT to Photoshop
There are some 3D LUTs that Adobe Photoshop provides. Usually, these LUTs are limited and are not very effective when working on major projects. Most people, therefore, prefer to add their own 3D LUTs to Photoshop.
There are two ways to import 3D LUT to Photoshop; Adding LUTs to a specific project and Installing LUTs.
Before applying any of the two methods, you need to ensure you have your LUTs right there. You can purchase them or get them for free. Download them to your computer device.
Method 1. Adding LUTs to a Particular Project
This first step is undemanding since you only have to locate a given LUT and then directly incorporate it into your project.
Step 1. Unzip your LUTs
First, you ought to unzip your files. In Mac devices, you double-click on the file to unzip it, whereas, in Windows, you right-click then select “Extract all” from the drop-down list.
 SwifDoo PDF Perpetual (2-PC) Free upgrade. No monthly fees ever.
Step 2. Create a Project
Go to the Photoshop app and create a new project. Load the image that you want to edit to Photoshop.
Step 3. Generate a new Adjustment Layer in Color Look Up
Go to the “Color Look Up” tab, then click on the “Adjustment” option.
 SwifDoo PDF Perpetual (1 PC) Free upgrade. No monthly fees ever.
Step 4. Open 3D LUTs
A drop-down list will be displayed by clicking on the “Adjustment” option. From the list, select “Load 3D LUT.”

Step 5. Add your LUTs
Lastly, load your LUTs. Click on the drop-down arrow, and a list of LUTs will be presented. Select the one that you had unzipped.

Method 2. Installing LUTs
The second method of adding 3D LUTs to Photoshop is installing LUTs in the Photoshop installation folder.

Step 1. Open LUT Folder
Firstly, quit Photoshop app.
If you are using Mac, open the LUT folder by going to “Applications” > “Adobe Photoshop” > “Preset” > 3D LUTS.”
For Windows users, go to “Local disk C” > “Program Files” > “Adobe” > “Adobe Photoshop” > “Presets” > “3D LUTS.”
Step 2. Create a new Folder
After accessing your 3D LUTs on your computer, you need to create a new folder that will contain your new LUTs. Right-click, then click on “New folder.” Name the folder based on your preference.
Step 3. Copy and Paste your LUTs
Copy your LUTs and paste them to the folder you have just created.
Step 4. Restart Photoshop
Lastly, restart your Photoshop app. You can access your new files by clicking “Color Lookup” > “Adjustment layer.” Usually, the files are saved as .cube files.

How to Use 3D LUT in Photoshop
Now that you have incorporated your 3D LUTs into the Photoshop folder, it is that time that you make use of it.

Step 1. Open your Project Image
First, go to your Photoshop app and add your photo.
Step 2. Open the Adjustment Panel
Hover over to “Color Lookup” and then select “Adjustments.”
In some instances, the Adjustment tab might be turned off. For this case, click on the windows option at the top of your interface, then select “Adjustment”. Alternatively, you can access color look up adjustment by heading over to the Layers panel and clicking on “Adjustment.” From the drop-down menu, click on “Color Lookup.”
Step 3. Load 3D LUT
In the “Color lookup panel,” a drop-down list will be displayed. Select “Load 3D LUT.”

Step 4. Apply your 3D LUT
Here is our final step in 3D LUT Photoshop. After selecting “Load 3D LUT,” various LUTs will be displayed. Now, you need to select the LUT you added to the application.
Usually, the added LUTs are in .cube format, so select one that will work best with your project and apply it.
After applying your desired LUT, you can regulate the opacity levels by either lowering or raising the adjustment layer.
More Photoshop editing tips
Bonus! Get 3D LUT File Photoshop Download Free
You don’t always have to pay for you to access 3D LUT files. Besides, tons of excellent 3D LUT files are offered for free.
Here are some of the places where you can access the 3D LUT file Photoshop free download:
1. PhotoshopDream
Another exceptional platform where you can get free 3D LUTs is PhotoshopDream. Here, you will access over 450 3D LUT Photoshop downloads for free. The 3D LUTs are compatible with footage from most cameras, including Sony RX10, Arri Alexa, Samsung NX1, and Lumix LX 100.
An outstanding factor about these 3D LUTs is that not only will you be able to use them in Photoshop alone but also in other video editing software such as, After Effects, Sony Vegas, and Premiere Pro. There is no attribute required when using these 450+ 3D LUTs in PhotoDream.
2. FixThePhoto
FixThePhoto is a renowned source of free 3D LUTs. There are over 200 free LUTs that will allow you to create eye-catching and vibrant projects.
Here, LUTs are arranged in various categories to suit every need. Some of the categories include Free Film LUTs, Free Wedding LUTs, Free Color LUTs, Free Ground Control LUTs, and LUTs for Premiere.
The 3D LUTs Photoshop in FixThePhoto is mostly essential for editing footage for travel, lifestyle, and wedding.
3. Giggster
Giggster is an ideal platform that offers free photography, guides, retouching tools, resources, tips, and tricks.
Giggster also offers free LUTs for Photoshop. It has a collection of over 12 free 3D LUTs. And with them, you can be able to carry out color grading and add tons of creative effects to your project.
3. Giggster
Free 3D LUTs can also be accessed from ON1. Here, you can download 3D LUTs for free and use them to stylize your photo.
Some of the free 3D LUTs in ON1 include Cinematic, Portrait, B&W, and Moody. Usually, the 3D LUTs in ON1 function effectively in software that supports .cube files – This includes Photoshop, Lightroom, and Adobe Premium.
ON1 has various special offers on some of their premium 3DLUTs. You can also check some of the great offers offered on this site.
 vMix 4K - Software based live production. vMix 4K includes everything in vMix HD plus 4K support, PTZ control, External/Fullscreen output, 4 Virtual Outputs, 1 Replay, 4 vMix Call, and 2 Recorders.
Adjust Your Video Color with Filmora
Photos aren’t the only thing that requires color correction, videos also need color correction. When it comes to correcting or adjusting color in your video, you should choose the editor carefully to make sure it is easy to operate and get the outcome you want. We would like to recommend Filmora to you. As a video editing software for users of different levels, Filmora allows you to import 3D LUTs to use on your videos, you can also adjust the color setting by yourself. The below video can definitely help you learn more about how Filmora going to help you with the color of your videos.
For Win 7 or later (64-bit)
For macOS 10.12 or later
Conclusion
● Turn your footage into a masterpiece with 3D LUTs in Photoshop. By majoring in customizability and the number of operations, it is clear that 3D LUTs are way better than 1D LUT. Download free 3D LUTs from the sources above and import them to your Photoshop app.
● When using LUTs, there are a couple of things that you need to have right under your nose:
- Make sure that the white balance is accurate
- Carry out small adjustments to your footage, i.e., saturation and contrast, for you to obtain exemplary results
- Have correct exposure. You can use a histogram to aid you in this.
Creating a filter to use is a satisfying activity. Now, the shortcoming arises when you want to use a filter in Photoshop and you have a limited amount of time. To do the trick here, you can import LUTs to your Photoshop and briskly incorporate it into your project in seconds - This calls a halt to the extremes of creating a filter.
Even though 3D LUT is mainly associated with video projects, it conversely works with photos in Photoshop. You don’t have to sweat it when incorporating 3D LUT in Photoshop since here is a complete guide to using 3D LUT in Photoshop.
In this article
02 How to Import 3D LUT to Photoshop
03 How to Use 3D LUT in Photoshop

What is 3D LUT?
3D LUT (Look-Up-Table) is a function key that maps a given color space to another. Technically, LUTs are used for complex processes such as converting an image shot from a Canon Log profile and making it more enticing or converting one image color space to its better version.
Working with LUTs, there are two types; 3D LUT and 1D LUT. The difference is that the former provides room for complex color operations, whereas the latter has limitations on the number of color operations.
Here are more differences between 3D and 1D LUTs:
3D LUT
It Places luma and color in a 3D (Cube) form; hence very easy to work with.
The output values are not from each respective combination in a color space.
It is a bit complex when customizing the basic settings such as contrast and white balance. Usually, the final result becomes remarkable.
1D LUT
The color and luma are placed in a 1D; hence quite not easy to work on.
It contains a clear value of the outputs and on the basis of the bit depth, i.e., 1024 values in a 10 - bit.
It is a walk in the park when it comes to adjustments to the basic settings such as contrast, brightness, and white balance. But, the resulting output will be mid.
Wrapping up the differences, 3D LUTs are essential for colorists and editors since they can carry out tons of color customizations. Therefore, they can make their work uniquely stunning.
How to Import 3D LUT to Photoshop
There are some 3D LUTs that Adobe Photoshop provides. Usually, these LUTs are limited and are not very effective when working on major projects. Most people, therefore, prefer to add their own 3D LUTs to Photoshop.
There are two ways to import 3D LUT to Photoshop; Adding LUTs to a specific project and Installing LUTs.
Before applying any of the two methods, you need to ensure you have your LUTs right there. You can purchase them or get them for free. Download them to your computer device.
Method 1. Adding LUTs to a Particular Project
This first step is undemanding since you only have to locate a given LUT and then directly incorporate it into your project.
Step 1. Unzip your LUTs
First, you ought to unzip your files. In Mac devices, you double-click on the file to unzip it, whereas, in Windows, you right-click then select “Extract all” from the drop-down list.
Step 2. Create a Project
Go to the Photoshop app and create a new project. Load the image that you want to edit to Photoshop.
Step 3. Generate a new Adjustment Layer in Color Look Up
Go to the “Color Look Up” tab, then click on the “Adjustment” option.
Step 4. Open 3D LUTs
A drop-down list will be displayed by clicking on the “Adjustment” option. From the list, select “Load 3D LUT.”
Step 5. Add your LUTs
Lastly, load your LUTs. Click on the drop-down arrow, and a list of LUTs will be presented. Select the one that you had unzipped.
Method 2. Installing LUTs
The second method of adding 3D LUTs to Photoshop is installing LUTs in the Photoshop installation folder.
Step 1. Open LUT Folder
Firstly, quit Photoshop app.
If you are using Mac, open the LUT folder by going to “Applications” > “Adobe Photoshop” > “Preset” > 3D LUTS.”
For Windows users, go to “Local disk C” > “Program Files” > “Adobe” > “Adobe Photoshop” > “Presets” > “3D LUTS.”
Step 2. Create a new Folder
After accessing your 3D LUTs on your computer, you need to create a new folder that will contain your new LUTs. Right-click, then click on “New folder.” Name the folder based on your preference.
Step 3. Copy and Paste your LUTs
Copy your LUTs and paste them to the folder you have just created.
Step 4. Restart Photoshop
Lastly, restart your Photoshop app. You can access your new files by clicking “Color Lookup” > “Adjustment layer.” Usually, the files are saved as .cube files.

How to Use 3D LUT in Photoshop
Now that you have incorporated your 3D LUTs into the Photoshop folder, it is that time that you make use of it.
Step 1. Open your Project Image
First, go to your Photoshop app and add your photo.
Step 2. Open the Adjustment Panel
Hover over to “Color Lookup” and then select “Adjustments.”
In some instances, the Adjustment tab might be turned off. For this case, click on the windows option at the top of your interface, then select “Adjustment”. Alternatively, you can access color look up adjustment by heading over to the Layers panel and clicking on “Adjustment.” From the drop-down menu, click on “Color Lookup.”
 Project Manager - Asset Browser for 3Ds Max
Step 3. Load 3D LUT
In the “Color lookup panel,” a drop-down list will be displayed. Select “Load 3D LUT.”
Step 4. Apply your 3D LUT
Here is our final step in 3D LUT Photoshop. After selecting “Load 3D LUT,” various LUTs will be displayed. Now, you need to select the LUT you added to the application.
Usually, the added LUTs are in .cube format, so select one that will work best with your project and apply it.
After applying your desired LUT, you can regulate the opacity levels by either lowering or raising the adjustment layer.
 Epubor Audible Converter for Mac: Download and convert Audible AAXC/AA/AAX to MP3 with 100% original quality preserved.
More Photoshop editing tips
Bonus! Get 3D LUT File Photoshop Download Free
You don’t always have to pay for you to access 3D LUT files. Besides, tons of excellent 3D LUT files are offered for free.
Here are some of the places where you can access the 3D LUT file Photoshop free download:
1. PhotoshopDream
Another exceptional platform where you can get free 3D LUTs is PhotoshopDream. Here, you will access over 450 3D LUT Photoshop downloads for free. The 3D LUTs are compatible with footage from most cameras, including Sony RX10, Arri Alexa, Samsung NX1, and Lumix LX 100.
An outstanding factor about these 3D LUTs is that not only will you be able to use them in Photoshop alone but also in other video editing software such as, After Effects, Sony Vegas, and Premiere Pro. There is no attribute required when using these 450+ 3D LUTs in PhotoDream.
2. FixThePhoto
FixThePhoto is a renowned source of free 3D LUTs. There are over 200 free LUTs that will allow you to create eye-catching and vibrant projects.
Here, LUTs are arranged in various categories to suit every need. Some of the categories include Free Film LUTs, Free Wedding LUTs, Free Color LUTs, Free Ground Control LUTs, and LUTs for Premiere.
The 3D LUTs Photoshop in FixThePhoto is mostly essential for editing footage for travel, lifestyle, and wedding.
3. Giggster
Giggster is an ideal platform that offers free photography, guides, retouching tools, resources, tips, and tricks.
Giggster also offers free LUTs for Photoshop. It has a collection of over 12 free 3D LUTs. And with them, you can be able to carry out color grading and add tons of creative effects to your project.
3. Giggster
Free 3D LUTs can also be accessed from ON1. Here, you can download 3D LUTs for free and use them to stylize your photo.
Some of the free 3D LUTs in ON1 include Cinematic, Portrait, B&W, and Moody. Usually, the 3D LUTs in ON1 function effectively in software that supports .cube files – This includes Photoshop, Lightroom, and Adobe Premium.
ON1 has various special offers on some of their premium 3DLUTs. You can also check some of the great offers offered on this site.
 Jet Profiler for MySQL, Enterprise Version: Jet Profiler for MySQL is real-time query performance and diagnostics tool for the MySQL database server. Its detailed query information, graphical interface and ease of use makes this a great tool for finding performance bottlenecks in your MySQL databases.
 Adjust Your Video Color with Filmora
Photos aren’t the only thing that requires color correction, videos also need color correction. When it comes to correcting or adjusting color in your video, you should choose the editor carefully to make sure it is easy to operate and get the outcome you want. We would like to recommend Filmora to you. As a video editing software for users of different levels, Filmora allows you to import 3D LUTs to use on your videos, you can also adjust the color setting by yourself. The below video can definitely help you learn more about how Filmora going to help you with the color of your videos.
For Win 7 or later (64-bit)
For macOS 10.12 or later

Conclusion
● Turn your footage into a masterpiece with 3D LUTs in Photoshop. By majoring in customizability and the number of operations, it is clear that 3D LUTs are way better than 1D LUT. Download free 3D LUTs from the sources above and import them to your Photoshop app.
● When using LUTs, there are a couple of things that you need to have right under your nose:
- Make sure that the white balance is accurate
- Carry out small adjustments to your footage, i.e., saturation and contrast, for you to obtain exemplary results
- Have correct exposure. You can use a histogram to aid you in this.
- Title: 2024 Approved In-Depth Exploration of PS 3D LUTs for Exceptional Image Grading
- Author: Frank
- Created at : 2024-07-26 13:36:24
- Updated at : 2024-07-27 13:36:24
- Link: https://some-techniques.techidaily.com/2024-approved-in-depth-exploration-of-ps-3d-luts-for-exceptional-image-grading/
- License: This work is licensed under CC BY-NC-SA 4.0.