"2024 Approved Harnessing the Power of Dynamic Images in iOS"
Harnessing the Power of Dynamic Images in iOS
Live Photo Complete Guide: How to Use it on iPhone

Ollie Mattison
Mar 27, 2024• Proven solutions
Are you aware of the term live photos? An exciting moving pictures iPhone camera settings, iPhone live photo creates moving images and brings the photos to life. The live photos allow you to capture both audios and videos for 1.5 seconds before and after the tap on the shutter button. So, basically, you get 3 seconds high quality live pictures on iPhone.
Live photos are specific functions of the Apple products, introduced first on the 6s and 6s Plus devices, and later on, the iOS live photos became available on iOS devices as well.
A still photo can just capture your moment but, the live photos can capture images along with sound and movement. You may also add bounce or loop video effects, to convert your iPhone live photo into spectacular long image exposure. This tutorial is a complete guide to learn the uses of live photos for creating the live memories with iPhone.
- Part1: How do You Take iPhone Live Photos?
- Part2: How to Edit Live Photos?
- Part3: How to Turn off Live Photos?
- Part4: How to Change Your Key Photo for Live Photos?
- Part5: How to Add Live Photo to Lock Screen?
- Part6: Information Unlimited
Part1: How do You Take iPhone Live Photos?
Taking the iPhone camera live is very easy and simple. No sooner does the iPhone native camera application is opened, it starts recording the video. Live photos are already enabled on iPhone that helps to record the video with the opening of the application and when you tap the shutter button on, 1.5 seconds of the live pictures iPhone is already captured till you start the shutter button and saved, including the 1.5 seconds before starting the shutter button along with the image captured.
Steps-
- Aim at the subject you wish to click and open the camera app
- Ensure that the shooting option is set to Photo
- When you click on the app, you can see a yellow color live button
- If the button is white, click on it and turn it on
- A yellow color circle appears in the top middle, beside the HDR camera control
- A viewfinder appears in yellow color which is creating the iPhone live photo
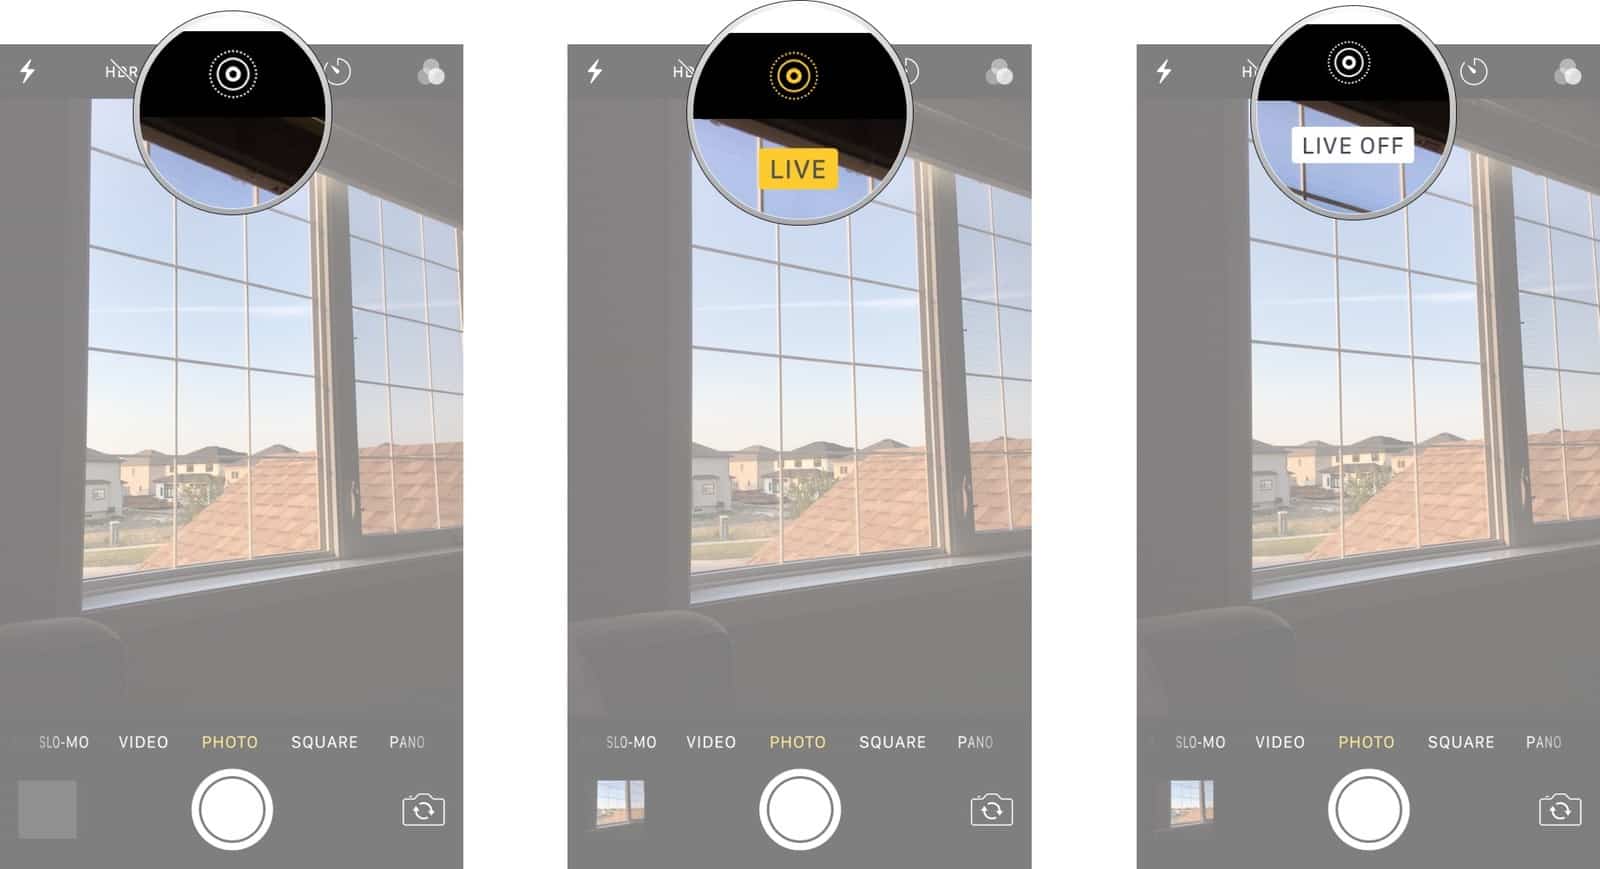
Image comes from iMore
It records only 1.5 seconds of the video prior to the starting the shutter button, rest of the videos recorded earlier after opening the app is discarded, without creating storage issues.
Part2: How to Edit Live Photos?
Editing is always fun. Post recording the moving picture iPhone device allows you to add effects to it as well. You may click on the right side corner edit option at the top, after entering the photos app. When the editing tool appears. You may crop, rotate, add color or make lighting adjustments. With iOS live photos, your photo can be more creative, unique, expressive, and super fun. In order to edit the live photos, open the app at first, swipe up till you see the effects, select the long exposure, create a video loop, or make it bounce and play back and forth, or create a magical blur or night sky in long exposure. Only the official photo editing option in iPhone can be used in order to get the dynamic effects.

Part3: How to Turn off Live Photos?
Keeping the iPhone Live photos on every moment can be quite space consuming. It creates 2 files- .mov and .jpeg. Each of the files is filled up with a lot of megabyte of space. Although the videos captured are of lesser resolution than the images, still it is double size of the images. To turn off the live photos, tap on the yellow concentric circles’ icon at the top middle beside the HDR. Tapping on it disables the live photos for the time.
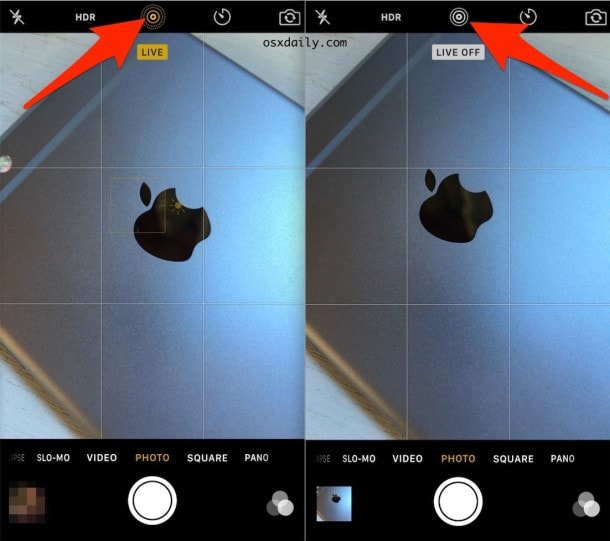
Image comes from OSXDaily
Part4: How to Change Your Key Photo for Live Photos?
Changing a key image for live pictures is nothing difficult. You just need to make the iPhone camera live, tap the Edit option and move the slider for changing the frame. Once done, release your finger and click on the make key photo option and then tap. You may toggle the live Photo effects off and on when required.
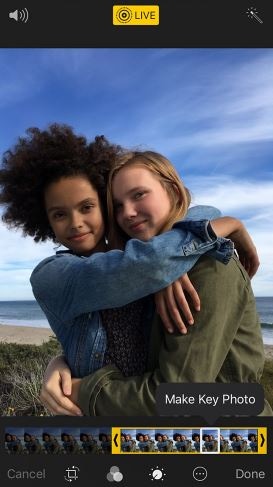
Image comes from Apple
Part5: How to Add Live Photo to Lock Screen?
Do you wish to enhance your iPhone lock screen by adding a live photo? You may set and activate the iPhone live photo as wallpaper using the 3D touch at any point of time. It’s like adding wallpaper to any other phone but with few added steps. Select a wallpaper from the iPhone live photos list, opening the setting app. Next, create a live photo, tapping “all photos”. Now, choose the live photo you wish to use as the lock screen and select “set as lock screen”. You may make your lock screen dynamic or static as per your wish.
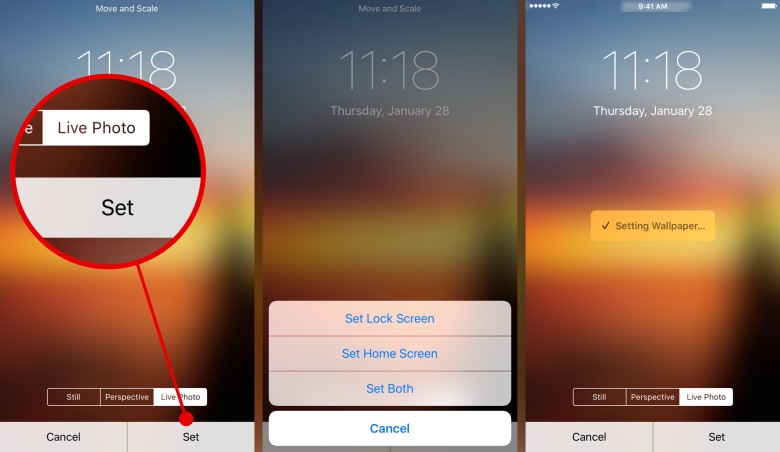
Image comes from Cult of Mac
Part6: Information Unlimited
Before using the iPhone live photo app or going iPhone camera live, here are some essential information to keep in note of-
The app captures only 1.5 seconds prior to tapping the shutter and not the entire video recorded once you open the app. Therefore, the storage remains stable and it is not filled up to make your iPhone functioning slow.
It takes a total of 3 seconds to record a video for 1.5 seconds and followed by capture image 1.5 seconds. As it is recording live pictures iPhone device already captures the 1.5 seconds leading to the shutter button press, and saves it along with the rest 1.5 seconds for image capture.
Sharing the photos is an interesting part and if you think you will be unable to share the iPhone live photos, then you are mistaken. You can share live photo to devices runing iOS 9 or above. The OS X El Capitan also supports sharing the Live photos.
Remember one thing that while you open the iPhone live photos app, the audio option is always switched on. So, whatever you speak, shout, or discuss will be clearly recorded in the video. Keep in mind that shouting at the top of your voice and asking a person to move so that you can click a great view or moving pictures on iPhone can spoil your live photos. So, beware.
Conclusion
The digital photography gets a completely new dimension through the iPhone live photos. Press the shutter button of your iOS devices and capture live pictures on iPhone. The Live photo is so much fun. You can try it right away and get creative. Although there are few drawbacks like editing full file or switching off the audio option not yet available, still the live photos truly help in capturing the images with its essence intact.
Images come from the Internet
Ollie Mattison
Ollie Mattison is a writer and a lover of all things video.
Follow @Ollie Mattison
Ollie Mattison
Mar 27, 2024• Proven solutions
Are you aware of the term live photos? An exciting moving pictures iPhone camera settings, iPhone live photo creates moving images and brings the photos to life. The live photos allow you to capture both audios and videos for 1.5 seconds before and after the tap on the shutter button. So, basically, you get 3 seconds high quality live pictures on iPhone.
Live photos are specific functions of the Apple products, introduced first on the 6s and 6s Plus devices, and later on, the iOS live photos became available on iOS devices as well.
A still photo can just capture your moment but, the live photos can capture images along with sound and movement. You may also add bounce or loop video effects, to convert your iPhone live photo into spectacular long image exposure. This tutorial is a complete guide to learn the uses of live photos for creating the live memories with iPhone.
- Part1: How do You Take iPhone Live Photos?
- Part2: How to Edit Live Photos?
- Part3: How to Turn off Live Photos?
- Part4: How to Change Your Key Photo for Live Photos?
- Part5: How to Add Live Photo to Lock Screen?
- Part6: Information Unlimited
Part1: How do You Take iPhone Live Photos?
Taking the iPhone camera live is very easy and simple. No sooner does the iPhone native camera application is opened, it starts recording the video. Live photos are already enabled on iPhone that helps to record the video with the opening of the application and when you tap the shutter button on, 1.5 seconds of the live pictures iPhone is already captured till you start the shutter button and saved, including the 1.5 seconds before starting the shutter button along with the image captured.
Steps-
- Aim at the subject you wish to click and open the camera app
- Ensure that the shooting option is set to Photo
- When you click on the app, you can see a yellow color live button
- If the button is white, click on it and turn it on
- A yellow color circle appears in the top middle, beside the HDR camera control
- A viewfinder appears in yellow color which is creating the iPhone live photo
Image comes from iMore
It records only 1.5 seconds of the video prior to the starting the shutter button, rest of the videos recorded earlier after opening the app is discarded, without creating storage issues.
Part2: How to Edit Live Photos?
Editing is always fun. Post recording the moving picture iPhone device allows you to add effects to it as well. You may click on the right side corner edit option at the top, after entering the photos app. When the editing tool appears. You may crop, rotate, add color or make lighting adjustments. With iOS live photos, your photo can be more creative, unique, expressive, and super fun. In order to edit the live photos, open the app at first, swipe up till you see the effects, select the long exposure, create a video loop, or make it bounce and play back and forth, or create a magical blur or night sky in long exposure. Only the official photo editing option in iPhone can be used in order to get the dynamic effects.
Part3: How to Turn off Live Photos?
Keeping the iPhone Live photos on every moment can be quite space consuming. It creates 2 files- .mov and .jpeg. Each of the files is filled up with a lot of megabyte of space. Although the videos captured are of lesser resolution than the images, still it is double size of the images. To turn off the live photos, tap on the yellow concentric circles’ icon at the top middle beside the HDR. Tapping on it disables the live photos for the time.
Image comes from OSXDaily
Part4: How to Change Your Key Photo for Live Photos?
Changing a key image for live pictures is nothing difficult. You just need to make the iPhone camera live, tap the Edit option and move the slider for changing the frame. Once done, release your finger and click on the make key photo option and then tap. You may toggle the live Photo effects off and on when required.
Image comes from Apple
Part5: How to Add Live Photo to Lock Screen?
Do you wish to enhance your iPhone lock screen by adding a live photo? You may set and activate the iPhone live photo as wallpaper using the 3D touch at any point of time. It’s like adding wallpaper to any other phone but with few added steps. Select a wallpaper from the iPhone live photos list, opening the setting app. Next, create a live photo, tapping “all photos”. Now, choose the live photo you wish to use as the lock screen and select “set as lock screen”. You may make your lock screen dynamic or static as per your wish.
Image comes from Cult of Mac
Part6: Information Unlimited
Before using the iPhone live photo app or going iPhone camera live, here are some essential information to keep in note of-
The app captures only 1.5 seconds prior to tapping the shutter and not the entire video recorded once you open the app. Therefore, the storage remains stable and it is not filled up to make your iPhone functioning slow.
It takes a total of 3 seconds to record a video for 1.5 seconds and followed by capture image 1.5 seconds. As it is recording live pictures iPhone device already captures the 1.5 seconds leading to the shutter button press, and saves it along with the rest 1.5 seconds for image capture.
Sharing the photos is an interesting part and if you think you will be unable to share the iPhone live photos, then you are mistaken. You can share live photo to devices runing iOS 9 or above. The OS X El Capitan also supports sharing the Live photos.
Remember one thing that while you open the iPhone live photos app, the audio option is always switched on. So, whatever you speak, shout, or discuss will be clearly recorded in the video. Keep in mind that shouting at the top of your voice and asking a person to move so that you can click a great view or moving pictures on iPhone can spoil your live photos. So, beware.
Conclusion
The digital photography gets a completely new dimension through the iPhone live photos. Press the shutter button of your iOS devices and capture live pictures on iPhone. The Live photo is so much fun. You can try it right away and get creative. Although there are few drawbacks like editing full file or switching off the audio option not yet available, still the live photos truly help in capturing the images with its essence intact.
Images come from the Internet
Ollie Mattison
Ollie Mattison is a writer and a lover of all things video.
Follow @Ollie Mattison
Also read:
- [New] How to Channel Your Inner Metaverse Wit
- [Updated] Expert E-Learning Title Engineer
- [Updated] Expert's Choice Top 6 Software Solutions for Signature Erasure
- [Updated] Exploring Automatic Aspect Ratios in iMovie for 2024
- [Updated] Graphic Design Journeys From Passion to Profession
- [Updated] High-End Desktops for Professionals
- [Updated] In 2024, Surging Social Media Accelerating Instagram Interactions
- [Updated] Setting Up Facebook Viewing for Smooth Apple TV Experience for 2024
- 2024 Approved How to Use Preview App on Mac [Complete Guide]
- Best 4 Elon Musk Voice Generators to Make You Sound Like the Billionaire for 2024
- Exploring the World of DACs - What Are They and Why Might You Need One In Your Tech Arsenal?
- In 2024, Expand Your Viewing Realm on YouTube Platforms
- In 2024, File Sync-Up The 5 Fundamental Ways for Your Computer Upload
- In 2024, Guide Integrating Chapter Markers in YouTube Videos
- In 2024, Prime Binge-Worthy Hits Highest Tweets & View Counts
- Refreshing Windows Paperwork Handler
- The Complete Guide to Tecno Spark 10 4G FRP Bypass Everything You Need to Know
- Title: 2024 Approved Harnessing the Power of Dynamic Images in iOS
- Author: Frank
- Created at : 2025-01-26 00:13:17
- Updated at : 2025-01-29 08:16:07
- Link: https://some-techniques.techidaily.com/2024-approved-harnessing-the-power-of-dynamic-images-in-ios/
- License: This work is licensed under CC BY-NC-SA 4.0.