
"2024 Approved From Basics to Brilliance Fullscreen Proficiency in Premiere"
From Basics to Brilliance: Fullscreen Proficiency in Premiere
Getting a full screen preview of your project is an important post-production step. This is because the default preview window of most editors can be too small to show all the flaws in your clips. For example, you may have missed a spot during the color correction, which you would have missed when using normal view. However, accessing the function varies with the software and your device’s operating system. Here is how to access premiere pro full screen preview from different devices.
Part1: How to Do Full Screen Preview with Premiere Pro?
Adobe Premiere Pro is one of a videographer’s best video editing software. This is because it offers you one of the largest libraries of creative and editing assets. Furthermore, you can work cross-platform through the Creative Clouds service.
Unfortunately, this becomes challenging for Windows and macOS users because of the operation difference between their devices. For example, the key names differ on each device’s keyboard. Windows Keyboards feature the CTRL key, and Apple offers the COMMAND key instead. As such, it is challenging to locate functions with HOTKEYS.
Below is a full guide on how to access Premiere full screen preview on both devices.
Windows Users
- Launch Adobe Premiere Pro from your device and open your project file.
- Once all the clips load on their tracks, you begin editing with the suite of creative assets from the program library. Some of the edits you can do include applying color LUTS and green screen.
- Then, tap the Play button or the SPACEBAR key on your keyboard to preview your work.
- To enable a large screen preview, press the Grave Key (represent by ~ on a Windows keyboard. Also it shares the key with `) to enlarge the preview window.
- To activate Premier Pro full screen preview, just tab the same key while pressing Ctrl. In addition, the HOT KEY shortcut works with every video clip you want to preview.

- Finally, you deactivate the function by pressing CTRL and ~ to return to the normal screen.
macOS Users
The process for macOS users is similar to the above. However, you will notice a difference in the HOT KEYS shortcuts.
- Launch the program and click on the Open Project option to access your project. Alternatively, you can directly access the program by clicking the project file on your storage device.
- Then, select the clip you want to preview and hit the SPACEBAR to play the video. You can also activate play by clicking the Play button from your monitor panel.
- To enable a full screen preview, simply press Control Key (represented by a ^ on the Mac keyboard) while tapping the Grave Key (represented by a ‘) on your keyboard to activate the Premiere full screen preview. In addition, you can deactivate it by hitting the combination again. It’s quite easy to reach with only the left hand.

Pro tips: If you still find the combination complex, here’s how to change it:
First, click “Premiere Pro” on the top menu, and choose Keyboard Shortcuts.
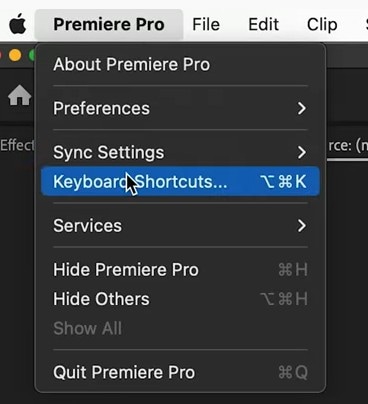
Then, search for “Full” and you will see the defult shortcut. Click to change it to keys you want.

Did you know you can also determine safe zone margins using Premiere Pro? These varying border lines on your Monitor Panel help you determine which objects are out of frame. Unfortunately, the feature is unavailable on previews or export files. Regardless, it is an extremely useful feature for your post-production. Follow these steps to enable it in your projects.
- Launch Premiere Pro on your device and import your clip to the Monitor Panel.
- Select the clip you want to edit and right-click on the screen.
- Enable the Safe Margins option by checking the box beside its name.
Part2: What If Full Screen Preview lags heavily?
So, you now know how to access Adobe Premiere Pro Full Screen Preview, but there is a problem. Your videos are not playing right, and you are wondering what to do. Here are a few solutions when you notice full screen preview is lagging
1. Fix your video rendering and playback setting
Adobe Premiere Pro is configured to utilize your device’s GPU for rendering. However, using the wrong video rendering and playback settings can cause your full screen preview to lag. Follow these steps to fix the problem.
- Tap on Project settings to open the settings menu.
- Then, proceed to Renderer to view your current settings. You will find the option under video rendering and playback.
- Choose your device’s GPU as the default option to activate GPU acceleration. In addition, you will need a compatible graphics processing unit to support this function.
2. Uncheck the Mercury Transmit Feature
Another reason for full screen preview lag is Mercury Transmit. The feature allows you to transmit your video to a secondary screen. However, it takes up valuable RAM, especially when you do not own a second monitor. Here is how to disable it.
- Open your program settings and proceed to the Playback
- Uncheck the Enable Mercury Transmit option in the resulting menu.
3. Always update your system hardware and software
Sometimes your full screen previews may lag because you miss the latest updates. Typically, developers provide users with free regular updates to make their software run better. For example, Adobe Premiere Pro issues regular updates to fix bugs and provide you with more creative library content.
As such, ensure you have the Check For Updates function enabled in your programs. Kindly note the feature only works if your device has an active internet connection.
4. Play the video at a lower playback resolution
It is not wrong wanting to preview your video at 4K resolution. However, this can cause the program to lag significantly, especially if your device has low specs. In addition, changing your preview’s playback resolution does not affect its export settings. Follow these steps to make the changes:
- Access the Playback Resolution menu of your video clip from the Settings
- Then, alternate between lower values until the video lag stops. Currently, you can lower your Premiere full screen preview playback resolution up to 1/16 the original value.
Part3: What’s the Best Alternative to Premiere Pro?

So, you have given up on Premiere Pro’s persistent problems. What is the alternative? Wondershare’s Filmora is arguably one of the best alternatives you have. Here is evidence why you should consider it for your video editing.
- The program is compatible with macOS and Windows devices.
- You get a 7-day trial and 30-day money-back guarantee with every subscription.
- It comes with tons of presets you can use to rival the best Hollywood directors.
- It is not device resource-intensive, meaning you do not need a high-end device to run it smoothly.
Free Download For Win 7 or later(64-bit)
Free Download For macOS 10.14 or later
2. How to full screen preview with Filmora
Now that you have your active trial subscription, this is how you activate full screen preview with Filmora.
Windows Users
- Launch Filmora using the designated program shortcut.
- Load the video clips you want to edit to the Timeline.
- Then, select the section you want to preview full screen, click play, and press the ALT and TAB keys simultaneously. You can also enable full screen by clicking the dual arrow option on the bottom right corner of your preview screen.
Mac Users
- Open the Filmora Project you want to edit from your device’s storage.
- Once the project loads, make your edits using the different tools available on the Timeline page. For example, you can use the Green Screen tool to alternate between creative backgrounds.
- Then, click on the Play button to review your editing in normal on the Timeline preview window.
- Finally, activate the full screen preview by tapping the double-arrow icon next to the volume icon. Alternatively, you can activate it by pressing the OPTION and ENTER keys simultaneously.
Part4: FAQs
Do you need a high-end device to run Adobe Premium Pro and Filmora?
Yes, it would be best if you had a high-end PC to run Adobe Premium Pro. However, Filmora is less resource-hungry and will run smoothly on your standard device. For example, you can run it comfortably on a mac with an Intel 5 2.0 GHz processor and macOS 10.14.
Does Adobe Premium Pro offer a free trial?
No, Adobe does not offer a free trial for Premiere Pro. However, your first 7 days are free with any subscription. In addition, the developer is offering a 60% discount to students and teachers on all their creative products.
How do you get a free trial for Adobe Premiere Pro?
The process is really simple.
- Go to the Adobe Premiere Pro homepage and click free trial.
- Then, set up an Adobe ID or can log in to your account if you already have one.
- Select your subscription type, including your billing address, and proceed to checkout.
- You will receive a download link and install the program on your device. Kindly note that the trial is only valid for seven days, after which the charge applies.
Is a full screen preview really necessary?
Yes. There are many benefits to including a full screen preview in your post-production process. It allows you to review your work before releasing it to the public. As such, you can refine your editing and avoid releasing sub-standard work.
In addition, it enables you to collaborate with partners if you are working on a joint project. Therefore, everyone can chip in, and you complete the work faster.
Free Download For Win 7 or later(64-bit)
Free Download For macOS 10.14 or later
Free Download For macOS 10.14 or later
2. How to full screen preview with Filmora
Now that you have your active trial subscription, this is how you activate full screen preview with Filmora.
Windows Users
- Launch Filmora using the designated program shortcut.
- Load the video clips you want to edit to the Timeline.
- Then, select the section you want to preview full screen, click play, and press the ALT and TAB keys simultaneously. You can also enable full screen by clicking the dual arrow option on the bottom right corner of your preview screen.
Mac Users
- Open the Filmora Project you want to edit from your device’s storage.
- Once the project loads, make your edits using the different tools available on the Timeline page. For example, you can use the Green Screen tool to alternate between creative backgrounds.
- Then, click on the Play button to review your editing in normal on the Timeline preview window.
- Finally, activate the full screen preview by tapping the double-arrow icon next to the volume icon. Alternatively, you can activate it by pressing the OPTION and ENTER keys simultaneously.
Part4: FAQs
Do you need a high-end device to run Adobe Premium Pro and Filmora?
Yes, it would be best if you had a high-end PC to run Adobe Premium Pro. However, Filmora is less resource-hungry and will run smoothly on your standard device. For example, you can run it comfortably on a mac with an Intel 5 2.0 GHz processor and macOS 10.14.
Does Adobe Premium Pro offer a free trial?
No, Adobe does not offer a free trial for Premiere Pro. However, your first 7 days are free with any subscription. In addition, the developer is offering a 60% discount to students and teachers on all their creative products.
How do you get a free trial for Adobe Premiere Pro?
The process is really simple.
- Go to the Adobe Premiere Pro homepage and click free trial.
- Then, set up an Adobe ID or can log in to your account if you already have one.
- Select your subscription type, including your billing address, and proceed to checkout.
- You will receive a download link and install the program on your device. Kindly note that the trial is only valid for seven days, after which the charge applies.
Is a full screen preview really necessary?
Yes. There are many benefits to including a full screen preview in your post-production process. It allows you to review your work before releasing it to the public. As such, you can refine your editing and avoid releasing sub-standard work.
In addition, it enables you to collaborate with partners if you are working on a joint project. Therefore, everyone can chip in, and you complete the work faster.
Free Download For Win 7 or later(64-bit)
Free Download For macOS 10.14 or later
Also read:
- [New] 2024 Approved Embedding YouTube Videos Seamlessly Into Stories
- [New] Full Review of LG BP350 - From Screen Brightness to Audio Output
- [New] Making Memorable Impressions with FB Slideshow Features for 2024
- [New] Unlocking Video Revenue Potential The Facebook Marketing Playbook for 2024
- [Updated] Getting Ahead with Snapchat's Latest Features
- [Updated] Infusing Identity Tips for Iconic Podcast Graphics
- [Updated] The Ultimate Guide to Understanding and Leveraging Instagram's Reels for 2024
- 2024 Approved Face Fluidity Masterclass Perfecting the Art of Motion Blur via Picsart
- 2024 Approved Gopro Match-Up Ultimate Buyer's Analysis
- 2024 Approved Hacking HD Problems Clearing Chrome's Video Blockade on Social Platforms
- Cutting-Edge Video Tools Opt for Studio or Latest Beta Version
- Elevate Your AI Adventures: With Copilot and Turbo Combined
- How the Addition of Google Gemini Boosts Utility in Apple iPhones
- In 2024, Guide to Acquiring Free Picture Frame Videos
- In 2024, Hero5 Black in Action Essential Shooting Advice for Amazing Results
- In 2024, Hues Harmonized Implementing Color Strategies
- In 2024, Premier Selection of Moving Typefaces
- Revolutionize Your Live Broadcasts Using ManyCam - The Ultimate Software for Virtual Webcams
- Understanding Frequent Windows Hardware Issue Triggers - In-Depth Analysis by YL Computing
- Title: 2024 Approved From Basics to Brilliance Fullscreen Proficiency in Premiere
- Author: Frank
- Created at : 2025-02-03 19:16:09
- Updated at : 2025-02-09 18:57:26
- Link: https://some-techniques.techidaily.com/2024-approved-from-basics-to-brilliance-fullscreen-proficiency-in-premiere/
- License: This work is licensed under CC BY-NC-SA 4.0.