
"2024 Approved Expertise in iPhone The Ultimate HDR Photo Journey"
Expertise in iPhone: The Ultimate HDR Photo Journey
The Ultimate Guide of HDR Photo on iPhone Camera

Ollie Mattison
Mar 27, 2024• Proven solutions
Since we are all born photographers, we do try to satisfy this basic instinct. But we always can’t capture that “very moment” due to our DLSR unavailability. But don’t give up. One fact that may be hidden from you is the “iPhone HDR mode”. What you don’t know is that, you can take excellent HDR photo on iPhone. HDR iPhone is your hidden starlet.
- Part1: What does HDR photo mean
- Part2: How to use HDR photo on iPhone
- Part3: How to discard normal photo
- Part4: When to use iPhone HDR mode
- Part5: When not to take HDR photo on iPhone
Part1: What does HDR photo mean
For a novice like me, this seems like a million dollar question. HDR stands for “High Dynamic Range”. It explains the difference between the vision of a human eye and a camera. A human eye can miraculously differentiate between intensities of light and colour. Hence we can see perfect brightness, shadows, colours and contrasts. A camera cannot do that naturally. Like capturing sunset through lightened towers or darker object in bright surrounding can result in too bright or too dark photo.
The hidden star in such cases is the HDR effect. It merges “the lights” and “the darks” to give a better picture. It’s all about blending the photos with different exposures. iPhone HDR mode, will behind the scene, take 3 different exposures of the same image. Under-exposed (darkest), over-exposed (striking light) and normal. It will then blend all three to combine best parts. The resulting HDR photo will have best details, sharpness, colors and light.


Part2: How to use HDR photo on iPhone
If you are using the latest devices (iPhone 8/Plus and X), then there is good news for you. The camera sensors are improved to the extent that it captures highlights and shadows with best results.
- Open the camera application.
- Tap on HDR on the top.
- Tap on options “Auto” or “On”.
- Click to take photo

Part3: How to discard normal photo
If you want to discard normal photo, still, you have the option of disabling and manually controlling the HDR effect.
- Open settings
- Tap on camera from the list
- Under the HDR heading slide the toggle to “off”
.png) Kanto Player Professional
Kanto Player Professional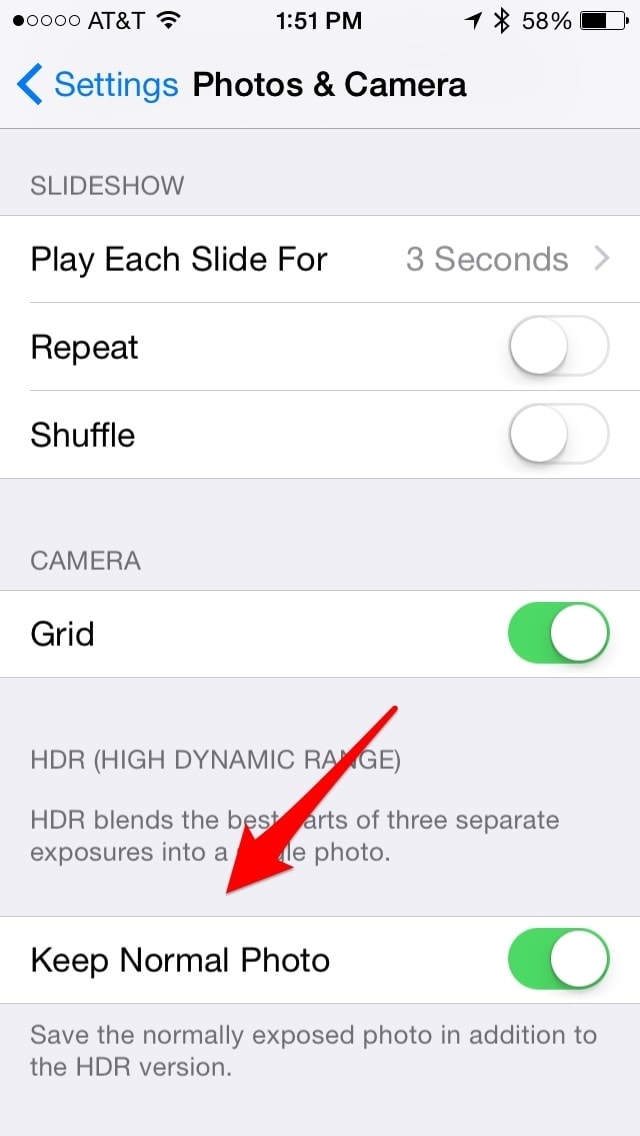
Rest is the same as previous devices. The HDR version, as well as the normal version of the photo, will be saved in the gallery. This can clearly help in comparing the effects and quality. But if you are worried about memory consumption then slide the toggle “keep normal photo” to off.
Now, as you know how to use it, you might get tempted to use it every time. No! Just like too much of sweet is bad for teeth, too much of HDR can also spoil the result. You should know when to use and when not to use it. For instance

Part4: When to use iPhone HDR mode
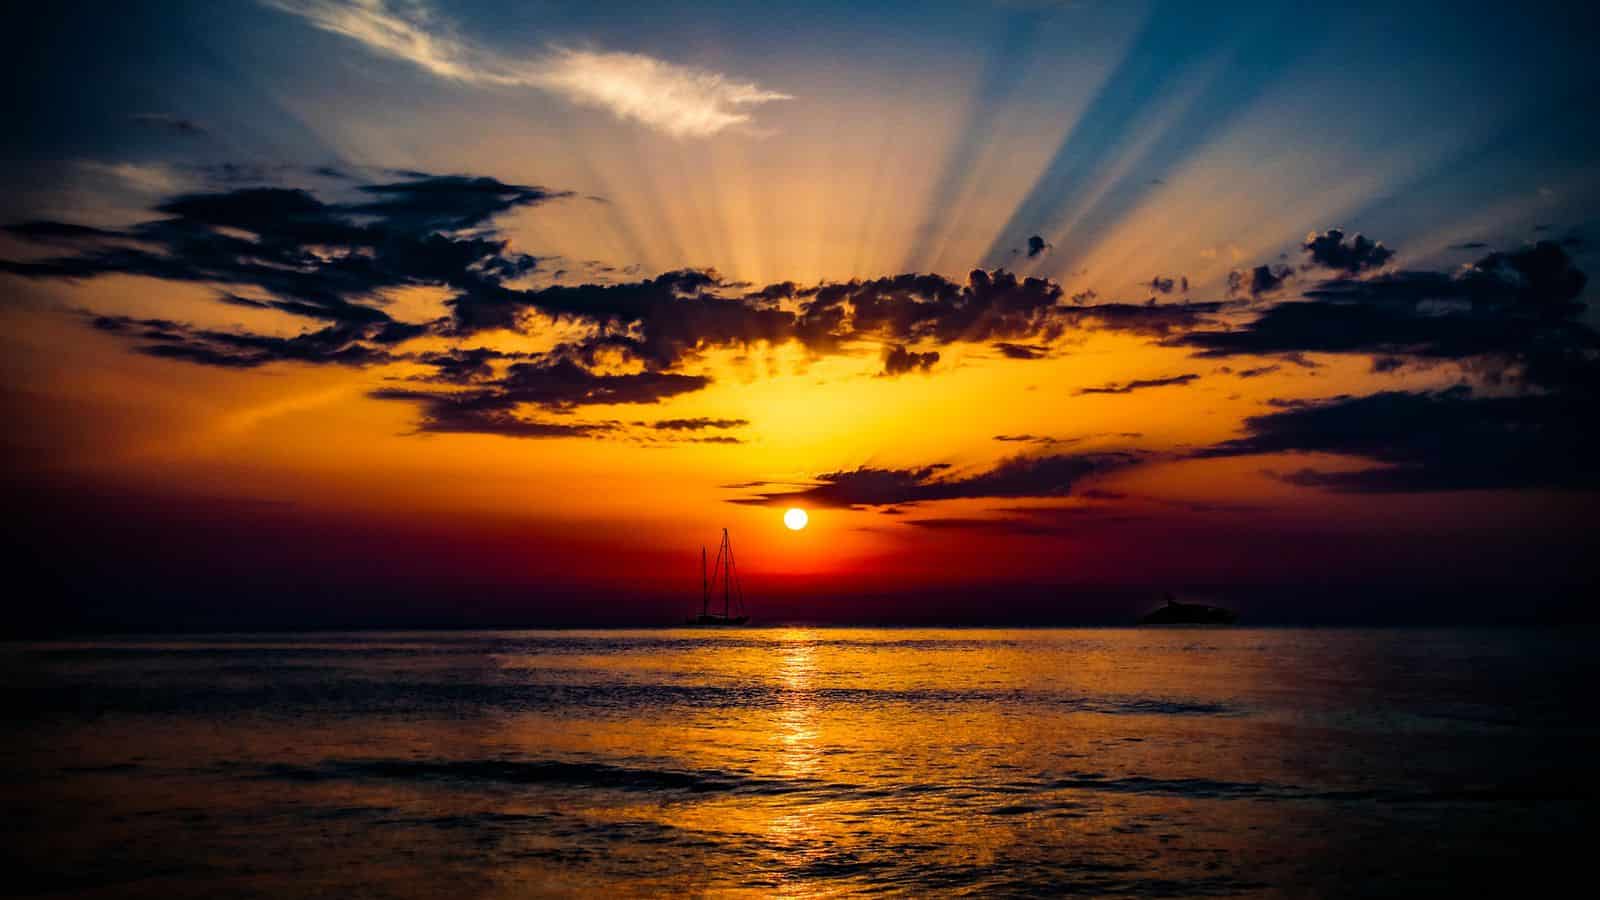
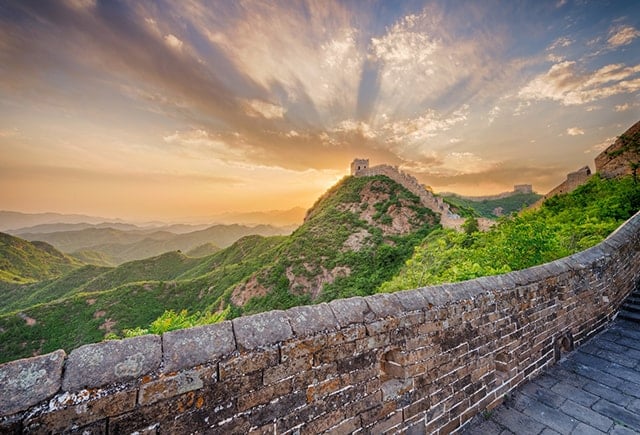
Landscapes
Landscapes are about the contrast. So instead of hemming and hawing over the blown-out sky for land details or perfectly coloured sky for blackened land, use HDR. It’s best to capture the “brightest white” to the “darkest black”. The merging of lightest and darkest element will give best results.
 Lyric Video Creator Professional Version
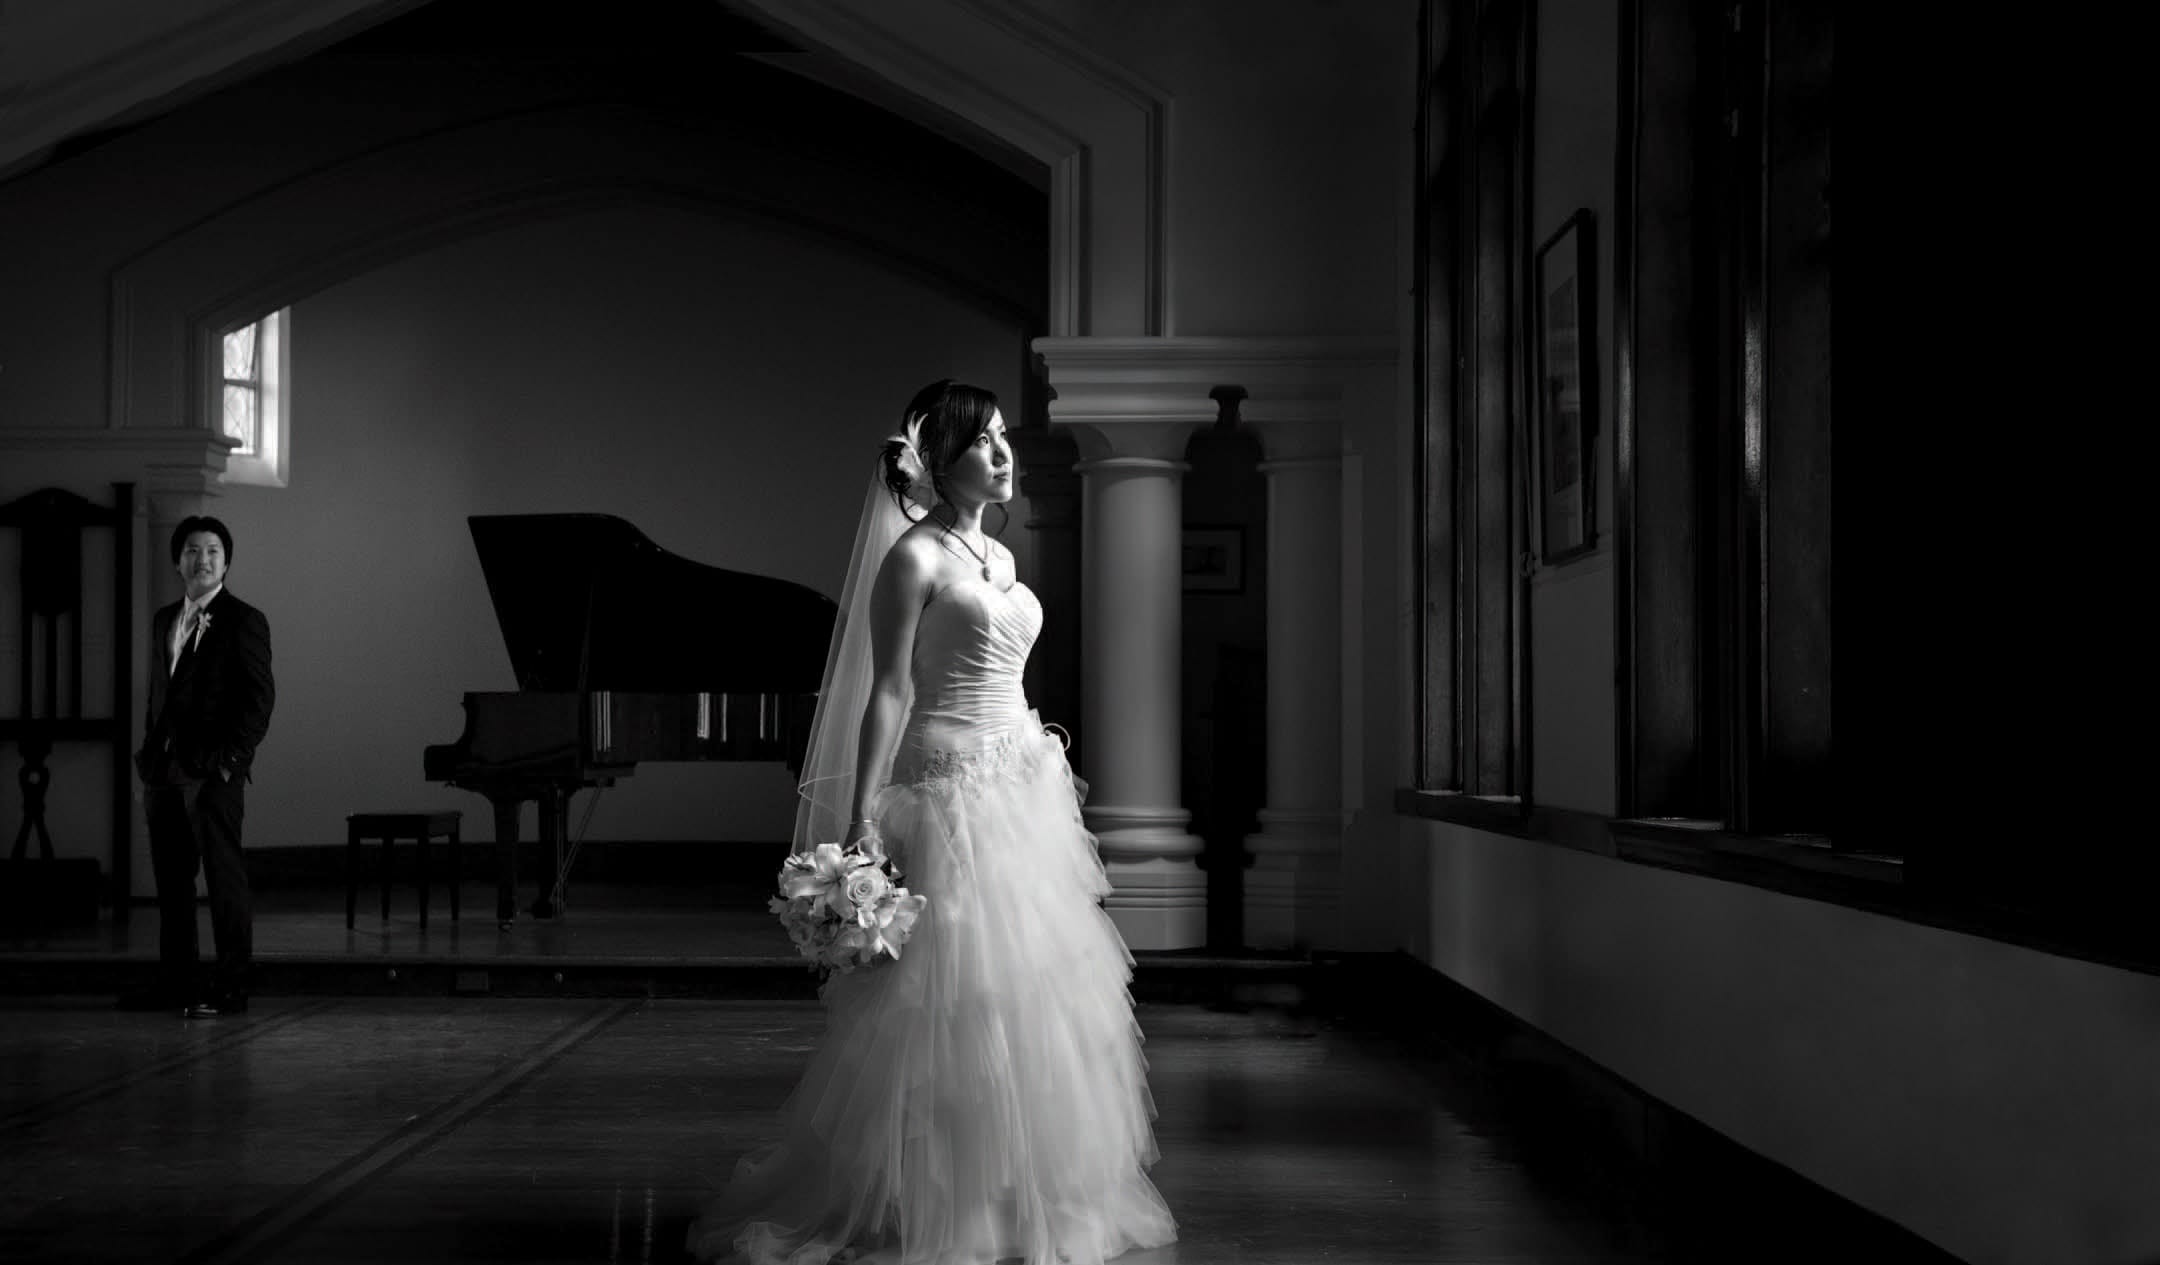
Back-lit scenes
There can be times when the source of light is behind the subject or there is too much of light (i.e portrait in sunlight) which can overshadow the foreground. HDR will bring the glare down and balance the front

Low-light
Low light can give dark shadows and sacrifice details.HDR photography will combine shadows, highlights and details from the 3 exposed frames and give a single best picture.
Part5: When not to take HDR photo on iPhone
High contrast scenes
Sometimes, it’s all about the stark, vivid and bright contrast between dark and light areas. Suppose you want to capture shadow then HDR will make the difference less intense. If you want to capture the striking colour or light difference, HDR will normalise and blend it to make less interesting.
Vivid colourful scenes
Sometimes the scene has rich colours. The crisp and vibrant colours need to be captured. As HDR does bring the detail forward from too dark or too bright but, at the same time, it can wash out the sharpness
Scenes with movements
If you are moving or any subject in the scene to be captured is moving. Even if, there is a possibility that something in the scene might move then don’t use HDR.(Don’t in capital letters). As HDR is all about taking three shots so any movement between them will result in ghosting.

WPS Office Premium ( File Recovery, Photo Scanning, Convert PDF)–Yearly

Quick Snap
If you want to take a quick snap then HDR will be too slow for you. As it takes a little longer, owing to the fact that it takes 3 pictures and combines them for the final outcome.
Conclusion
iPhone HDR mode is just perfect to capture high contrast scenes, landscapes with very light and very dark areas, shaded subjects or when the light source is just at the back of subject. But again if this doesn’t satisfy you, use third party HDR software. There are some good ones for more dramatic and processed results. So don’t stop your innate instinct. Grab your HDR iPhone or iPad running iO7 or later and click.
Images come from the Internet
Ollie Mattison
Ollie Mattison is a writer and a lover of all things video.
Follow @Ollie Mattison
Ollie Mattison
Mar 27, 2024• Proven solutions
Since we are all born photographers, we do try to satisfy this basic instinct. But we always can’t capture that “very moment” due to our DLSR unavailability. But don’t give up. One fact that may be hidden from you is the “iPhone HDR mode”. What you don’t know is that, you can take excellent HDR photo on iPhone. HDR iPhone is your hidden starlet.
- Part1: What does HDR photo mean
- Part2: How to use HDR photo on iPhone
- Part3: How to discard normal photo
- Part4: When to use iPhone HDR mode
- Part5: When not to take HDR photo on iPhone

Part1: What does HDR photo mean
For a novice like me, this seems like a million dollar question. HDR stands for “High Dynamic Range”. It explains the difference between the vision of a human eye and a camera. A human eye can miraculously differentiate between intensities of light and colour. Hence we can see perfect brightness, shadows, colours and contrasts. A camera cannot do that naturally. Like capturing sunset through lightened towers or darker object in bright surrounding can result in too bright or too dark photo.
The hidden star in such cases is the HDR effect. It merges “the lights” and “the darks” to give a better picture. It’s all about blending the photos with different exposures. iPhone HDR mode, will behind the scene, take 3 different exposures of the same image. Under-exposed (darkest), over-exposed (striking light) and normal. It will then blend all three to combine best parts. The resulting HDR photo will have best details, sharpness, colors and light.
Part2: How to use HDR photo on iPhone
If you are using the latest devices (iPhone 8/Plus and X), then there is good news for you. The camera sensors are improved to the extent that it captures highlights and shadows with best results.
- Open the camera application.
- Tap on HDR on the top.
- Tap on options “Auto” or “On”.
- Click to take photo
Part3: How to discard normal photo
If you want to discard normal photo, still, you have the option of disabling and manually controlling the HDR effect.
- Open settings
- Tap on camera from the list
- Under the HDR heading slide the toggle to “off”

Key features:
• Import from any devices and cams, including GoPro and drones. All formats supported. Сurrently the only free video editor that allows users to export in a new H265/HEVC codec, something essential for those working with 4K and HD.
• Everything for hassle-free basic editing: cut, crop and merge files, add titles and favorite music
• Visual effects, advanced color correction and trendy Instagram-like filters
• All multimedia processing done from one app: video editing capabilities reinforced by a video converter, a screen capture, a video capture, a disc burner and a YouTube uploader
• Non-linear editing: edit several files with simultaneously
• Easy export to social networks: special profiles for YouTube, Facebook, Vimeo, Twitter and Instagram
• High quality export – no conversion quality loss, double export speed even of HD files due to hardware acceleration
• Stabilization tool will turn shaky or jittery footage into a more stable video automatically.
• Essential toolset for professional video editing: blending modes, Mask tool, advanced multiple-color Chroma Key
Rest is the same as previous devices. The HDR version, as well as the normal version of the photo, will be saved in the gallery. This can clearly help in comparing the effects and quality. But if you are worried about memory consumption then slide the toggle “keep normal photo” to off.
Now, as you know how to use it, you might get tempted to use it every time. No! Just like too much of sweet is bad for teeth, too much of HDR can also spoil the result. You should know when to use and when not to use it. For instance
Part4: When to use iPhone HDR mode
Landscapes
Landscapes are about the contrast. So instead of hemming and hawing over the blown-out sky for land details or perfectly coloured sky for blackened land, use HDR. It’s best to capture the “brightest white” to the “darkest black”. The merging of lightest and darkest element will give best results.
Back-lit scenes
There can be times when the source of light is behind the subject or there is too much of light (i.e portrait in sunlight) which can overshadow the foreground. HDR will bring the glare down and balance the front
Low-light
Low light can give dark shadows and sacrifice details.HDR photography will combine shadows, highlights and details from the 3 exposed frames and give a single best picture.
Part5: When not to take HDR photo on iPhone
High contrast scenes
Sometimes, it’s all about the stark, vivid and bright contrast between dark and light areas. Suppose you want to capture shadow then HDR will make the difference less intense. If you want to capture the striking colour or light difference, HDR will normalise and blend it to make less interesting.
Vivid colourful scenes
Sometimes the scene has rich colours. The crisp and vibrant colours need to be captured. As HDR does bring the detail forward from too dark or too bright but, at the same time, it can wash out the sharpness
Scenes with movements
If you are moving or any subject in the scene to be captured is moving. Even if, there is a possibility that something in the scene might move then don’t use HDR.(Don’t in capital letters). As HDR is all about taking three shots so any movement between them will result in ghosting.
 CollageIt Pro
Quick Snap
If you want to take a quick snap then HDR will be too slow for you. As it takes a little longer, owing to the fact that it takes 3 pictures and combines them for the final outcome.
Conclusion
iPhone HDR mode is just perfect to capture high contrast scenes, landscapes with very light and very dark areas, shaded subjects or when the light source is just at the back of subject. But again if this doesn’t satisfy you, use third party HDR software. There are some good ones for more dramatic and processed results. So don’t stop your innate instinct. Grab your HDR iPhone or iPad running iO7 or later and click.
Images come from the Internet
 NeoDownloader - Fast and fully automatic image/video/music downloader.
Ollie Mattison
Ollie Mattison is a writer and a lover of all things video.
Follow @Ollie Mattison
Ollie Mattison
Mar 27, 2024• Proven solutions
Since we are all born photographers, we do try to satisfy this basic instinct. But we always can’t capture that “very moment” due to our DLSR unavailability. But don’t give up. One fact that may be hidden from you is the “iPhone HDR mode”. What you don’t know is that, you can take excellent HDR photo on iPhone. HDR iPhone is your hidden starlet.
- Part1: What does HDR photo mean
- Part2: How to use HDR photo on iPhone
- Part3: How to discard normal photo
- Part4: When to use iPhone HDR mode
- Part5: When not to take HDR photo on iPhone
 HD Video Converter Factory Pro
Part1: What does HDR photo mean
For a novice like me, this seems like a million dollar question. HDR stands for “High Dynamic Range”. It explains the difference between the vision of a human eye and a camera. A human eye can miraculously differentiate between intensities of light and colour. Hence we can see perfect brightness, shadows, colours and contrasts. A camera cannot do that naturally. Like capturing sunset through lightened towers or darker object in bright surrounding can result in too bright or too dark photo.
The hidden star in such cases is the HDR effect. It merges “the lights” and “the darks” to give a better picture. It’s all about blending the photos with different exposures. iPhone HDR mode, will behind the scene, take 3 different exposures of the same image. Under-exposed (darkest), over-exposed (striking light) and normal. It will then blend all three to combine best parts. The resulting HDR photo will have best details, sharpness, colors and light.
Part2: How to use HDR photo on iPhone
If you are using the latest devices (iPhone 8/Plus and X), then there is good news for you. The camera sensors are improved to the extent that it captures highlights and shadows with best results.
- Open the camera application.
- Tap on HDR on the top.
- Tap on options “Auto” or “On”.
- Click to take photo
If you want to discard normal photo, still, you have the option of disabling and manually controlling the HDR effect.
- Open settings
- Tap on camera from the list
- Under the HDR heading slide the toggle to “off”
 EmEditor Professional (Lifetime License, non-store app)
Rest is the same as previous devices. The HDR version, as well as the normal version of the photo, will be saved in the gallery. This can clearly help in comparing the effects and quality. But if you are worried about memory consumption then slide the toggle “keep normal photo” to off.
Now, as you know how to use it, you might get tempted to use it every time. No! Just like too much of sweet is bad for teeth, too much of HDR can also spoil the result. You should know when to use and when not to use it. For instance
Part4: When to use iPhone HDR mode
Landscapes
Landscapes are about the contrast. So instead of hemming and hawing over the blown-out sky for land details or perfectly coloured sky for blackened land, use HDR. It’s best to capture the “brightest white” to the “darkest black”. The merging of lightest and darkest element will give best results.
Back-lit scenes
There can be times when the source of light is behind the subject or there is too much of light (i.e portrait in sunlight) which can overshadow the foreground. HDR will bring the glare down and balance the front
Low-light
Low light can give dark shadows and sacrifice details.HDR photography will combine shadows, highlights and details from the 3 exposed frames and give a single best picture.
Part5: When not to take HDR photo on iPhone
High contrast scenes
Sometimes, it’s all about the stark, vivid and bright contrast between dark and light areas. Suppose you want to capture shadow then HDR will make the difference less intense. If you want to capture the striking colour or light difference, HDR will normalise and blend it to make less interesting.
Vivid colourful scenes
Sometimes the scene has rich colours. The crisp and vibrant colours need to be captured. As HDR does bring the detail forward from too dark or too bright but, at the same time, it can wash out the sharpness
 PaperScan Professional: PaperScan Scanner Software is a powerful TWAIN & WIA scanning application centered on one idea: making document acquisition an unparalleled easy task for anyone.
Scenes with movements
If you are moving or any subject in the scene to be captured is moving. Even if, there is a possibility that something in the scene might move then don’t use HDR.(Don’t in capital letters). As HDR is all about taking three shots so any movement between them will result in ghosting.
Quick Snap
If you want to take a quick snap then HDR will be too slow for you. As it takes a little longer, owing to the fact that it takes 3 pictures and combines them for the final outcome.
Conclusion
iPhone HDR mode is just perfect to capture high contrast scenes, landscapes with very light and very dark areas, shaded subjects or when the light source is just at the back of subject. But again if this doesn’t satisfy you, use third party HDR software. There are some good ones for more dramatic and processed results. So don’t stop your innate instinct. Grab your HDR iPhone or iPad running iO7 or later and click.
Images come from the Internet
Ollie Mattison
Ollie Mattison is a writer and a lover of all things video.
Follow @Ollie Mattison
Ollie Mattison
Mar 27, 2024• Proven solutions
Since we are all born photographers, we do try to satisfy this basic instinct. But we always can’t capture that “very moment” due to our DLSR unavailability. But don’t give up. One fact that may be hidden from you is the “iPhone HDR mode”. What you don’t know is that, you can take excellent HDR photo on iPhone. HDR iPhone is your hidden starlet.
- Part1: What does HDR photo mean
- Part2: How to use HDR photo on iPhone
- Part3: How to discard normal photo
- Part4: When to use iPhone HDR mode
- Part5: When not to take HDR photo on iPhone
 Glary Utilities PRO - Premium all-in-one utility to clean, speed up, maintain and protect your PC
Part1: What does HDR photo mean
For a novice like me, this seems like a million dollar question. HDR stands for “High Dynamic Range”. It explains the difference between the vision of a human eye and a camera. A human eye can miraculously differentiate between intensities of light and colour. Hence we can see perfect brightness, shadows, colours and contrasts. A camera cannot do that naturally. Like capturing sunset through lightened towers or darker object in bright surrounding can result in too bright or too dark photo.
The hidden star in such cases is the HDR effect. It merges “the lights” and “the darks” to give a better picture. It’s all about blending the photos with different exposures. iPhone HDR mode, will behind the scene, take 3 different exposures of the same image. Under-exposed (darkest), over-exposed (striking light) and normal. It will then blend all three to combine best parts. The resulting HDR photo will have best details, sharpness, colors and light.
 PCDJ DEX 3 for Windows & MAC is the total entertainment DJ software solution, offering audio, video, and karaoke mixing ability. Automatic beat-sync, smart looping, 4 decks, DJ MIDI controller support, Karaoke Streaming and much more.

company, user or members of the same household. Action! - screen and game recorder</a>
Part2: How to use HDR photo on iPhone
If you are using the latest devices (iPhone 8/Plus and X), then there is good news for you. The camera sensors are improved to the extent that it captures highlights and shadows with best results.
- Open the camera application.
- Tap on HDR on the top.
- Tap on options “Auto” or “On”.
- Click to take photo
Part3: How to discard normal photo
If you want to discard normal photo, still, you have the option of disabling and manually controlling the HDR effect.
- Open settings
- Tap on camera from the list
- Under the HDR heading slide the toggle to “off”
Rest is the same as previous devices. The HDR version, as well as the normal version of the photo, will be saved in the gallery. This can clearly help in comparing the effects and quality. But if you are worried about memory consumption then slide the toggle “keep normal photo” to off.
Now, as you know how to use it, you might get tempted to use it every time. No! Just like too much of sweet is bad for teeth, too much of HDR can also spoil the result. You should know when to use and when not to use it. For instance
Part4: When to use iPhone HDR mode
Landscapes
Landscapes are about the contrast. So instead of hemming and hawing over the blown-out sky for land details or perfectly coloured sky for blackened land, use HDR. It’s best to capture the “brightest white” to the “darkest black”. The merging of lightest and darkest element will give best results.
 Forex Robotron Gold Package
Back-lit scenes
There can be times when the source of light is behind the subject or there is too much of light (i.e portrait in sunlight) which can overshadow the foreground. HDR will bring the glare down and balance the front
Low-light
Low light can give dark shadows and sacrifice details.HDR photography will combine shadows, highlights and details from the 3 exposed frames and give a single best picture.
Part5: When not to take HDR photo on iPhone
High contrast scenes
Sometimes, it’s all about the stark, vivid and bright contrast between dark and light areas. Suppose you want to capture shadow then HDR will make the difference less intense. If you want to capture the striking colour or light difference, HDR will normalise and blend it to make less interesting.
Vivid colourful scenes
Sometimes the scene has rich colours. The crisp and vibrant colours need to be captured. As HDR does bring the detail forward from too dark or too bright but, at the same time, it can wash out the sharpness
Scenes with movements
If you are moving or any subject in the scene to be captured is moving. Even if, there is a possibility that something in the scene might move then don’t use HDR.(Don’t in capital letters). As HDR is all about taking three shots so any movement between them will result in ghosting.
 vMix Basic HD - Software based live production. vMix Basic HD includes 4 inputs, 3 cameras, streaming, recording, playlist.
Quick Snap
If you want to take a quick snap then HDR will be too slow for you. As it takes a little longer, owing to the fact that it takes 3 pictures and combines them for the final outcome.
Conclusion
iPhone HDR mode is just perfect to capture high contrast scenes, landscapes with very light and very dark areas, shaded subjects or when the light source is just at the back of subject. But again if this doesn’t satisfy you, use third party HDR software. There are some good ones for more dramatic and processed results. So don’t stop your innate instinct. Grab your HDR iPhone or iPad running iO7 or later and click.
Images come from the Internet
Ollie Mattison
Ollie Mattison is a writer and a lover of all things video.
Follow @Ollie Mattison
- Title: 2024 Approved Expertise in iPhone The Ultimate HDR Photo Journey
- Author: Frank
- Created at : 2024-07-26 12:17:50
- Updated at : 2024-07-27 12:17:50
- Link: https://some-techniques.techidaily.com/2024-approved-expertise-in-iphone-the-ultimate-hdr-photo-journey/
- License: This work is licensed under CC BY-NC-SA 4.0.