
"2024 Approved Expert Insights Blending Visual & Auditory Elements in Windows Photos"
Expert Insights: Blending Visual & Auditory Elements in Windows Photos
How to Add Filters and Music on Windows 10 Photos App
 Allavsoft Batch Download Online Videos, Music Offline to MP4, MP3, MOV, etc format

Shanoon Cox
Mar 27, 2024• Proven solutions
Having Windows 10 Photos app is an advantage for you. This is not like any other photo viewing app, but a mighty photo editor as well. If you are thinking that can you add filters using Windows 10 Photos app, then we are glad to affirm that, the Photos app does it without much complication. There are inbuilt filters that can come in handy, while you try to add them to any photo. So, without any further ado, let’s learn how you can accomplish this.
You may also like: How to Trim Video in Windows 10 Photos Easily >>
Part 1: How to add filters on Windows 10 Photos App
If you have got Windows 10 Photos app and wish to add filters, though, it is by default a photo viewing app, its editing features are worth to mention. This step by step guide is your perfect savior in that case.
Step 1: From your folder using ‘File Explorer’, open the desired photo to be edited. Double clicking the picture opens it. Otherwise, you can browse ‘Start’ menu > ‘Photos’ > locate the photo.
Note: Photos doesn’t systematically arrange images, so finding it through the ‘File Explorer’ is convenient.
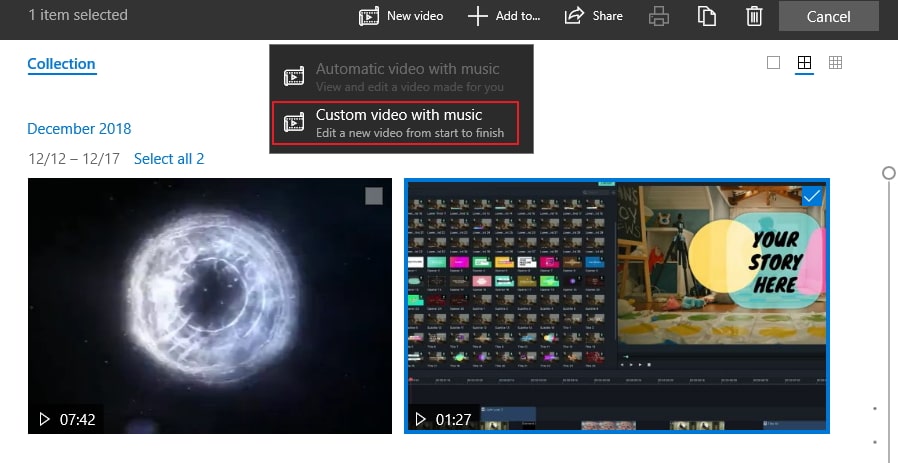
Step 2: Choose the video you want to add filters. Click New video at top > Custom video with music.

Step 3: Now, you will be in an video editing page. You can name your video at start or later.
Step 4: Click Filters at tool bar. Microsoft Photos has 14 filters you can use, including classic, adventure, sepia and so on.
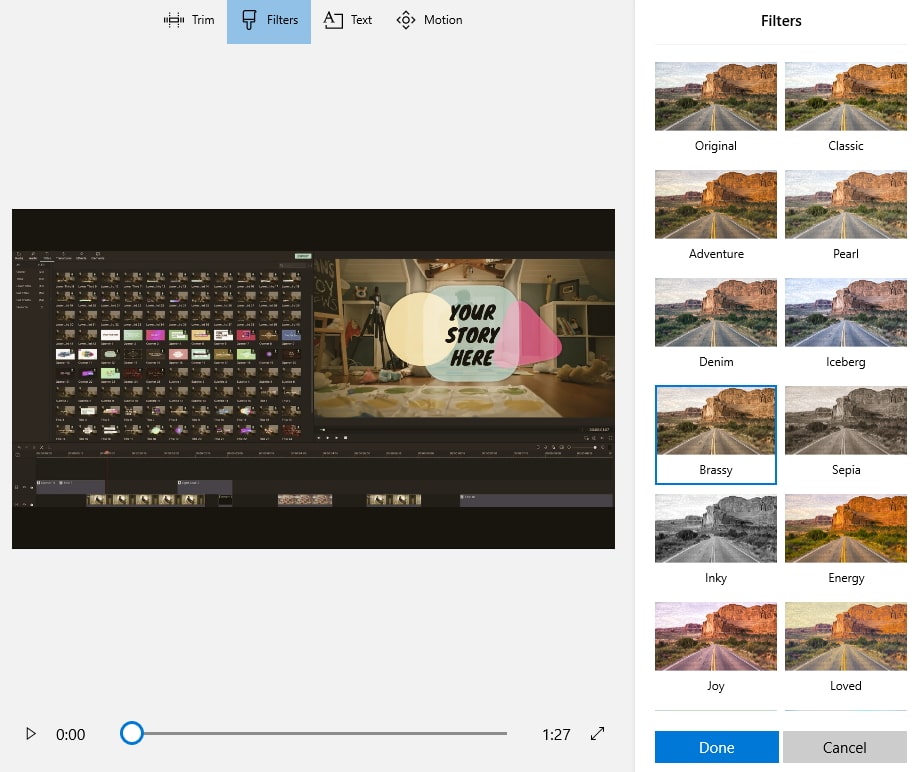
Step 5: Just select one you like. Preview it and then click Done.

Part 2: How to add music on Windows 10 Photos App
Now that you have learnt how to add filters using Windows 10 Photos app. Do you think there is any possibility regarding adding music over it? Adding music to your video would make it more enjoyable. The artificial intelligence feature on Windows 10 Photos app helps it add music to videos with a single click. It’s easy to do, but meanwhile there will be some twitches to the way artificial intelligence videos show up as you try to match the volume and tempo of the music. But, you can do it with the help of default Microsoft tools.
Step 1: Open Photos app and then tap on the blue color ‘New video’ icon showing on the top. A drop down menu will open after that.
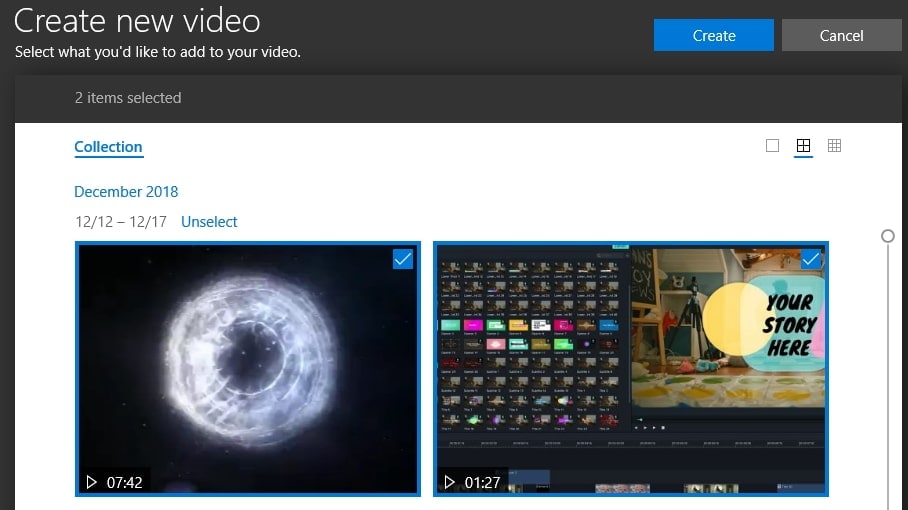
Step 2: Choose ‘Custom video with music’ and then select the checkbox from the top-right corner of the video.
Step 3: Now, hit the ‘Create’ button from the top-right followed by dragging the video to Photos timeline. Later, hit on ‘Auio’ at top right.
Step 4: Pick ‘Your music’ so that you can set up a custom track. There are over 20 music you can choose. You can also sync music to video’s beat. You can visit ‘Recommended’ section for adding default ones.
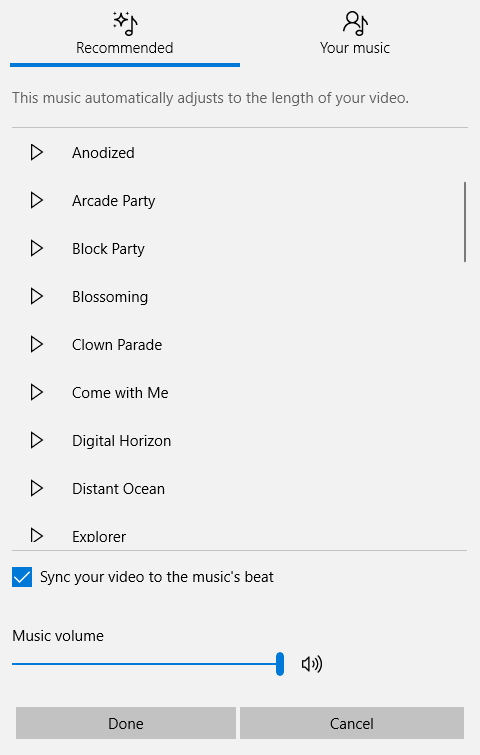
Step 5: Hit the ‘Done’ button.

Conclusion
From the above article, we conclude that Windows 10 Photos app is an amazing app when it comes to photo editing and screen capturing from a video. While there are numerous options out there, you can add filters using Windows 10 Photos app in the best way possible. Moreover, this application enables you enable to even add music to videos using Windows 10 Photos app. The advantages of Windows 10 are innumerable, and with the right tools, you can get the best out of it.
Shanoon Cox
Shanoon Cox is a writer and a lover of all things video.
Follow @Shanoon Cox
Shanoon Cox
Mar 27, 2024• Proven solutions
Having Windows 10 Photos app is an advantage for you. This is not like any other photo viewing app, but a mighty photo editor as well. If you are thinking that can you add filters using Windows 10 Photos app, then we are glad to affirm that, the Photos app does it without much complication. There are inbuilt filters that can come in handy, while you try to add them to any photo. So, without any further ado, let’s learn how you can accomplish this.
You may also like: How to Trim Video in Windows 10 Photos Easily >>
Part 1: How to add filters on Windows 10 Photos App
If you have got Windows 10 Photos app and wish to add filters, though, it is by default a photo viewing app, its editing features are worth to mention. This step by step guide is your perfect savior in that case.
Step 1: From your folder using ‘File Explorer’, open the desired photo to be edited. Double clicking the picture opens it. Otherwise, you can browse ‘Start’ menu > ‘Photos’ > locate the photo.
Note: Photos doesn’t systematically arrange images, so finding it through the ‘File Explorer’ is convenient.
Step 2: Choose the video you want to add filters. Click New video at top > Custom video with music.
Step 3: Now, you will be in an video editing page. You can name your video at start or later.
Step 4: Click Filters at tool bar. Microsoft Photos has 14 filters you can use, including classic, adventure, sepia and so on.
Step 5: Just select one you like. Preview it and then click Done.
Part 2: How to add music on Windows 10 Photos App
Now that you have learnt how to add filters using Windows 10 Photos app. Do you think there is any possibility regarding adding music over it? Adding music to your video would make it more enjoyable. The artificial intelligence feature on Windows 10 Photos app helps it add music to videos with a single click. It’s easy to do, but meanwhile there will be some twitches to the way artificial intelligence videos show up as you try to match the volume and tempo of the music. But, you can do it with the help of default Microsoft tools.
Step 1: Open Photos app and then tap on the blue color ‘New video’ icon showing on the top. A drop down menu will open after that.
Step 2: Choose ‘Custom video with music’ and then select the checkbox from the top-right corner of the video.
Step 3: Now, hit the ‘Create’ button from the top-right followed by dragging the video to Photos timeline. Later, hit on ‘Auio’ at top right.
Step 4: Pick ‘Your music’ so that you can set up a custom track. There are over 20 music you can choose. You can also sync music to video’s beat. You can visit ‘Recommended’ section for adding default ones.
 SwifDoo PDF 2-Year Plan
Step 5: Hit the ‘Done’ button.
Conclusion
From the above article, we conclude that Windows 10 Photos app is an amazing app when it comes to photo editing and screen capturing from a video. While there are numerous options out there, you can add filters using Windows 10 Photos app in the best way possible. Moreover, this application enables you enable to even add music to videos using Windows 10 Photos app. The advantages of Windows 10 are innumerable, and with the right tools, you can get the best out of it.
Shanoon Cox
Shanoon Cox is a writer and a lover of all things video.
Follow @Shanoon Cox
Shanoon Cox
Mar 27, 2024• Proven solutions
Having Windows 10 Photos app is an advantage for you. This is not like any other photo viewing app, but a mighty photo editor as well. If you are thinking that can you add filters using Windows 10 Photos app, then we are glad to affirm that, the Photos app does it without much complication. There are inbuilt filters that can come in handy, while you try to add them to any photo. So, without any further ado, let’s learn how you can accomplish this.
You may also like: How to Trim Video in Windows 10 Photos Easily >>

Part 1: How to add filters on Windows 10 Photos App
If you have got Windows 10 Photos app and wish to add filters, though, it is by default a photo viewing app, its editing features are worth to mention. This step by step guide is your perfect savior in that case.
Step 1: From your folder using ‘File Explorer’, open the desired photo to be edited. Double clicking the picture opens it. Otherwise, you can browse ‘Start’ menu > ‘Photos’ > locate the photo.
Note: Photos doesn’t systematically arrange images, so finding it through the ‘File Explorer’ is convenient.
Step 2: Choose the video you want to add filters. Click New video at top > Custom video with music.
Step 3: Now, you will be in an video editing page. You can name your video at start or later.
Step 4: Click Filters at tool bar. Microsoft Photos has 14 filters you can use, including classic, adventure, sepia and so on.
 Glarysoft File Recovery Pro Annually - Helps to recover your lost file/data, even permanently deleted data.
Step 5: Just select one you like. Preview it and then click Done.
Part 2: How to add music on Windows 10 Photos App
Now that you have learnt how to add filters using Windows 10 Photos app. Do you think there is any possibility regarding adding music over it? Adding music to your video would make it more enjoyable. The artificial intelligence feature on Windows 10 Photos app helps it add music to videos with a single click. It’s easy to do, but meanwhile there will be some twitches to the way artificial intelligence videos show up as you try to match the volume and tempo of the music. But, you can do it with the help of default Microsoft tools.
Step 1: Open Photos app and then tap on the blue color ‘New video’ icon showing on the top. A drop down menu will open after that.
Step 2: Choose ‘Custom video with music’ and then select the checkbox from the top-right corner of the video.
Step 3: Now, hit the ‘Create’ button from the top-right followed by dragging the video to Photos timeline. Later, hit on ‘Auio’ at top right.
Step 4: Pick ‘Your music’ so that you can set up a custom track. There are over 20 music you can choose. You can also sync music to video’s beat. You can visit ‘Recommended’ section for adding default ones.
Step 5: Hit the ‘Done’ button.
Conclusion
From the above article, we conclude that Windows 10 Photos app is an amazing app when it comes to photo editing and screen capturing from a video. While there are numerous options out there, you can add filters using Windows 10 Photos app in the best way possible. Moreover, this application enables you enable to even add music to videos using Windows 10 Photos app. The advantages of Windows 10 are innumerable, and with the right tools, you can get the best out of it.
Shanoon Cox
Shanoon Cox is a writer and a lover of all things video.
Follow @Shanoon Cox
Shanoon Cox
Mar 27, 2024• Proven solutions
Having Windows 10 Photos app is an advantage for you. This is not like any other photo viewing app, but a mighty photo editor as well. If you are thinking that can you add filters using Windows 10 Photos app, then we are glad to affirm that, the Photos app does it without much complication. There are inbuilt filters that can come in handy, while you try to add them to any photo. So, without any further ado, let’s learn how you can accomplish this.
You may also like: How to Trim Video in Windows 10 Photos Easily >>

Part 1: How to add filters on Windows 10 Photos App
If you have got Windows 10 Photos app and wish to add filters, though, it is by default a photo viewing app, its editing features are worth to mention. This step by step guide is your perfect savior in that case.
Step 1: From your folder using ‘File Explorer’, open the desired photo to be edited. Double clicking the picture opens it. Otherwise, you can browse ‘Start’ menu > ‘Photos’ > locate the photo.
Note: Photos doesn’t systematically arrange images, so finding it through the ‘File Explorer’ is convenient.
Step 2: Choose the video you want to add filters. Click New video at top > Custom video with music.
Step 3: Now, you will be in an video editing page. You can name your video at start or later.
Step 4: Click Filters at tool bar. Microsoft Photos has 14 filters you can use, including classic, adventure, sepia and so on.
Step 5: Just select one you like. Preview it and then click Done.
Part 2: How to add music on Windows 10 Photos App
Now that you have learnt how to add filters using Windows 10 Photos app. Do you think there is any possibility regarding adding music over it? Adding music to your video would make it more enjoyable. The artificial intelligence feature on Windows 10 Photos app helps it add music to videos with a single click. It’s easy to do, but meanwhile there will be some twitches to the way artificial intelligence videos show up as you try to match the volume and tempo of the music. But, you can do it with the help of default Microsoft tools.
Step 1: Open Photos app and then tap on the blue color ‘New video’ icon showing on the top. A drop down menu will open after that.
Step 2: Choose ‘Custom video with music’ and then select the checkbox from the top-right corner of the video.
Step 3: Now, hit the ‘Create’ button from the top-right followed by dragging the video to Photos timeline. Later, hit on ‘Auio’ at top right.
Step 4: Pick ‘Your music’ so that you can set up a custom track. There are over 20 music you can choose. You can also sync music to video’s beat. You can visit ‘Recommended’ section for adding default ones.
Step 5: Hit the ‘Done’ button.
Conclusion
From the above article, we conclude that Windows 10 Photos app is an amazing app when it comes to photo editing and screen capturing from a video. While there are numerous options out there, you can add filters using Windows 10 Photos app in the best way possible. Moreover, this application enables you enable to even add music to videos using Windows 10 Photos app. The advantages of Windows 10 are innumerable, and with the right tools, you can get the best out of it.
Shanoon Cox
Shanoon Cox is a writer and a lover of all things video.
Follow @Shanoon Cox
- Title: 2024 Approved Expert Insights Blending Visual & Auditory Elements in Windows Photos
- Author: Frank
- Created at : 2024-07-26 12:46:57
- Updated at : 2024-07-27 12:46:57
- Link: https://some-techniques.techidaily.com/2024-approved-expert-insights-blending-visual-and-auditory-elements-in-windows-photos/
- License: This work is licensed under CC BY-NC-SA 4.0.