
"2024 Approved Evaluating the Effectiveness of 'Shake' Reduction in Adobe Photos"
Evaluating the Effectiveness of ‘Shake’ Reduction in Adobe Photos
Create High-Quality Video - Wondershare Filmora
An easy and powerful YouTube video editor
Numerous video and audio effects to choose from
Detailed tutorials are provided by the official channel
Is Shake Reduction in Photoshop useful? We have all seen the commercials where senior people have a shaky video, and after it is fixed, we see that they are doing some amazing things but aren’t even moving. Shake reduction is one of the best features of Photoshop. It removes shakiness from a video, but it can also remove the movement from a picture. In this article, we’ll look at the use of Photoshop shake reduction, how it works, what it does, and how you can avoid using it.
In this article
01 What is the Photoshop Shake Reduction effect?
02 Is the Shake Reduction effect really useful to fix the camera shake?
03 How to use Shake Reduction in Photoshop?
What is the Photoshop Shake Reduction effect?
The Shake Reduction effect is something that many photographers do not need. It was added to Photoshop because of the number of pictures coming in with a blurring caused by camera movement while the shutter button was pressed. This blurring is called camera shake, and it can be not easy to get rid of in post-processing if you don’t have tools to help you fix it. The Shake Reduction feature introduced in Photoshop attempts to help with this problem.
The Shake Reduction effect in Photoshop is a very useful feature that allows you to remove the effects of camera shake from your photos. It can also be used as a creative effect, allowing you to distort your images for some interesting effects intentionally.
Trying to take great photos with a handheld camera will always result in some blurring and camera shake. Even the best photographers can’t hold the camera completely steady for long periods of time. Unless you’re on a tripod, there’s always the chance that your photos are going to end up slightly blurred, especially if you’re shooting in low light or at high speeds.
The Shake Reduction effect in Photoshop allows you to fix this problem by removing the blur and restoring crispness to your images.
Is the Shake Reduction effect really useful to fix the camera shake?
The perfect shot is a fine balance of elements. You need the right lighting and the ideal setting, and you must also have precise timing. When it comes to taking a picture or photo, timing is very important. You don’t want to miss that perfect moment when the sun rays behind the clouds hit your face just right or when you capture your friend jumping off a diving board at just the right angle.
But sometimes, even if you do have everything in place and make sure you get the timing right, your picture can still turn out to be blurry. That’s where the Photoshop Shake Reduction effect comes in handy.
Shake Reduction is a feature that creates motion blur from camera shake, and many photographers consider it to be one of the most useful tools in Photoshop.
Some photographers prefer to use the Photoshop Shake Reduction effect instead of dealing with blurry photos. The main reason for this is that it can help them save time and effort when editing their images.
The Shake Reduction filter can also correct for perspective distortion introduced by tilting the camera up or down. It can compensate for uneven lighting, too. And one of the features that I find most impressive is that it can automatically remove video noise from old video transfers.
Truly, this effect is very useful, but not necessarily for fixing camera shake. In this tutorial, we will show you how to use Shake Reduction to create realistic depictions of motion. You will learn how to achieve different results by modifying the settings of Shake Reduction and combining it with other effects and filters in Photoshop.
How to use Shake Reduction in Photoshop?
A special Photoshop filter called Camera Shake Reduction can reduce blurriness in any image. Several factors can lead to blurred images, including slow shutter speeds, long focal lengths, and unsteady hands. Smart extrapolation detects the blurry path and sharpens the image at those points. Besides controlling sharpening for different areas of an image, the Filter’s interface also lets you override Photoshop’s auto-analysis. Want to use the photoshop shake reduction effect? Just follow the steps given below:
Step 1\
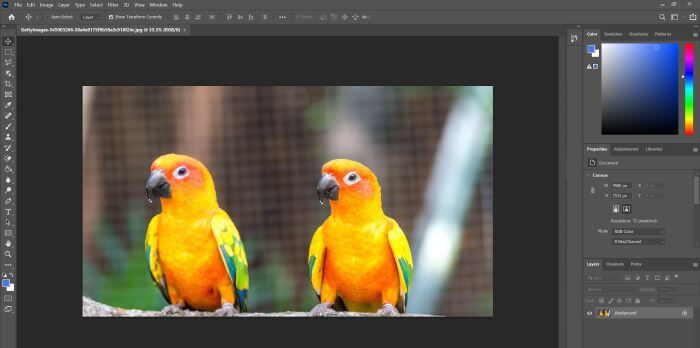
First of all, open the image in photoshop on which you want to apply shake reduction.
Step 2\
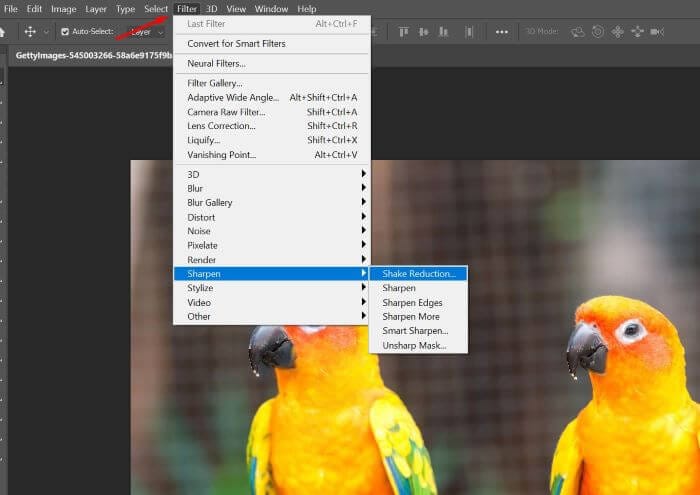
Now click on the filters option from the top menu, select sharpen, and then select shake reduction. Go to Filter> Sharpen > Shake Reduction
Step 3\
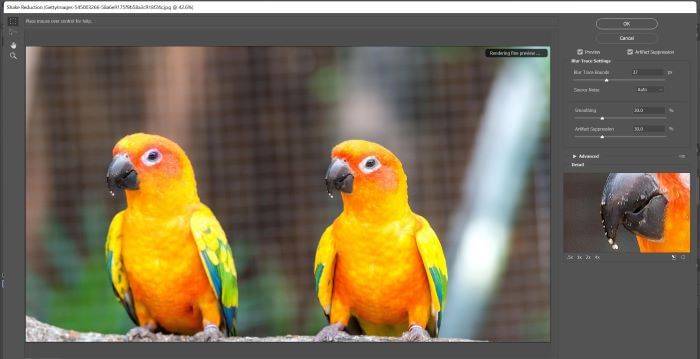
The Shake Reduction dialogue box shows the Preview of the image as Photoshop automatically de-blurs the image.
Step 4\
You can fine-tune the blue reduction in the Shake Reduction dialogue box as Photoshop’s automatic detection can introduce unwanted artifacts.
Step 5\
When Photoshop detects moving pixels, it places a selection rectangle on that region. With the Blue Estimation tool for Photoshop, you can resize and reposition the box around the image to focus on more areas. As Photoshop selects areas of the image, “blue traces” are created, and the Filter is applied.
Step 6\
The blur correction can be controlled using the advanced control sliders. By adjusting the Blur Trace Bounds slider, you can adjust the area used to trace the blur. Also, moving the sliders to the left will increase Smoothness and Artifact Suppression.

In order to minimize blockiness in the image, it is essential to check the Preview and select Artifact Suppression. A comprehensive walkthrough of how to use Shake Reduction commands is available on Adobe’s support site.
Though camera shake may make your photos look less impressive, it may bring something new to your videos. That’s why popular video editors have built-in camera shake effects for editors to add to their videos. If you are looking for a video editor like this, I would recommend Filmora for you.
For Win 7 or later (64-bit)
For macOS 10.12 or later
Conclusion
● Shake reduction is a neat little feature that has a few quirks, one being the fact that it doesn’t seem to work very well if you’re already zoomed in on your image when you try to reduce camera shake. If there’s any hope of getting this feature to work for these images, you’d have to zoom back out and try reducing camera shake again. Some might find this frustrating, but it’s necessary if you’re trying to alleviate a lot of blur in your images.
●Photoshop Shake Reduction is really useful when you want to reduce the shake and blurriness caused by the slow shutter speeds that camera phones inherently use. It’s quite simply a great feature for those who only shoot with their smartphones, but if you can afford a better camera, we would recommend using a tripod instead - it will always be better than Photoshop Shake Reduction.
Is Shake Reduction in Photoshop useful? We have all seen the commercials where senior people have a shaky video, and after it is fixed, we see that they are doing some amazing things but aren’t even moving. Shake reduction is one of the best features of Photoshop. It removes shakiness from a video, but it can also remove the movement from a picture. In this article, we’ll look at the use of Photoshop shake reduction, how it works, what it does, and how you can avoid using it.
In this article
01 What is the Photoshop Shake Reduction effect?
02 Is the Shake Reduction effect really useful to fix the camera shake?
03 How to use Shake Reduction in Photoshop?
What is the Photoshop Shake Reduction effect?
The Shake Reduction effect is something that many photographers do not need. It was added to Photoshop because of the number of pictures coming in with a blurring caused by camera movement while the shutter button was pressed. This blurring is called camera shake, and it can be not easy to get rid of in post-processing if you don’t have tools to help you fix it. The Shake Reduction feature introduced in Photoshop attempts to help with this problem.
The Shake Reduction effect in Photoshop is a very useful feature that allows you to remove the effects of camera shake from your photos. It can also be used as a creative effect, allowing you to distort your images for some interesting effects intentionally.
Trying to take great photos with a handheld camera will always result in some blurring and camera shake. Even the best photographers can’t hold the camera completely steady for long periods of time. Unless you’re on a tripod, there’s always the chance that your photos are going to end up slightly blurred, especially if you’re shooting in low light or at high speeds.
The Shake Reduction effect in Photoshop allows you to fix this problem by removing the blur and restoring crispness to your images.
Is the Shake Reduction effect really useful to fix the camera shake?
The perfect shot is a fine balance of elements. You need the right lighting and the ideal setting, and you must also have precise timing. When it comes to taking a picture or photo, timing is very important. You don’t want to miss that perfect moment when the sun rays behind the clouds hit your face just right or when you capture your friend jumping off a diving board at just the right angle.
But sometimes, even if you do have everything in place and make sure you get the timing right, your picture can still turn out to be blurry. That’s where the Photoshop Shake Reduction effect comes in handy.
Shake Reduction is a feature that creates motion blur from camera shake, and many photographers consider it to be one of the most useful tools in Photoshop.
Some photographers prefer to use the Photoshop Shake Reduction effect instead of dealing with blurry photos. The main reason for this is that it can help them save time and effort when editing their images.
The Shake Reduction filter can also correct for perspective distortion introduced by tilting the camera up or down. It can compensate for uneven lighting, too. And one of the features that I find most impressive is that it can automatically remove video noise from old video transfers.
Truly, this effect is very useful, but not necessarily for fixing camera shake. In this tutorial, we will show you how to use Shake Reduction to create realistic depictions of motion. You will learn how to achieve different results by modifying the settings of Shake Reduction and combining it with other effects and filters in Photoshop.
How to use Shake Reduction in Photoshop?
A special Photoshop filter called Camera Shake Reduction can reduce blurriness in any image. Several factors can lead to blurred images, including slow shutter speeds, long focal lengths, and unsteady hands. Smart extrapolation detects the blurry path and sharpens the image at those points. Besides controlling sharpening for different areas of an image, the Filter’s interface also lets you override Photoshop’s auto-analysis. Want to use the photoshop shake reduction effect? Just follow the steps given below:
Step 1\
First of all, open the image in photoshop on which you want to apply shake reduction.
Step 2\
Now click on the filters option from the top menu, select sharpen, and then select shake reduction. Go to Filter> Sharpen > Shake Reduction
Step 3\
The Shake Reduction dialogue box shows the Preview of the image as Photoshop automatically de-blurs the image.
Step 4\
You can fine-tune the blue reduction in the Shake Reduction dialogue box as Photoshop’s automatic detection can introduce unwanted artifacts.
Step 5\
When Photoshop detects moving pixels, it places a selection rectangle on that region. With the Blue Estimation tool for Photoshop, you can resize and reposition the box around the image to focus on more areas. As Photoshop selects areas of the image, “blue traces” are created, and the Filter is applied.
Step 6\
The blur correction can be controlled using the advanced control sliders. By adjusting the Blur Trace Bounds slider, you can adjust the area used to trace the blur. Also, moving the sliders to the left will increase Smoothness and Artifact Suppression.
In order to minimize blockiness in the image, it is essential to check the Preview and select Artifact Suppression. A comprehensive walkthrough of how to use Shake Reduction commands is available on Adobe’s support site.
Though camera shake may make your photos look less impressive, it may bring something new to your videos. That’s why popular video editors have built-in camera shake effects for editors to add to their videos. If you are looking for a video editor like this, I would recommend Filmora for you.
For Win 7 or later (64-bit)
For macOS 10.12 or later
Conclusion
● Shake reduction is a neat little feature that has a few quirks, one being the fact that it doesn’t seem to work very well if you’re already zoomed in on your image when you try to reduce camera shake. If there’s any hope of getting this feature to work for these images, you’d have to zoom back out and try reducing camera shake again. Some might find this frustrating, but it’s necessary if you’re trying to alleviate a lot of blur in your images.
●Photoshop Shake Reduction is really useful when you want to reduce the shake and blurriness caused by the slow shutter speeds that camera phones inherently use. It’s quite simply a great feature for those who only shoot with their smartphones, but if you can afford a better camera, we would recommend using a tripod instead - it will always be better than Photoshop Shake Reduction.
Also read:
- [New] Full Range Virtual Sphere Review
- [New] In 2024, Best 6 Modern Homes for Minecraft Enthusiasts
- [New] The Essentials of High-Quality Audio Interfaces in Podcasting
- [New] VisualSnitch Capture and Save Tweets' Images & Videos
- [Updated] Free Mobile Live Stream Apps Essentials for Smartphones
- [Updated] From Novice to Pro Paving the Way in Graphics Careers
- [Updated] In 2024, Break Through the Crowd - Your Guide to Choosing Free Intro Masters
- [Updated] The Ultimate Guide to Free, Stunning Photographs for 2024
- In 2024, From Audio Clips to Written Content Harnessing MS Word's Transcription Features
- In 2024, How to Run a Sports YouTube Chain on MacOS
- Word文件不見?5种簡单办法保存丢失的Word文档!
- Title: 2024 Approved Evaluating the Effectiveness of 'Shake' Reduction in Adobe Photos
- Author: Frank
- Created at : 2025-01-27 09:29:25
- Updated at : 2025-01-29 01:57:12
- Link: https://some-techniques.techidaily.com/2024-approved-evaluating-the-effectiveness-of-shake-reduction-in-adobe-photos/
- License: This work is licensed under CC BY-NC-SA 4.0.